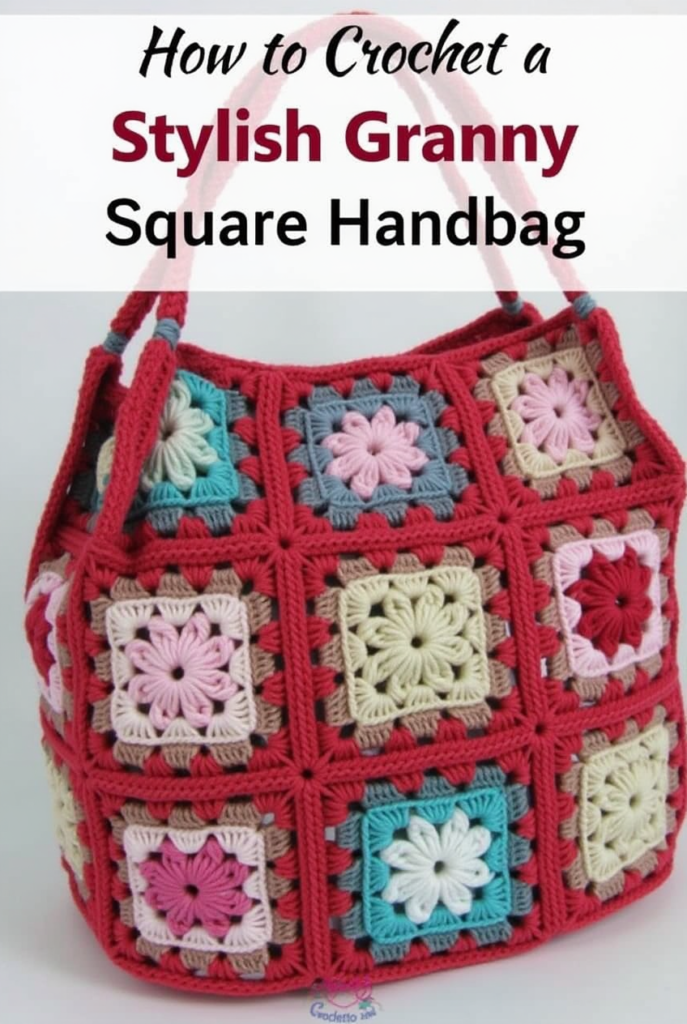
How to Crochet a Stylish Granny Square Handbag
Are you looking to crochet a granny square handbag that’s both functional and stylish? You’ve come to the right place! This step-by-step guide will show you how to create a sturdy granny square handbag using just 13 squares, clever slip-stitching, and a simple strap design. Best of all, you’ll only need to weave in two loose ends when you’re finished. Let’s get started!
Credit: VivCrochets
Table of Contents
- Why You’ll Love This Granny Square Handbag
- Materials You’ll Need
- Finished Dimensions
- Abbreviations & Stitch Key
- How to Crochet the Popcorn Stitch
- Crochet the Flower Granny Square
- Assemble the Granny Squares Into a Handbag
- Show Off Your New Granny Square Handbag
Why You’ll Love This Granny Square Handbag
- Advanced-Beginner Friendly: If you’ve already mastered the basic granny square, this pattern helps you expand your skills with the textured popcorn stitch.
- Minimal Sewing: You only have two loose ends to weave in once you’re done—talk about easy finishing!
- Customizable: Experiment with various yarn colors for your flower centers, petals, and square bases. Great for using up leftover yarn.
- Sturdy & Stylish: Perfect as a granny square handbag for errands, beach outings, or daily wear. When made with cotton yarn, it’s durable and holds its shape well.
Materials You’ll Need
- Yarn (medium weight)
- Color A: Flower center
- Color B: Flower petals
- Color C: Square base
– Example used: Re-Up in “Mineral Springs” & “Surf Spray” + Big Twist Favorite Cotton in “Cream” - Approx. 15 grams per square
- Crochet Hook: 4.5 mm (e.g., Clover Amour or your preferred hook)
- Scissors
- Yarn Needle
- Optional: Tension ring and yarn bowl
Finished Dimensions
- Each flower granny square measures around 10.5 cm x 10.5 cm (4.1 in x 4.1 in).
- The 3D flower center is roughly 5.5 cm across.
- Feel free to add extra rounds if you want larger squares for your granny square handbag.
Abbreviations & Stitch Key
(US crochet terms)
- ch = chain
- sl st = slip stitch
- sc = single crochet
- hdc = half double crochet
- dc = double crochet
- PC = popcorn stitch
- st = stitch
- ch-sp = chain space
How to Crochet the Popcorn Stitch
- Work 4 double crochets (dc) into the same stitch.
- Remove your hook from the loop (keep it on your finger to avoid unraveling).
- Insert your hook into the first dc of the group.
- Place the loop back on your hook and pull it tight.
- Pull the loop through the first dc to “close” the popcorn stitch.
- Chain 1 to lock the popcorn stitch.
Crochet the Flower Granny Square
Step 1: Crochet the Popcorn Flower Center
- Foundation Round:
- With Color A, create a magic ring (or chain 4 and sl st to form a ring).
- Ch 2 (doesn’t count as a stitch), then work 12 dc into the ring.
- Switch to Color B, sl st to the first dc to close the round (12 stitches total).
- If using a magic ring, pull the tail to close tightly; if using the chain method, you might chain 5 for a slightly bigger ring.
Step 2: Add Flower Petals
- Round 2:
- Ch 2, then work 1 popcorn stitch (PC) in each stitch from the previous round.
- After the final popcorn stitch, switch to Color C and sl st to close the round (12 popcorn stitches total).
- Double knot and trim the ends of Color A and B.
Step 3: Form the Granny Square Around the Flower
- Round 3:
- Ch 2, then repeat [dc, hdc, sc in next 2 stitches, hdc, dc, ch 2] around.
- Sl st to the first dc to close. There will be 6 stitches on each side, plus a ch-2 corner.
- Round 4:
- Ch 2, work 2 dc in the corner ch-sp.
- Repeat [dc in next 6 stitches, 2 dc, ch 2, 2 dc in corner ch-sp] around.
- For the last corner, only work 2 dc, ch 2, then sl st to close (10 stitches on each side).
- Round 5:
- Ch 2, work 2 dc in the corner ch-sp.
- Repeat [dc in next 10 stitches, 2 dc, ch 2, 2 dc in corner ch-sp] around.
- For the final corner, only work 2 dc, ch 2, then sl st to close (14 stitches on each side).
Tip: Add more rounds if you want a larger granny square for your granny square handbag.
Assemble the Granny Squares Into a Handbag
Once you have 13 granny squares completed, you’re ready to transform them into a granny square handbag.
What You’ll Need for the Handbag Assembly
- 13 granny squares
- 2 squares with the yarn still attached
- 11 squares with ends woven in
- 4.5 mm crochet hook
- Worsted-weight yarn in coordinating colors (preferably cotton)
- Scissors
- Yarn needle
(Example used: Big Twist Favorite Cotton in Cream for the square base, Re-Up Yarn in Mineral Springs for the flower centers, and Re-Up Yarn in Surf Spray for the flower petals. Total: 215 grams.)
Step 1: Layout Your Squares
Layout your 13 squares as follows:
- 4 squares in a left column
- 3 squares in a middle column
- 4 squares in a right column
- 2 extra squares for the bottom and sides
Position one square with the yarn still attached in the middle column, ensuring the yarn tail is to the right. Refer back to this layout as you join.
Step 2: Begin Slip-Stitching the Squares Together
Use a slip-stitch join (through outer loops only) to create flat, clean seams.
How to Join:
- Place two squares back-to-back, wrong sides facing each other.
- Insert your hook through both squares’ corner ch-2 spaces.
- Yarn over, pull through, and slip stitch.
- Continue slip stitching across each stitch, using the outer loops only.
- End with a slip stitch in the opposite corner ch-2 space.
Step 3: Connecting the Squares
- Start at the center square and connect it to adjacent squares in your planned layout:
- Up the first column (4 squares),
- Across the middle column (3 squares),
- Down the last column (4 squares).
- Chain 1 whenever you transition to a new set of squares, preventing tightness at the joins.
- Use the final two squares to close the base and form the sides.
- Fold the connected squares in half to create the 3D shape of your granny square handbag. Slip stitch along the bottom to secure it.
Step 4: Creating the Strap
- Attach the Yarn:
- Make a slip knot and pull it through the corner ch-2 space on one side.
- Ch 1 to secure.
- Crocheting the Strap Base:
- Single crochet (sc) along the square’s edge until the top corner.
- Chain the length of your strap (e.g., 60 chains for about 38 cm).
- Skip the bag’s opening, then sc into the opposite corner ch-2 space.
- Continue sc along the edge; sl st to close the round.
- Adding Strap Width:
- Ch 1, then sc around the entire bag, including each chain of the strap.
- Repeat until you reach your desired strap width (2–4 rounds typically).
Step 5: Finishing the Strap Interior
- Attach yarn to the inside corner ch-2 space.
- Single crochet along the inside edge of the strap, working into the opposite side of each chain.
- Slip stitch to close.
- Repeat for the other inside edge if desired, giving your granny square handbag a polished look.
Step 6: Weaving in Ends
Here’s the fun part: you’ll only have two loose ends—the ones attached to the squares with yarn still connected.
- Use a yarn needle to secure them in the seams.
- Trim the excess yarn, and you’re done!
Show Off Your New Granny Square Handbag
Congratulations on completing your granny square handbag! This versatile accessory is perfect for everyday use—whether you’re heading to the market, the beach, or a casual day out. Thanks to minimal sewing and a slip-stitch assembly, you’ll have a finished project that’s both durable and visually stunning.
Did you enjoy this tutorial? Let me know in the comments below! I’d love to hear how your handbag turned out. Remember to share your creations online—don’t forget to tag me so I can see your beautiful work!
Happy Crocheting!


