The Ultimate Moses Basket Crochet Pattern (Free & Step-by-Step Guide)
There are few projects as rewarding and meaningful as creating a handmade item for a new baby. A Moses basket, a cozy and portable first bed, is a timeless heirloom. But have you ever considered making one yourself? With this ultimate Moses basket crochet pattern, you can craft a stunning, sturdy, and modern bassinet that will be cherished for years to come.
This comprehensive, step-by-step tutorial is designed to guide you through every stage of the process, from selecting your materials to weaving in the final end. We’ll cover two beautiful variations: a classic, open-style bassinet and a chic version with a modern, angled hood.
Whether you’re an ambitious intermediate crocheter looking for a show-stopping project or a dedicated crafter ready to tackle a new challenge, this guide has everything you need. We will break down every stitch, explain every technique, and provide all the tips and tricks for a successful and beautiful result.
Ready to create a masterpiece? Let’s gather our supplies and begin this incredible crochet journey.
A Crucial Note on Safety: Is a Crocheted Moses Basket Safe?
Before we dive into the pattern, it’s essential to address the most important aspect of any baby project: safety. When made correctly with the right materials, a crocheted Moses basket can be a safe space for a newborn. However, you must follow safe sleep guidelines.
Disclaimer: This pattern is a guide for creating a decorative and functional baby item. The safety of the final product depends on the quality of your materials, the sturdiness of your construction, and adherence to safe sleep practices. Always supervise a baby when they are using the basket.
Here are the non-negotiable safety rules:
- Firm, Flat Surface: The mattress you place inside the basket must be firm, flat, and perfectly fitted to the base. There should be no gaps between the mattress and the sides of the basket where a baby could become trapped.
- Use Sturdy Materials: The pattern calls for a thick, 9mm braided cotton cord and a solid wooden base. Do not substitute with flimsy yarns that could stretch or lose their shape. The basket walls must be rigid and upright.
- No Loose Items: The bassinet should be completely empty. Do not add pillows, loose blankets, bumpers, or soft toys, as these are suffocation hazards.
- Place on a Safe Surface: Always place the Moses basket on a firm, flat surface on the floor. Never place it on a countertop, bed, or other elevated, soft surface from which it could fall.
- Stop Use When Baby Can Roll: Once a baby shows signs of being able to push up on their hands and knees or roll over, you must stop using the Moses basket for sleep.
By following this pattern diligently and adhering to these safety standards, you can create a beautiful and secure first bed for a little one.
Before You Begin: What to Expect
- Skill Level: Intermediate. While the stitches themselves (single crochet, waistcoat stitch) are not complex, this project requires consistent tension, strength, and the ability to work with a large, heavy-duty cord.
- Project Cost: This is a significant project in terms of material cost. As the creator notes, the cord and wooden base can total around $150 USD, not including shipping. Keep this in mind as you plan.
- Physical Effort: Working with 9mm cotton cord is like an upper-body workout! Take frequent breaks to stretch your hands, arms, and back. Ensure your workspace is at a comfortable height to avoid hunching over. Keep a good, unscented moisturizer handy, as the cord can be drying on your hands.
Gather Your Materials
Having the right tools is the first step to success. Here’s exactly what you’ll need for this DIY crochet bassinet.
- Wooden Base: The foundation of your basket.
- Dimensions: Approximately 29.5 inches long x 16 inches wide, and 6mm thick.
- Holes: The base used in this tutorial has 110 holes.
- Hole Sizing: 12mm diameter holes with 10mm of space between them.
- Note: Don’t worry if your base has slightly different specs! We’ll discuss how to adjust the pattern in Round 1.
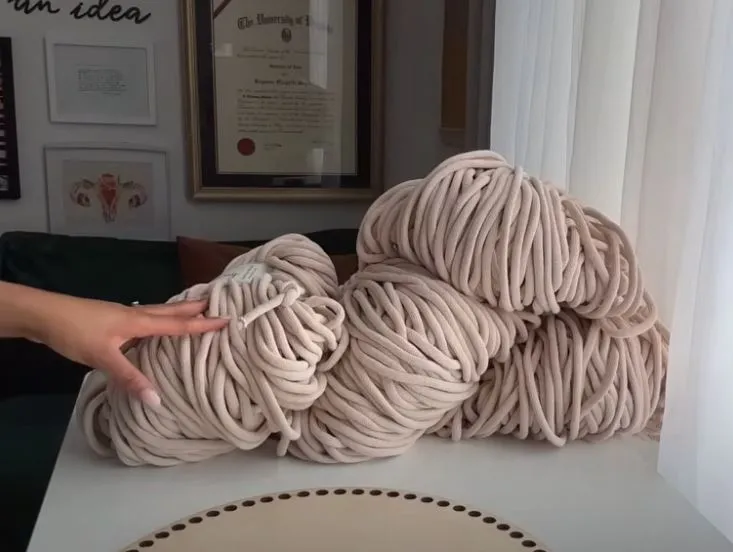
- Cord:
- Type: 9mm Braided Cotton Cord. The tutorial uses the brand Bobbiny, which is known for its high quality and beautiful color variety.
- Quantity:
- Standard Basket (No Hood): 3 bundles (100m / 108 yards each).
- Hooded Basket: 4 bundles.
- Crochet Hooks:
- Main Hook: 9mm hook.
- Smaller Hook: 8mm hook (for getting into tight spaces, like the setup round and joining).
- Pro Tip: Use a sturdy, one-piece metal or wooden hook. Fancy resin hooks can break under the strain of this heavy cord.
- Essential Notions:
- Sharp, Heavy-Duty Scissors
- Tape Measure
- Locking Stitch Markers (at least 7)
Abbreviations and Special Stitches
To make this pattern easy to follow, here are the abbreviations and detailed instructions for the special stitches used.
- ch: chain
- sl st: slip stitch
- sc: single crochet
- st(s): stitch(es)
Special Stitch: The Waistcoat Stitch (aka Center Single Crochet)
This stitch is the star of the show! It creates a dense, non-stretchy fabric that looks like a knitted stockinette stitch. The key is hook placement.
- How to do it: Instead of inserting your hook under the two top loops of the stitch from the previous round (like a standard sc), you will insert your hook directly into the center of the “V” of the stitch. Push your hook all the way through to the back, yarn over, pull up a loop, yarn over, and pull through both loops on your hook.
- The Result: Your stitches will stack perfectly on top of each other, creating strong, vertical columns. If your stitches look staggered, you’re likely working a standard single crochet.
Special Technique: The Invisible Join
This technique creates a seamless join for working in the round, eliminating the visible seam that a typical sl st join can create.
- Complete the last stitch of your round. Pull up the loop on your hook to make it larger and remove the hook.
- From the back of your work, insert your hook from back to front under both top loops of the first stitch of the round.
- Place the dropped loop back onto your hook and pull it through to the back of your work.
- Remove the hook from that loop. Now, insert your hook from front to back through the center of the very same stitch you just pulled the loop through (as if you’re starting a waistcoat stitch).
- Yarn over and pull a loop through to the front.
- Carefully place the loop you left at the back onto your hook. You should now have two loops on your hook.
- Yarn over and pull through both loops.
You have now completed the invisible join and simultaneously created the first waistcoat stitch of the new round! It might feel awkward at first, but it creates a flawless finish.
The Moses Basket Crochet Pattern
Let’s begin crafting! Follow these steps carefully for a beautiful and sturdy basket.
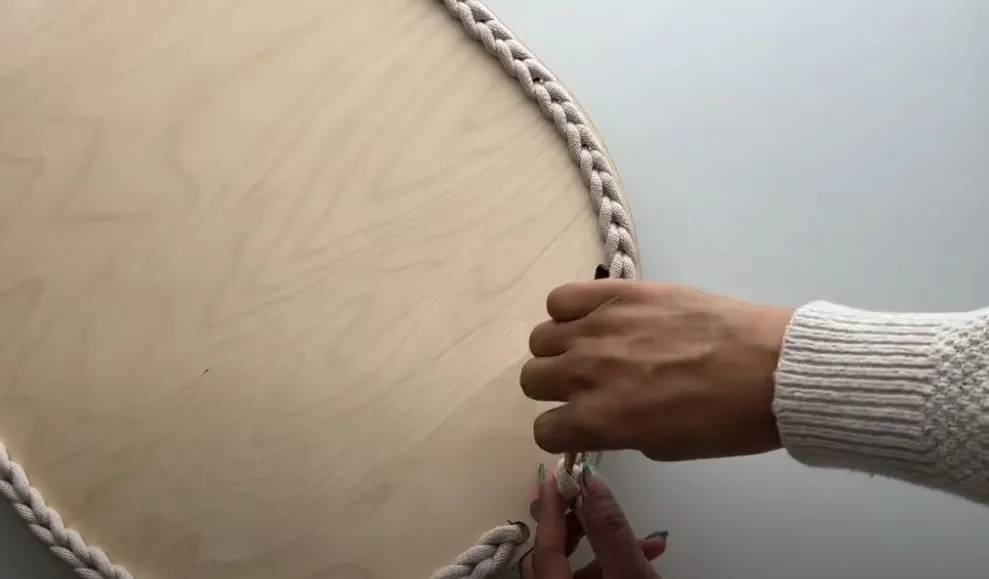
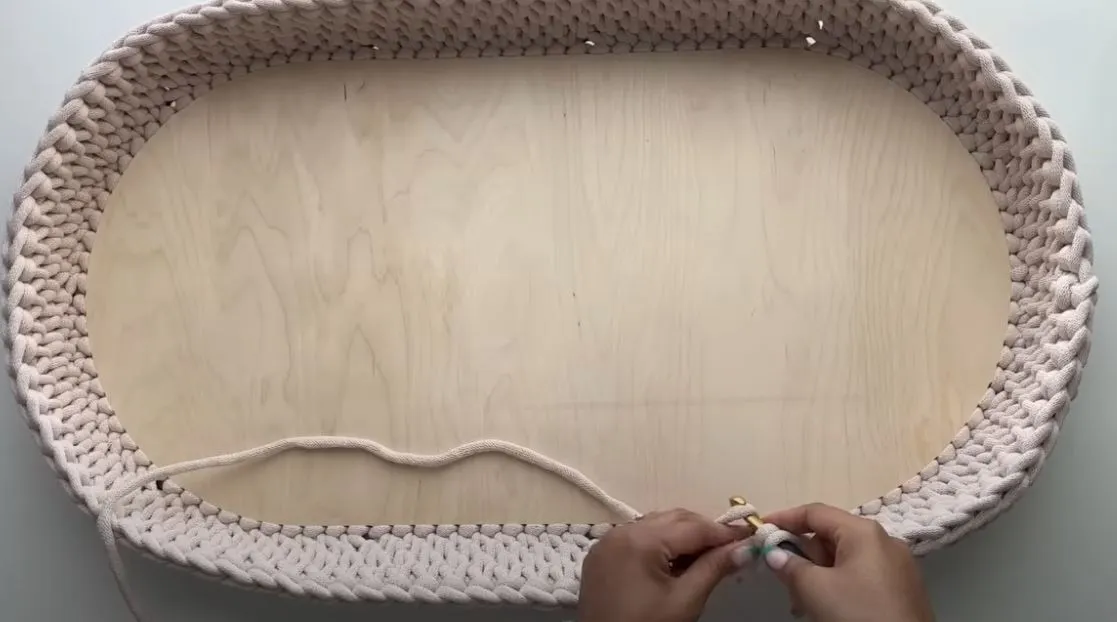
Part 1: The Setup Round (Optional but Recommended)
This round is a design choice that adds a polished, professional finish. It covers the raw wood on the inside of the basket and helps to slightly close up the holes in the base, which is especially useful if you need to skip holes later. The braided look it creates will be on the bottom of the base.
- Start on one of the shorter sides of your base. Locate the center hole.
- Insert your 9mm hook from the top of the base down through the center hole.
- Pull your cord through to the top, leaving a 6-inch tail at the bottom.
- Insert your hook into the next hole to the right, pull up a loop, and pull it through the loop already on your hook to complete a slip stitch.
- Continue to sl st in every hole around the entire perimeter of the base. Keep your tension even but not too tight.
- When you reach the starting hole, you’ll need to make one final slip stitch to close the round. The hole will be tight. Switch to your 8mm hook to help you get in. Pull up a final loop and complete the slip stitch.
You have now completed the setup round. The top side (where you were working) has a simple “dash” look in each hole. Flip the base over to see the beautiful braided chain you created on the bottom.
Part 2: Round 1 – Building the Foundation
This is the most critical and potentially trickiest round. You will now build the first row of walls. We’ll be working into the same holes from the top side of the base.
- Flip your base so the slip-stitched braid is on the bottom. You will be working from the inside of the basket now.
- Using your 8mm hook (the holes are still tight), ch 1.
- Insert your hook into the next hole and work a standard single crochet (sc). As you work, hold the beginning tail along the edge and crochet over it to weave it in as you go.
- Continue working 1 sc into each hole around the base.
IMPORTANT – How to Adjust for Your Base:
The goal is to create walls that go straight up, not ones that flare outwards.
- If you work one sc in every single one of your 110 holes, you may find the walls start to flare out like a bowl. This means you have too many stitches.
- The creator of this pattern found that skipping 10 holes, evenly spaced around the base, was the magic number. This reduced the total stitch count from 110 to 100 and made the walls perfectly vertical.
- Your mission for this round: Crochet around your base. If the walls start to flare, you need to reduce your stitch count. Pull the round out and try again, skipping a few holes at regular intervals (e.g., skip every 10th hole). This may take some trial and error, but getting it right is crucial for the structure of the basket.
Once you have completed the round and your stitch count is correct, it’s time to join.
- Join the round using the Invisible Join technique described in the “Special Stitches” section. Use your 9mm hook for this.
Part 3: Rounds 2-10 – The Body of the Basket
Now for the cruise control part! For these next nine rounds, you’ll simply be working the waistcoat stitch. This will build the height of your basket walls.
- Your invisible join from the previous round has already created the first stitch of Round 2.
- Continue working one Waistcoat Stitch into every stitch around. Remember to insert your hook into the center “V” of the stitch below.
- At the end of the round, use the Invisible Join to close the round and create the first stitch of the next round.
- Repeat this process for a total of 10 rounds (or until your basket reaches your desired height).
How to Add a New Bundle of Cord:
You will run out of cord partway through. Joining a new bundle is simple.
- When you have about 6-8 inches of your old cord left, grab your new bundle.
- Hold the end of the new cord alongside the tail of the old cord.
- Simply treat the new cord as your working yarn and continue making waistcoat stitches.
- As you make the next 5-6 stitches, crochet over both tails (the old and the new) to secure them and weave them in seamlessly. They will be completely hidden inside your stitches.
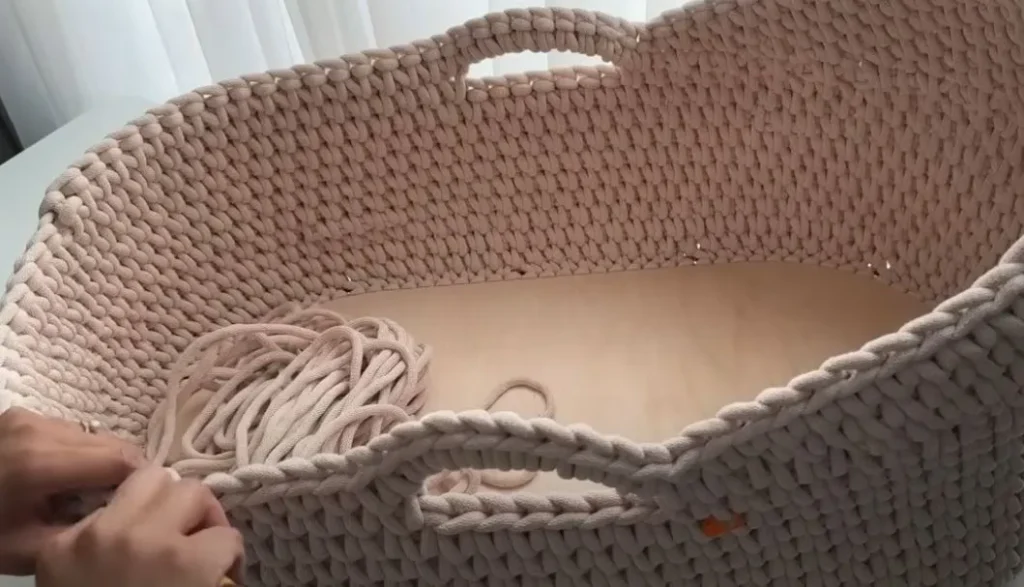
Part 4: Round 11 – Creating the Handle Foundation
In this round, we’ll create the chain spaces that will become the handles.
- First, place your stitch markers. Lay your basket flat and locate the center of one of the long sides.
- Mark off 7 stitches where you want your handle to be. Place a stitch marker in the first stitch and the last stitch of this 7-stitch section. (So, marker, 5 un-marked stitches, marker).
- Repeat on the opposite long side, ensuring the handles are perfectly aligned.
- Begin Round 11 by working the Waistcoat Stitch as normal until you reach the stitch right before your first handle marker.
- Work a waistcoat stitch into the marked stitch, and remove the marker.
- Ch 8. (You can chain more for a longer, floppier handle, or fewer for a smaller one).
- Skip the 5 un-marked stitches between your markers.
- Work a Waistcoat Stitch into the stitch marked by your second marker. Remove the marker. You have now created the handle space.
- Continue working the waistcoat stitch around the basket until you reach the markers for the second handle.
- Repeat steps 5-8 to create the second handle.
- Continue with the waistcoat stitch until you reach the end of the round.
- Join with the Invisible Join.
At this point, you have a choice: finish the standard basket or continue on to the hooded version.
Finishing Option A: The Standard Moses Basket
If you are not making a hood, you are just one round away from being finished!
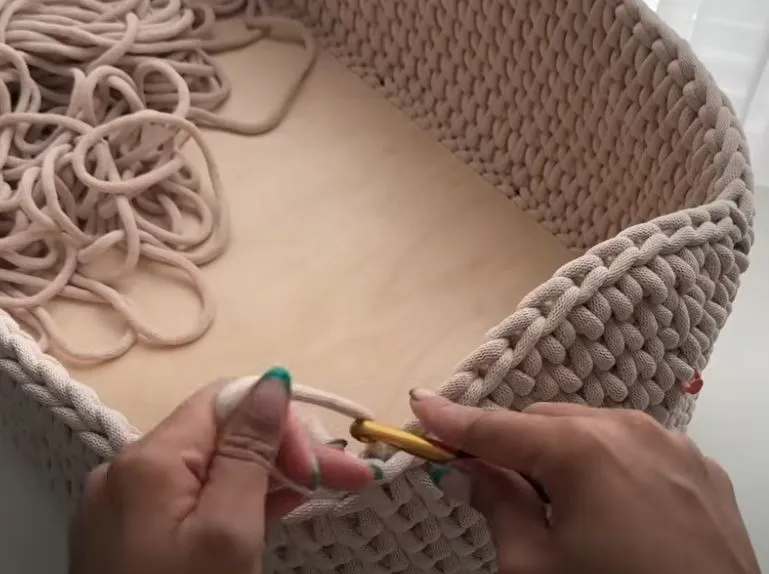
Round 12 (Final Round)
- Work the Waistcoat Stitch around until you reach the ch-8 space for your first handle.
- Now, work 9 standard single crochet (sc) stitches around the chain space. You are not working into the chains, but around them, encasing the chain within your stitches.
- As you work the 9 sc, push them together so they are snug and completely cover the chain.
- Once the 9 sc are complete, immediately resume working the Waistcoat Stitch in the next stitch on the basket wall.
- Continue with the waistcoat stitch until you reach the second handle. Repeat step 2 to cover the second chain space with 9 sc.
- Continue with the waistcoat stitch until you reach the end of the round.
You are now ready to finish your basket! Skip to the “Finishing Touches: The Invisible Closure” section below. With the cord left from your third bundle, you will have more than enough to create the decorative tassels.
Finishing Option B: The Hooded Moses Basket
For this elegant version, we will use short rows to build up the hood at one end of the basket. This requires a fourth bundle of cord.
Step 1: Mark Your Hood Placement
- On one of the short ends of the basket, you will mark the placement for the hood. The hood will be built between the handles.
- The creator placed the outer markers for the hood two stitches away from the handle foundation.
- Find the center of this short side. If you have two center stitches, mark them both. If you have one, mark it. This is your starting point.
- If you have two center stitches: You’ll start with these two. Your first short row will be 2 sts long.
- If you have one center stitch: You will start with the center stitch and the stitch on either side. Your first short row will be 3 sts long. (For simplicity, this pattern will follow the video’s example, which appears to start with a section of 5-6 stitches in the center).
The goal is to build rows outwards from the center. For clarity, we’ll mark a starting section of 6 stitches in the dead center of the hood area.
Step 2: Crocheting the Short Rows
You will be cutting your cord after each short row. Leave a 2-inch tail each time to make weaving in easier.
Short Row 1 (Center Section):
- Take your new, 4th bundle of cord.
- Join the cord in the first stitch of your marked 6-stitch center section. Ch 1.
- Work a Waistcoat Stitch in that same stitch and in the next 5 stitches, crocheting over the starting tail to secure it.
- After the 6th stitch, cut your cord, leaving a 2-inch tail. Pull the tail all the way through the top of the last stitch.
Short Row 2:
- You will now expand your row. Start in the second available stitch to the right of your first short row.
- Join your cord, ch 1.
- Work a waistcoat stitch in that same stitch and the next stitch.
- Now, work a waistcoat stitch across the 6 stitches of Short Row 1. As you do, crochet over the tail you left at the end of that row.
- Continue and work a waistcoat stitch into the next two empty stitches to the left of Short Row 1.
- Cut your cord, leaving a tail, and pull it through. Your second row is now 10 stitches long (2 + 6 + 2).
Continue Building Short Rows:
Repeat the process of Short Row 2, each time starting your new row two stitches to the right of the previous row and ending it two stitches to the left. Each row will be 4 stitches longer than the last. Continue adding short rows in this manner until your hood reaches its desired width (the tutorial stops two stitches away from the handles). The hood will form at a beautiful, modern angle.
Step 3: The Final Connecting Round
Now we will connect everything with one final round. Go back to the cord from your 3rd bundle, which you left on hold.
- Continue working the Waistcoat Stitch around the basket from where you left off.
- When you reach the first handle, work 9 sc around the chain space, just as described in the “Standard Basket” version.
- Immediately after the handle, begin working the Waistcoat Stitch into the stitches of the basket wall, leading right into the stitches of your final and longest short row.
- Work the waistcoat stitch all the way across the top of the hood, crocheting over the final tail from your last short row.
- When you exit the hood section, continue with the waistcoat stitch until you reach the second handle.
- Work 9 sc around the second handle’s chain space.
- Continue with the waistcoat stitch until you reach the end of the round.
Finishing Touches: The Invisible Closure & Tassels
You’ve made it to the very end! Let’s give your project a flawless finish.
The Invisible Closure
This technique mimics the look of a real stitch to create a perfectly seamless finish.
- Cut your cord, leaving a 6-inch tail. Pull the tail all the way through the top of your last stitch.
- Thread the tail onto a tapestry needle (or use your smaller hook to guide it).
- Identify the first “real” stitch of your final round. Insert your needle from front to back under both top loops of that stitch. Pull the tail through.
- Now, insert your needle back down into the top of the very last stitch you made, going through the center of the “V”. This creates a “fake” stitch on top.
- Pull the tail to the inside of the basket. Adjust the tension so your fake stitch is the same size as the others.
- On the inside of the basket, securely tie the tail into a knot around a nearby stitch.
- Use your crochet hook to weave the remaining tail horizontally behind several stitches on the inside to hide it completely.
How to Make Decorative Tassels (Makes 2)
Use the leftover cord to add this beautiful finishing touch.
You will need to cut:
- For the fringe: 12 pieces of cord, each 13 inches long.
- For the hanging loop: 2 pieces of cord, each 23 inches long.
- For the wrap: 2 pieces of cord, each 26 inches long.
Instructions (per tassel):
- Take your 6 (13-inch) cords and line them up together.
- Take one 23-inch cord and tie a knot near one end to form a hanging loop.
- Lay the hanging loop cord on top of your bundle of fringe cords, with the knot in the middle.
- Fold the fringe cords in half over the hanging loop cord, making sure the knot is hidden inside the fold.
- Take your 26-inch wrap cord. Create a “U” shape and lay it against the top of your tassel, with the loop of the “U” pointing down.
- Tightly wrap the long end of the wrap cord around the top of the tassel, trapping the “U” shape underneath. Wrap downwards about 1-1.5 inches.
- Thread the end of your wrapping cord through the loop of the “U” at the bottom.
- Pull the top tail of the “U” upwards. This will pull the bottom loop and the threaded tail up underneath your wraps, hiding and securing the knot. Pull until the knot is in the center of the wraps.
- Cut the two excess ends of the wrap cord flush with the wraps.
- Use sharp scissors to trim the bottom of your tassel fringe so it’s perfectly even.
- Use the hanging loop to attach the tassel to the base of your basket handle.
Frequently Asked Questions (FAQ)
- Can I use a different yarn or cord?
It’s not recommended. This sturdy crochet basket pattern relies on the rigidity of the 9mm braided cotton cord. A standard yarn, even held double or triple, will not provide the necessary structure and could be unsafe. - What if my wooden base has more or fewer holes?
That’s okay! The key is in Round 1. You must adjust your stitch count to ensure the walls are vertical. If your base has fewer holes, you might be able to put one stitch in every hole. If it has many more, you may need to skip even more holes than suggested. - Is this project really beginner-friendly?
This project is best suited for an intermediate crocheter or a very determined and patient beginner. The techniques aren’t difficult, but the project’s scale and the physical effort required can be challenging. - How do I clean the finished Moses basket?
Due to the wooden base, this item is not machine washable. You should only spot-clean the basket with a damp cloth and a mild detergent if necessary.
Congratulations! You have completed your stunning, handmade crocheted Moses basket. This is more than just a crochet project; it’s a labor of love, an heirloom in the making, and a beautiful, cozy nest for a precious new life. Every single stitch was made with care, and that love is woven into the very fabric of the basket.
We hope you enjoyed this Moses basket crochet pattern. If you make one, we’d love to see it! Share your creation and be proud of the incredible piece you’ve brought to life.