A Modern Twist on a Classic: The Granny Square Baby Afghan Free Pattern
Hello, my fellow yarn lovers! Is there anything more iconic in the world of crochet than the humble granny square? It’s often the first thing we learn, and it’s a design we return to time and time again for its comforting rhythm and endless versatility.
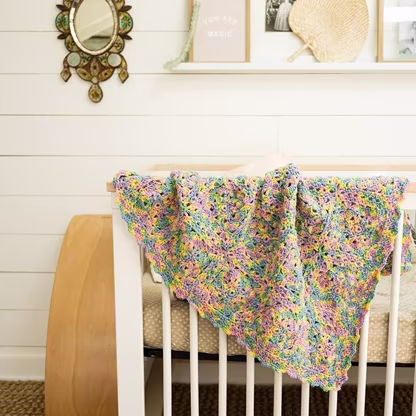
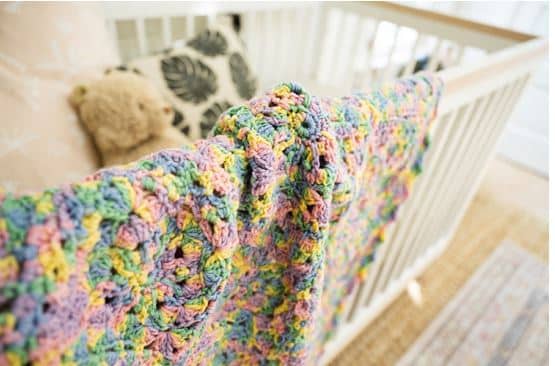
But what if we told you there’s a granny square with a delightful secret? Get ready to fall in love with the Granny Square Baby Afghan, a stunningly beautiful and unique pattern from Lion Brand, designed in collaboration with Missy Marshall. This isn’t your average granny square. Each motif starts as a delicate circle, blooms into a lacy shell design, and then magically transforms into a perfect square.
This easy-level pattern is perfect for the crocheter who loves making motifs and is ready for a fun, satisfying project. The best part? The pattern uses a “join-as-you-go” technique, so you’ll build your blanket as you complete your squares. Using a self-striping yarn like Lion Brand’s Bundle Of Love makes the gorgeous color transitions completely effortless. Let’s create an heirloom!
What You’ll Need to Get Started
This pattern uses a self-striping bulky weight yarn that works up quickly and creates a beautiful, painterly effect with its color changes.
- Yarn: 2 balls of Lion Brand® Bundle Of Love in the color #209 Chamomile.
- Crochet Hook: Size J-10 (6 mm)
- Notions: A large-eyed blunt needle (or tapestry needle) for the final finishing touches.
Pattern Details: Gauge & Sizing
- Finished Afghan Size: Approximately 32 x 38 inches (81.5 x 96.5 cm).
- Finished Square Size: Each square is about 6.25 inches (16 cm).
- Gauge: Rounds 1-3 of a square should measure about 2.5 inches (6.5 cm). It’s a good idea to make one full square to check your gauge before you begin making all 30!
- Abbreviations (US Terms):
- ch: chain
- ch-sp: chain space
- st(s): stitch(es)
- sl st: slip stitch
- sc: single crochet
- hdc: half double crochet
- dc: double crochet
- tr: treble crochet
- RS: right side
- WS: wrong side
Special Stitches (Your Guide to Success!)
This pattern has a few special stitches that give it its unique texture. Don’t worry, they are easy to master!
- Shell: Work 5 dc all into the same stitch or space. This creates a beautiful, fan-like shape.
- Corner-fan: Work (2 dc, 1 tr, ch 2, 1 tr, 2 dc) all into the same stitch. This combination of taller and shorter stitches is what helps create a sharp, neat corner.
- Spike-dc (Spike Double Crochet): This stitch is just a regular double crochet, but you work it into a round below the one you are currently on. Yarn over, insert your hook into the stitch indicated in the round below, and pull your loop up to the height of your current working round. Then, finish the double crochet as usual (yarn over, pull through 2 loops, twice). This creates a lovely, textured “spike.”
Let’s Begin! Making Your Squares (Make 30)
This beautiful afghan is made of 30 individual squares that are joined together at the end. Each square is worked in three parts. Remember, you do not turn your work unless the pattern tells you to.
Part 1: The Center Circle (Rounds 1-3)
Round 1 (RS): Ch 4, and join with a sl st to the first ch to form a ring. Ch 1, work 8 sc into the ring. Join with a sl st to the first sc. (You’ll have 8 sc).
Round 2: Ch 1, sc in the first st. Ch 1, sc in the next st. Repeat from * to * all the way around. To finish, ch 1 and join with a sl st to the first sc. (8 sc and 8 ch-1 spaces).
Round 3: Ch 1, work (1 sc, ch 2, 1 sc) all in the first st. Ch 1, then in the next st work (1 sc, ch 2, 1 sc). Repeat from * to * all the way around. To finish, ch 1 and join with a sl st to the first sc. (16 sc, 8 ch-1 spaces, and 8 ch-2 spaces).
Fasten off your yarn.
Part 2: The Lace and Shell Section (Rounds 4-6)
Round 4 (WS): For this round, you’ll be working on the Wrong Side. Attach your yarn in any ch-2 space. Ch 1, sc in that same space. Ch 2, skip the next sc, and work a Spike-dc into the ch-1 space from two rounds below (Round 2).
*Ch 2, skip the next sc, sc in the next ch-2 space. Ch 2, skip the next sc, Spike-dc in the next ch-1 space from two rounds below.
Repeat from * to * all the way around. To finish, ch 2, skip the last sc, and join with a sl st to the first sc. (You should have 8 Spike-dc and 8 sc).
Round 5 (RS): Ch 1 and TURN your work. You are now on the Right Side again.
*Work 1 sc in the next ch-2 space, skip the next st, work a Shell (5 dc) in the next ch-2 space, skip the next st.
Repeat from * to * all the way around. Join with a sl st to the first sc. (8 Shells and 8 sc).
Round 6: This round positions you for the next row of shells. Slip stitch into the first 2 dc of the first Shell. Now, in the next stitch (which is the center dc of the Shell), work (sl st, ch 1, sc). Skip the next 2 dc, then work a Shell in the next sc stitch between the shells.
*Skip the next 2 dc, sc in the center dc of the next Shell, skip the next 2 dc, Shell in the next sc.
Repeat from * to * all the way around. Join with a sl st to the first sc. (8 Shells and 8 sc).
Part 3: Shaping the Circle into a Square (Rounds 7-8)
Round 7: This is the magic round where your circle becomes a square!
Slip stitch into the next 2 dc. In the next st (the center of the Shell), work (sl st, ch 1, sc).
Now, follow this sequence carefully:
- Ch 2, skip the next 2 dc, work 1 hdc into the next sc.
- Ch 2, skip the next 2 dc, sc in the center dc of the next Shell.
- Ch 2, skip the next 2 dc, work a Corner-fan in the next sc. This is your first corner!
Now, repeat this sequence to form the other 3 sides and corners:
*Ch 2, sk next 2 dc, sc in center dc of next Shell, ch 2, sk next 2 dc, hdc in next sc, ch 2, sk next 2 dc, sc in center dc of next Shell, ch 2, sk next 2 dc, Corner-fan in next sc.
Repeat from * to * two more times. To finish the round, ch 2, skip the last 2 dc and join with a sl st to the first sc. (You should now have a square with 4 Corner-fans).
Round 8 (WS): Ch 1 and TURN.
Work 2 sc in the first ch-2 space. Ch 1, skip the next dc, sc in the next dc. Ch 1, skip the next tr, then work (sc, ch 2, sc) into the corner ch-2 space.
Now for the side:
*Ch 1, skip the next tr, sc in the next dc. (Ch 1, skip the next st, 2 sc in the next ch-2 space) 4 times. Ch 1, skip the next dc, sc in the next dc. Ch 1, skip the next tr, (sc, ch 2, sc) in the corner ch-2 space.
Repeat from * to * two more times. Finish the last side, join with a sl st to the first sc.
Fasten off. You’ve completed one beautiful square! Repeat this entire process until you have 30 squares.
Assembly: Joining Your Squares (Join-As-You-Go)
Now for the fun of seeing it all come together! Arrange your squares into a grid of 6 rows by 5 squares. You will join them using a special “join-as-you-go” method while working a final round on each square.
Joining Round (Round 9 – RS):
This round is worked on the Right Side of each square. You’ll be working only in the chain spaces, skipping over the single crochet stitches.
- For your VERY FIRST square (top left corner):
Attach yarn in any corner ch-2 space. Ch 1, then work (sc, ch 4, sc) in that same corner space.
Now for the side: work (sc, ch 2, sc) in the next ch-1 space. Then, [ch 1, (sc, ch 2, sc) in the next ch-1 space] repeat this 6 times.
Repeat this entire sequence for the other 3 sides. Join with a sl st to the first sc. Fasten off. One square is done! - For all OTHER squares:
You will follow the same pattern as above, but when you get to a side that needs to connect to an already-finished square, you will replace the “ch-2” or “ch-4” with a special joining slip stitch.- To join a ch-2 space: Ch 1, drop the loop from your hook, insert your hook from front to back through the corresponding ch-2 space on the neighboring square, pick the loop back up, pull it through, and ch 1.
- To join a corner ch-4 space: Ch 2, drop the loop, insert hook into the neighbor’s corner, pull the loop through, ch 2.
Work your way across the rows, joining each square to its neighbor(s) as you go.
Finishing: The Final Border
Once all your squares are joined, you’ll work a beautiful shell border around the entire afghan.
Border Round 1 (RS):
Attach yarn in any corner ch-4 space. Ch 1, and begin in that same space.
*Work (sc, Shell, sc) in the corner ch-4 space.
- Work a Shell in the next ch-2 space.
- (Skip the next ch-1 space, sc in the next ch-2 space, skip the next ch-1 space, Shell in the next ch-2 space) 3 times.
- When you reach the seam between squares, work a sc2tog over the two ch-2 spaces on either side of the seam to bring them together neatly.
Continue this pattern all the way around the blanket. Join with a sl st to the first sc.
Border Round 2:
Ch 1, sc in the same stitch. Ch 2, skip the next 2 dc of the shell, then work (sc, ch 2, sc) in the center dc of the Shell.
*Ch 2, skip the next 2 dc, sc in the next sc between shells, ch 2, skip the next 2 dc, (sc, ch 2, sc) in the center dc of the next Shell.
Repeat from * to * all the way around the entire border. Join with a sl st to the first sc.
Fasten off and weave in any remaining ends.
Customization & Tips
- Go Scrappy! This is a fantastic pattern for using up leftover yarn from your stash. Making each square in a different color would look absolutely stunning.
- Adjust the Size: Want a larger blanket? Simply make more squares! A 7×8 grid would make a lovely throw-sized afghan. For a smaller lovey, a 3×3 or 4×4 grid would be perfect.
- Take Your Time: The join-as-you-go method is so rewarding. Lay your squares out first and work one at a time. It’s like putting together a beautiful, soft puzzle.
Happy crocheting