Get Beach-Ready: Crochet Bikini Top
crochet bikini top
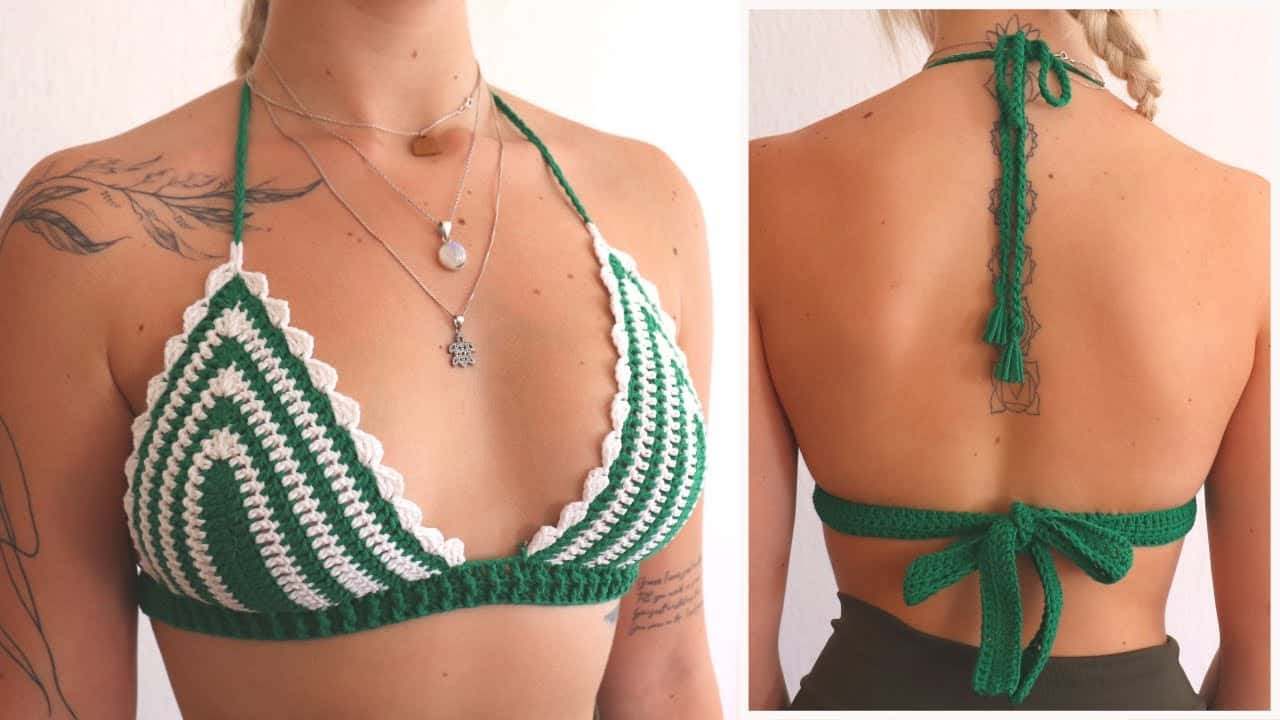
Dive into summer with your own handmade creation! This guide provides a full, easy-to-follow crochet bikini top pattern, perfect for advanced beginners looking to craft their own stylish swimwear. By making your own, you can customize the fit, color, and style to create a piece that’s uniquely you. Get ready to turn heads at the beach or pool with your gorgeous, self-made bikini top.

Why Crochet Your Own Bikini Top?
- Perfect Custom Fit: Adjust the cups, band, and straps to perfectly match your body measurements.
- Unique Style: Choose from an endless sea of colors and add your own embellishments like tassels or beads.
- Affordable & Fun: It’s a quick, rewarding project that costs a fraction of a store-bought designer top.
- Durable & Comfortable: Using the right yarn (100% cotton is key!) ensures your top is comfortable and holds its shape, even when wet.
Pattern Details
Skill Level
Advanced Beginner. You should be comfortable with basic stitches, increasing, and working in rows.
Materials & Tools
- Yarn: Approx. 100-150 yards of Worsted Weight (Category 4) 100% Cotton Yarn. Cotton is crucial as it doesn’t stretch or sag when wet like acrylic or wool. Recommended brands include Lily Sugar’n Cream or Lion Brand 24/7 Cotton.
- Crochet Hook: 3.75mm (F) or size needed to obtain gauge.
- Scissors: For cutting yarn.
- Tapestry Needle: For weaving in ends.
- Stitch Markers (Optional): To mark the top corner of the cups.
Crochet Abbreviations (US Terms)
- ch: chain
- st(s): stitch(es)
- sl st: slip stitch
- sc: single crochet
- hdc: half double crochet
- sp: space
- (…): stitches worked in the same stitch or space
Gauge
4 rows of hdc = 1 inch. Gauge is important for sizing. Create a small 4×4 inch swatch before you begin to ensure your top fits as expected. If your swatch is too small, go up a hook size. If it’s too big, go down a hook size.
Sizing Guide
This pattern is based on standard cup sizes. The beauty of this pattern is that you can stop increasing rows when the cup triangle is the right size for you. Measure the base of the triangle as you go.
- Size S (A/B Cup): Base of triangle measures approx. 5.5 – 6 inches. (Approx. 10-11 rows)
- Size M (B/C Cup): Base of triangle measures approx. 6.5 – 7 inches. (Approx. 12-13 rows)
- Size L (C/D Cup): Base of triangle measures approx. 7.5 – 8 inches. (Approx. 14-15 rows)
- Size XL (D/DD Cup): Base of triangle measures approx. 8.5 – 9 inches. (Approx. 16-17 rows)
The Free Crochet Bikini Top Pattern
Part 1: The Bikini Cups (Make 2)
The cups are worked from the bottom point upwards, increasing on each row.
To Start: Make a slip knot and ch 13 (for all sizes).
Row 1: hdc in the 3rd ch from the hook (the 2 skipped chs count as your first hdc). hdc in each ch across. You will have 11 hdc sts. (11)
Row 2: ch 2 (counts as first hdc here and throughout), turn. hdc in the same st. hdc in each st across to the last st. Work 2 hdc in the last st. (13)
Row 3: ch 2, turn. hdc in each st across. (13)
Row 4: ch 2, turn. hdc in the same st. hdc in each st across to the last st. Work 2 hdc in the last st. (15)
Row 5: ch 2, turn. hdc in each st across. (15)
General Pattern for Following Rows:
Continue repeating the pattern of one increase row (working 2 hdc in the first and last stitch) followed by one regular row (working 1 hdc in each stitch).
Continue this pattern until the base of your triangle reaches the desired width according to the Sizing Guide above. End on a non-increase row.
Final Cup Row (Edging): After your last row, do not fasten off. ch 1. Work 1 sc evenly along one straight side of the triangle, work (sc, ch 2, sc) in the top point (the starting chain from Row 1), and then work 1 sc evenly down the other straight side.
Fasten off the first cup. For the second cup, DO NOT fasten off. We will now join them.
Part 2: The Body Band & Back Ties
With the yarn still attached to the second cup:
Step 1 (Connecting Chain): ch 3 (for a small gap) or ch 4-5 (for a wider gap between cups).
Step 2 (Joining): Take your first cup and sl st to the bottom inside corner to join.
Step 3 (Band Row 1): ch 1, turn. Work 1 sc in each st along the bottom edge of the first cup. Work 1 sc in each ch of the connecting chain. Work 1 sc in each st along the bottom edge of the second cup.
Step 4 (Band Rows 2-4): ch 1, turn. Work 1 sc in each st across the entire band. Repeat for a total of 3-5 rows, or until the band is your desired thickness.
Step 5 (Creating the Back Ties): After your final band row, do not fasten off. ch 100-120 (or long enough to tie comfortably around your back). Turn, sl st in the 2nd ch from hook and in each ch back towards the body. sl st to the bikini band to secure. Fasten off.
Attach yarn to the other side of the band. Repeat Step 5 to create the second back tie. Fasten off.
Part 3: The Neck Straps
Step 1: Attach yarn with a sl st to the ch-2 sp at the very top point of one of the bikini cups.
Step 2: ch 120-150 (or long enough to tie comfortably around your neck).
Step 3: Turn, sl st in the 2nd ch from the hook and in each ch back down towards the cup.
Step 4: sl st into the ch-2 sp again to secure the strap. Fasten off.
Repeat all 4 steps for the second cup.
Part 4: Finishing
The most important step! Use your tapestry needle to securely weave in all loose ends. This ensures your bikini top is durable and won’t come apart after washing or wearing.
Customization & Care
How to Customize Your Top
- Add Fringe/Tassels: Attach tassels to the bottom of the body band for a fun, bohemian look.
- Beaded Straps: String a few wooden or plastic beads onto your straps before securing them.
- Scalloped Edge: Add a simple scalloped or shell stitch border around the cups for a feminine touch.
- Color Blocking: Use a different color for the straps and band than you did for the cups.
Care Instructions
To keep your crochet bikini top looking its best, always hand wash in cold water with a mild detergent. Do not wring it out. Gently squeeze out excess water, reshape, and lay flat to dry on a towel. Do not put it in the dryer!
Frequently Asked Questions (FAQ)
Can I actually swim in a crochet bikini top?
Absolutely! The key is using 100% cotton yarn. Cotton holds its shape well when wet and doesn’t sag. Avoid acrylic and wool yarns, which will stretch out and become heavy.
My cups are curling at the edges. How can I fix this?
Curling is normal. You can fix this by “blocking” your top. After weaving in the ends, wet the top, gently stretch it into shape, pin it to a foam board or towel, and let it air dry completely. The single crochet edging row also helps prevent curling.
How do I adjust the pattern for a better fit?
This pattern is very forgiving!
- For more coverage: Simply add more rows to the cups before starting the band.
- For less coverage: Work fewer rows on the cups.
- For a larger band size: The long back ties make the band size very adjustable. If you need more structure, you can continue the single crochet band rows and make shorter ties.
Now you’re ready to hit the beach in style! We’d love to see your creation. Share your finished crochet bikini top on social media and tag us for a chance to be featured!