
Cozy & Chic: Master Cable Stitch Crochet with Our Easy Patterns!
Mastering the Elegant Cable Stitch Crochet: A Comprehensive Tutorial
Welcome, fellow fiber artists! Are you ready to add a touch of timeless elegance and stunning texture to your crochet projects? Look no further than the beautiful cable stitch crochet. This advanced-looking yet surprisingly accessible technique creates a raised, intertwined effect reminiscent of traditional knitted cables, adding depth and sophistication to blankets, garments, accessories, and more.
In this comprehensive guide, we’ll walk you through every step to master the captivating cable stitch crochet pattern, transforming your regular stitches into a gorgeous, dimensional fabric. Whether you’re a seasoned crocheter looking to expand your skills or an adventurous beginner, our detailed instructions will help you confidently create this impressive design. Let’s dive into the world of textured crochet!
Materials You’ll Need for Your Cable Stitch Crochet Project
Before we begin our journey into the intricate world of cable stitch crochet, gather your supplies:
- Yarn: Any Category 4 (worsted weight) yarn. This is a versatile choice that clearly shows the stitch definition, making it ideal for practicing the cable stitch.
- Hook: A 5.5mm crochet hook.
Visual Guide: Watch the Cable Stitch Crochet in Action!
Sometimes, seeing a stitch in motion can make all the difference. Get a clear understanding of the movements involved in creating this stunning texture. We highly recommend watching this video to see the creation of the beautiful cable stitch crochet pattern we’re about to learn:
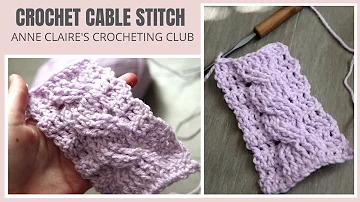 Admire the intricate beauty and raised texture of a completed cable stitch crochet swatch.
Getting Started: Foundation for Your Cable Stitch Crochet
Every impressive project begins with a solid foundation. For our cable stitch crochet, we’ll start with a simple chain.
- Make a Slip Knot: Create a slip knot on your hook, ensuring you leave a long tail at the end. This tail will be essential for weaving in later, giving your finished piece a professional, clean look.
- Foundation Chain: Create a foundation chain in multiples of 12. For this sample tutorial, we’ll begin with a chain of 12 stitches.
- To Chain: Yarn over, then pull the yarn straight through the loop on your hook. Repeat this action for each chain.
- Turning Chains: Add 2 more chains to your foundation chain. These extra chains will act as your turning chains for the first row, giving your fabric the necessary height.
Foundation Row: Setting the Base (Double Crochets)
This initial row will establish the flat base upon which your raised cable pattern will be built. This sets the stage for your beautiful cable stitch crochet to emerge.
- Skip Chains: Skip the first two chains from your hook.
- First Double Crochet (DC): Insert your hook into the third chain from your hook. You can choose to work into the top loop, the back bump, or both loops (the video tutorial demonstrates using both loops for a sturdy base).
- Yarn over, pull through (you should now have 3 loops on your hook).
- Yarn over, pull through the first two loops (2 loops remaining on hook).
- Yarn over, pull through the last two loops. This completes your first double crochet stitch.
- Continue DCs: Make one double crochet in each remaining chain across your entire foundation chain. You should end up with a total of 12 double crochets (or a multiple of 12, depending on your starting chain).
The Cable Pattern: Repeating Rows 2-7 for Stunning Texture
This is where the magic of the cable stitch crochet pattern comes to life! The following six rows (Rows 2-7) form the core of the cable design and will be repeated to create your desired project length. Each pattern row will begin and end with 3 regular double crochets, framing your central cable beautifully.
Row 2: Front Post Double Crochets (FPDC)
This row creates the first distinct raised elements of your cable, giving it dimension.
- Chain 2 and Turn: Chain 2, then turn your work to begin the new row. Remember, the initial chain 2 does NOT count as a stitch in this pattern.
- First 3 DCs: Make one double crochet into each of the first three stitches.
- 6 Front Post Double Crochets (FPDC): For the next six stitches, you will work Front Post Double Crochets around the posts of the DCs from the previous row.
- To FPDC: Yarn over, then instead of inserting your hook into the top of the stitch, insert it from front to back, *around the post* of the corresponding double crochet from the previous row. Yarn over, pull through (3 loops on hook). Yarn over, pull through two loops. Yarn over, pull through the final two loops. Repeat this for all 6 stitches.
- Last 3 DCs: Make one double crochet into each of the last three stitches of the row.
Row 3: Back Post Double Crochets (BPDC)
This row is worked from the back side of your project, further pushing the cable forward and defining its sculptural shape.
- Chain 2 and Turn: Chain 2, then turn your work around.
- First 3 DCs: Make one double crochet into each of the first three stitches.
- 6 Back Post Double Crochets (BPDC): For the next six stitches (which are the FPDCs from the previous row), you will work Back Post Double Crochets.
- To BPDC: Yarn over, then insert your hook from back to front, *around the post* of the stitch from the previous row. Yarn over, pull through (3 loops on hook). Yarn over, pull through two. Yarn over, pull through two. Repeat for all 6 stitches.
- Last 3 DCs: Make one double crochet into each of the last three stitches.
Row 4: Front Cable Twist (Treble Crochets – TrC)
This row is where the magic of the cable stitch crochet truly begins to show! We create the first captivating crossover for your cable using treble crochets (also known as triple crochets).
- Chain 2 and Turn: Chain 2, then turn your work around.
- First 3 DCs: Make one double crochet into each of the first three stitches.
- Front Cable Twist: This involves working 6 Treble Crochets (TrC) in a specific order to create the intertwined crossover effect.
- To TrC: Yarn over twice (you will have 3 loops on your hook).
- Step 1: Skip the first three Front Post Double Crochets from the previous row.
- Step 2: Work 1 Treble Crochet into each of the *next* three Front Post Double Crochets (these are the 4th, 5th, and 6th posts in the set of 6 FPDCs).
- Step 3: Now, work back to the *skipped* stitches. Work 1 Treble Crochet into each of the three skipped Front Post Double Crochets. You will work these TrCs in front of the ones you just made, gently pulling your yarn a little to ensure they sit correctly and form the twist.
- Last 3 DCs: Make one double crochet into each of the last three stitches.
Row 5: Back Post Double Crochets (After Twist)
This row consolidates the twist created in the previous row, further defining the cable’s shape and preparing it for the next cross.
- Chain 2 and Turn: Chain 2, then turn your work around.
- First 3 DCs: Make one double crochet into each of the first three stitches.
- 6 Back Post Double Crochets (BPDC): Make 6 Back Post Double Crochets over the twisted stitches from the previous row. It’s important to ensure you accurately grab the correct posts, even though they are now crossed.
- Last 3 DCs: Make one double crochet into each of the last three stitches.
Row 6: Front Post Double Crochets (FPDC)
This row extends the length of your beautifully forming cable, creating the space for the next twist.
- Chain 2 and Turn: Chain 2, then turn your work around.
- First 3 DCs: Make one double crochet into each of the first three stitches.
- 6 Front Post Double Crochets (FPDC): Make 6 Front Post Double Crochets around the posts of the stitches from the previous row.
- Last 3 DCs: Make one double crochet into each of the last three stitches.
Row 7: Back Cable Twist (Back Post Treble Crochets – BPTrC)
This final row in the repeating sequence beautifully completes the cable stitch crochet twist, preparing you to repeat the entire pattern for continuous, flowing cables.
- Chain 2 and Turn: Chain 2, then turn your work around.
- First 3 DCs: Make one double crochet into each of the first three stitches.
- Back Cable Twist: This involves working 6 Back Post Treble Crochets (BPTrC) to create the second crossover, twisting the cable back into place.
- To BPTrC: Yarn over twice, then insert your hook from back to front, *around the post* of the stitch from the previous row.
- Step 1: Skip the first three Back Post Double Crochets from the previous row.
- Step 2: Work 1 Back Post Treble Crochet into each of the *next* three Back Post Double Crochets (the 4th, 5th, and 6th posts).
- Step 3: Now, work back to the *skipped* stitches. Work 1 Back Post Treble Crochet into each of the three skipped Back Post Double Crochets. You’ll work these BPTrCs *behind* the ones you just made, making sure to grab the correct posts underneath for a seamless twist.
- Last 3 DCs: Make one double crochet into each of the last three stitches.
Repeating the Pattern
Congratulations! You’ve successfully completed one full repeat of the intricate cable stitch crochet pattern. To continue building your stunning fabric, simply **repeat Rows 2 through 7** for your desired project length. Each repeat will add another beautiful cable intertwine, creating a continuous textured design.
Finishing Your Cable Stitch Crochet Project
A well-finished project is a joy forever. Here’s how to neatly complete your work, ensuring your cable stitch crochet piece is polished and durable:
- Cut Yarn: Once you’ve reached your desired length, cut your yarn, leaving a tail of at least 6-8 inches. This length gives you enough to work with for weaving.
- Secure Stitch: Pull the yarn tail completely through the last loop on your hook. Tug gently to secure the knot.
- Weave in Ends: This crucial step hides your yarn tails, giving your project a professional and tidy finish.
- Thread your yarn tail onto a tapestry or yarn needle (a blunt-tipped needle works best).
- Weave the needle up and down through your stitches, following the path of the existing yarn within the fabric. Aim to go in several directions and weave through various strands to secure the tail firmly and prevent it from unraveling. Go as far as you need to feel secure that the tail won’t pop out.
- Carefully cut any excess yarn close to your work. Gently stretch your fabric where the end was woven in to help the tail disappear completely.
- Repeat this process for the starting tail at the beginning of your foundation chain as well.
Your beautiful cable stitch crochet project is now complete! Take a moment to admire the incredible texture, dimension, and craftsmanship you’ve created with your own hands.
Embrace the Art of Cable Stitch Crochet!
Mastering the cable stitch crochet opens up a world of possibilities for creating textured, luxurious, and unique items. From cozy blankets and stylish scarves to intricate garments and home decor, this technique adds a dimension that truly makes your crochet stand out. We hope this comprehensive tutorial has empowered you to confidently tackle this beautiful stitch and incorporate it into your future crafting adventures. Happy crocheting!