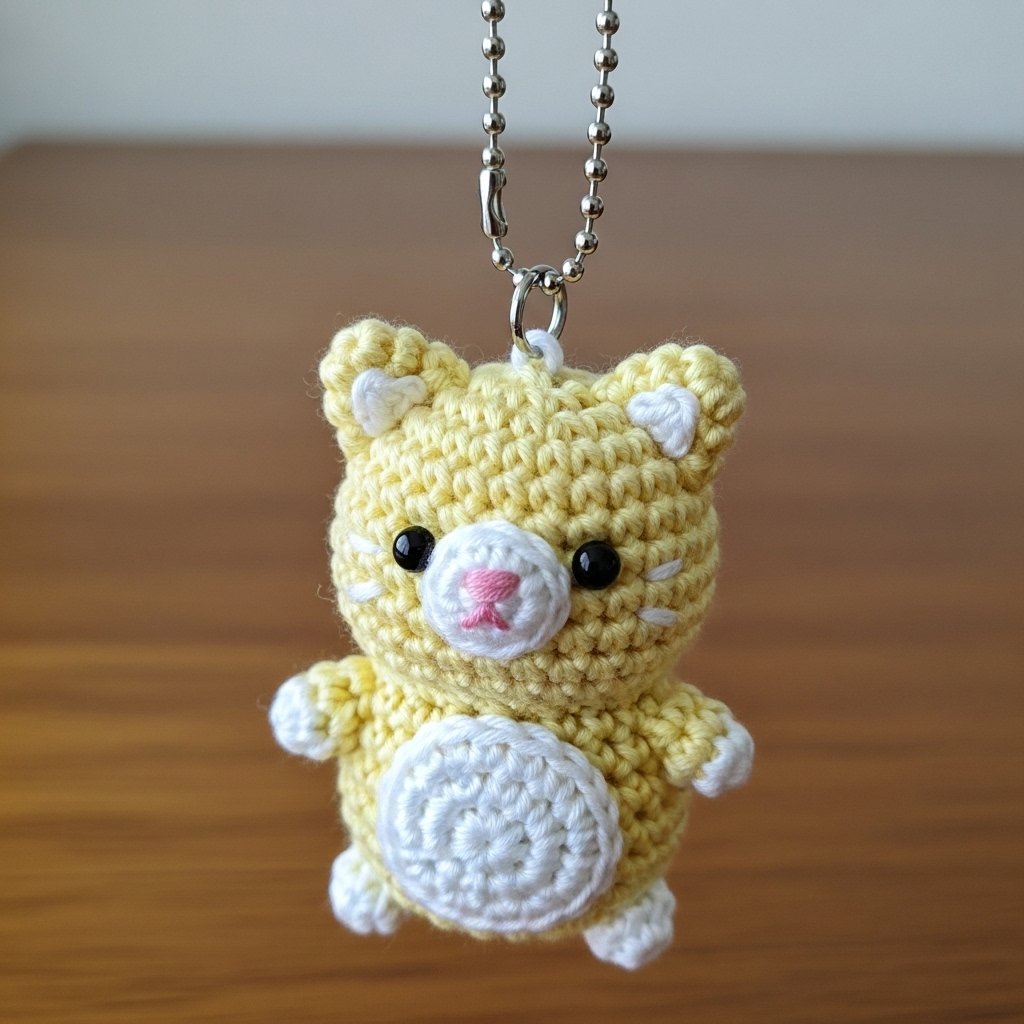
Crochet Calico Cat Keychain Amigurumi Pattern
Finished Size: Approximately 6.5 cm (2.5 inches) tall, excluding keychain hardware.
Skill Level: Intermediate
Materials:
- Yarn: Worsted weight (8-ply) yarn in Pastel Yellow and White.
- Hook: 3.0mm crochet hook.
- Eyes: 6mm black safety eyes (x2).
- Detailing: Pink embroidery floss for the nose; white embroidery floss for whiskers.
- Other: Polyester fiberfill stuffing, yarn needle, scissors, stitch marker, keychain ball chain or clasp.
Abbreviations (US Terms):
- MR: Magic Ring
- SC: Single Crochet
- INC: Increase (work 2 SC in the same stitch)
- DEC: Decrease (single crochet 2 stitches together)
- HDC: Half Double Crochet
- DC: Double Crochet
- st(s): stitch(es)
- Sl St: Slip Stitch
- FO: Fasten off
Pattern Instructions
Head and Body (Worked as one piece in Yellow yarn)
Start from the top of the head and work down in a continuous spiral.
Row 1: Start with 6 SC in a MR (6)
Row 2: INC in each st around (12)
Row 3: (SC 1, INC) × 6 (18)
Row 4: (SC 2, INC) × 6 (24)
Row 5: (SC 3, INC) × 6 (30)
Rows 6-10: SC in each st around (30) – 5 rows total
Insert safety eyes between Rows 8 and 9, about 6-7 stitches apart.
Row 11: (SC 3, DEC) × 6 (24)
Row 12: (SC 2, DEC) × 6 (18)
Begin stuffing the head firmly. The next row begins the body.
Row 13: (SC 2, INC) × 6 (24)
Rows 14-18: SC in each st around (24) – 5 rows total
Row 19: (SC 2, DEC) × 6 (18)
Finish stuffing the body firmly.
Row 20: (SC 1, DEC) × 6 (12)
Row 21: DEC × 6 (6)
FO, leaving a long tail. Use the yarn needle to weave the tail through the front loops of the final 6 stitches and pull tight to close. Weave in the end.
Muzzle (White Yarn)
Row 1: Start with 6 SC in a MR (6)
Row 2: INC in each st around (12)
Row 3: Sl St in the next st to finish the round smoothly.
FO, leaving a long tail for sewing. Using pink embroidery floss, stitch a small ‘Y’ or triangular shape in the center for the nose.
Ears (Make 2 in Yellow Yarn)
Row 1: Start with 4 SC in a MR (4)
Row 2: INC in each st around (8)
Row 3: SC in each st around (8)
FO, leaving a long tail for sewing. Do not stuff.
Inner Ear Detail (Make 2 in White Yarn)
This creates a tiny heart shape to place inside the ear.
Row 1: In a MR, work the following: Ch 1, HDC, DC, HDC, Sl St.
Pull the ring tight to shape the heart. FO, leaving a tail for sewing. Sew one heart onto the front of each yellow ear piece.
Arms and Legs (Make 4)
Start with White yarn.
Row 1: Start with 5 SC in a MR (5)
Change to Yellow yarn on the last part of the final stitch.
Row 2: SC in each st around (5)
FO, leaving a long tail for sewing. Do not stuff.
Belly Patch (White Yarn)
Row 1: Start with 6 SC in a MR (6)
Row 2: INC in each st around (12)
Row 3: (SC 1, INC) × 6 (18)
Row 4: Sl St in the next st to finish the round smoothly.
FO, leaving a long tail for sewing.
Assembly
- Muzzle: Sew the muzzle onto the face, centered just below and between the eyes, covering Rows 9-11 of the head.
- Ears: Sew the completed ears (with white hearts attached) to the top of the head, positioned over Rows 2-4 from the starting MR.
- Belly Patch: Sew the flat white circle onto the center front of the body, positioning it from Row 14 to Row 19.
- Arms: Sew two of the limbs to the sides of the body, aligned with Row 14 (just below the neck).
- Legs: Sew the remaining two limbs to the bottom front of the body, positioned on Rows 18-19, about 4-5 stitches apart.
- Whiskers: Using white embroidery floss, stitch two small, straight lines on either side of the muzzle.
- Keychain: Attach a small jump ring through a stitch at the very top center of the head. Connect your keychain hardware to the jump ring.