Crochet Adorable Teacup Amigurumi Pattern Free
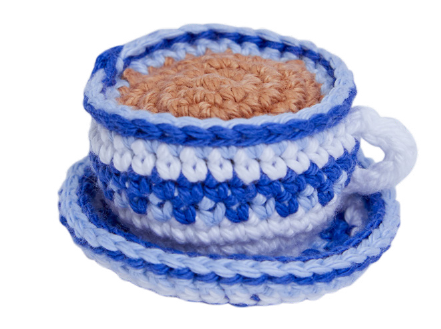
Crochet a Charming Teacup: A Delightful Amigurumi Pattern
Welcome, fellow crafters, to a world where yarn transforms into adorable miniatures! Here at Crochetto, we love bringing you charming and unique **crochet patterns** that spark joy and creativity. Today, we’re thrilled to share a delightful project that’s sure to brighten your day: a lovely crocheted Teacup. This pattern is perfect for adding a touch of whimsy to your home decor or creating a thoughtful handmade gift. Get ready to embark on a fun journey as we create this sweet Teacup, complete with its own saucer and a dollop of “tea.” Let’s gather our supplies and begin!
Tool Kit / Supplies
- DMC Happy Cotton yarn
- 3MM Crochet Hook
- Sewing Needle
- Toy Stuffing (or why not stuff your Teacup with some left-over yarn?)
Colour Guide
| Code N° | Colour | N° Skeins |
|---|---|---|
| A | 762 | x 1 |
| B | 798 | x 1 |
| C | 751 | x 1 |
| D | 776 | x 1 |
Techniques
Chain Stitch (CH)
The foundation of most crochet projects. To make a chain stitch, create a slip knot on your hook. Yarn over (wrap the yarn around your hook) and pull it through the loop on your hook. This creates one chain stitch.
Slip Stitch (SL)
Often used to join rounds or to move yarn across stitches without adding height. Insert your hook into the designated stitch, yarn over, and pull the yarn through the stitch AND through the loop already on your hook in one smooth motion.
Single Crochet (US) / Double Crochet (UK) (SC)
Insert your hook into the next stitch. Yarn over and pull the yarn through the stitch (you will have two loops on your hook). Yarn over again and pull the yarn through both loops on your hook. This completes one single crochet stitch.
Single Crochet Decrease (SC DEC)
- Insert your hook into the next stitch. Wrap the yarn around the hook, and pull it through the stitch. You now have two loops on your hook.
- Repeat step 1 (insert your hook into the next stitch, wrap the yarn around the hook, and pull it through the stitch). You now have three loops on your hook.
- Wrap your yarn around the hook again, and pull it through all three loops. You have made one decrease.
Magic Loop / Magic Ring
A technique to create a tight, closed center for working in the round. Wrap the yarn around your fingers to create a loop. Insert your hook into the loop, yarn over, and pull up a loop. Yarn over and pull through to create a chain. Now, work your first set of stitches into the ring, then pull the yarn tail to tighten the loop.
Neat Colour Change
To make a neat transition when alternating different coloured yarns when working in the round, remove the last stitch from your hook when you reach the end of your round. Insert your hook into the first stitch of the round and slide the last stitch back onto the hook. Take your new colour and use it to make a slip stitch through the two loops on your hook. Start your new round as usual by crocheting a chain stitch, then crocheting the first stitch(es) of the round back into where you made the slip stitch.
SC Bobble
- Insert your hook into the next stitch, wrap your yarn around your hook and pull the yarn through, wrap your yarn around your hook again and pull it through the first loop only (you now have two loops on your hook).
- Insert your hook again into the same stitch, wrap your yarn around your hook and pull the yarn through, wrap your yarn around your hook again and pull it through the first loop only (you now have three loops on your hook).
- Repeat step 2 (you now have four loops on your hook).
- Wrap your yarn around your hook and pull it through all four loops. Your bobble is now complete.
You will begin by crocheting your saucer in the round. Your teacup is then crocheted directly from a round of stitches on your saucer. The circle of tea is made separately and crocheted together with the second to last round of your teacup. The teacup handle is also worked separately and joined once your teacup is complete. Remember to refer to the Neat colour change instructions in the techniques section to create a seamless join when changing colours in the round.
To make the instructions easier to read, we will use some simple abbreviations:
- SC1 = make one single crochet stitch
- SC2 = make two single crochet stitches
- SC3 = make three single crochet stitches
- SC DEC = make one single crochet decrease
- CH = chain
- SL = slip stitch
Saucer
- Using the DMC Happy Cotton in Colour A, make a magic loop and SC6 around it. Join in the round by making a slip stitch into the first stitch of the round. When a neat colour change is not required, end your round by working a SL into the first stitch of the round, CH1, then work the first stitch of the new round back into that same space.
- Increase round: *SC2 into the next stitch*. Repeat the section inside the stars to the end of the round. (12 stitches.)
- Increase round: *SC1, SC2 into the next stitch*. Repeat the section inside the stars to the end of the round. (18 stitches.)
- Work each stitch of the next row through the back loop. Increase round: *SC2 into the next stitch, SC2*. Repeat the section inside the stars to the end of the round. (24 stitches.)
- In this round, you will alternate between using Colour B and Colour C using a technique called tapestry crochet. Join Colour B without cutting Colour A (refer to Neat colour change instructions). After working the SL st and CH1 in Colour B, insert your hook back into where you worked the slip stitch, wrap your yarn around your hook and pull the yarn through. Join Colour C by knotting it to one of the yarn tails on the back of your work. Wrap Colour C around your hook and pull through both loops of Colour B on your hook. *Insert your hook into the next stitch and wrap Colour C around your hook and pull the yarn through. Take Colour B, wrap it around your hook and pull through both loops of Colour C on your hook. Insert your hook into the next stitch and wrap Colour B around your hook and pull the yarn through. Take Colour C, wrap it around your hook and pull through both loops of Colour B on your hook.* Repeat the section inside the stars until 1 stitch remains, insert your hook into the next stitch and wrap Colour C around your hook and pull the yarn through. Take Colour B, wrap it around your hook and pull through both loops of Colour C on your hook. Work a SL into the first stitch of the round.
- Increase round: Using Colour B, *SC3, SC2 into the next stitch*. Repeat the section inside the stars to the end of the round. (30 stitches.)
- Increase round: Using Colour A, SC1, SC2 into the next stitch, *SC4, SC2 into the next stitch*. Repeat the section inside the stars until 3 stitches remain, SC3. (36 stitches.)
- Increase round: Cut Colour A, using Colour C, *SC5, SC2 into the next stitch*. Repeat the section inside the stars to the end of the round. (42 stitches.)
- Cut Colour C, using Colour B, work a SL into each stitch of the round.
- Cut your yarn approx. 10cm/4″ from the last stitch. Pull on the loop on your hook until the end pops through – you have now secured your last stitch.
Tea
- Using the DMC Happy Cotton in Colour D, make a magic loop and SC6 around it. Join in the round by making a slip stitch into the first stitch of the round. As a neat colour change is not required for this section, end your round by working a SL into the first stitch of the round, CH1, then work the first stitch of the new round back into that same space.
- Increase round: *SC2 into the next stitch*. Repeat the section inside the stars to the end of the round. (12 stitches.)
- Increase round: *SC1, SC2 into the next stitch*. Repeat the section inside the stars to the end of the round. (18 stitches.)
- Increase round: *SC2 into the next stitch, SC2*. Repeat the section inside the stars to the end of the round. (24 stitches.)
- Increase round: *SC3, SC2 into the next stitch*. Repeat the section inside the stars to the end of the round. (30 stitches.)
- Cut your yarn approx. 10cm/4″ from the last stitch. Pull on the loop on your hook until the end pops through – you have now secured your last stitch.
Teacup
The first round of your teacup is worked through the 18 front loops left unworked in step 4 of your saucer. Begin by using Colour A.
- Increase round: *SC2 into the next stitch, SC2*. Repeat the section inside the stars to the end of the round. (24 stitches.)
- Increase round: SC1, *SC2 into the next stitch, SC3*. Repeat the section inside the stars until 3 stitches remain, SC2 into the next stitch, SC2. (30 stitches.)
- Work 1 round in SC. Do not cut Colour A.
- In this round, you will alternate between using Colour B and Colour C using a technique called tapestry crochet. Follow the instructions as for step 5 of saucer.
- Using Colour B without cutting Colour A or C, work 1 round in SC.
- Using Colour A without cutting Colour B, work 1 round in SC.
- Cut Colour A, you will now use Colour C to join the last round of tea. Place the tea circle directly on top of the teacup with the right sides of the pieces facing away from each other and the last round of stitches on both pieces running parallel to each other. Insert your hook through the back loop of the next stitch on the teacup piece, then through the front loop of the corresponding stitch on the tea piece. Using Colour C, work a SC to join the two stitches together. Continue in this way until only a small opening is left, fill your teacup with stuffing, then finish the crochet join.
- Cut Colour C, using Colour B, work a SL into each stitch of the round.
- Cut your yarn approx. 10cm/4″ from the last stitch. Pull on the loop on your hook until the end pops through – you have now secured your last stitch.
Handle
- Using the DMC Happy Cotton in Colour A, make a foundation chain of 7 chain stitches.
- Turn your foundation chain over, you will see a series of bumps running down the reverse side of the chain. CH1, (this is your turning chain), work 1 SL into each of the 7 bumps.
- Cut your yarn approx. 10cm/4″ from the last stitch. Pull on the loop on your hook until the end pops through – you have now secured your last stitch.
Assembly and Finishing
- Thread your sewing needle with one of the yarn tails attached to the end of the handle. Take your teacup and attach one end of the handle below the last round of Colour C by working a couple of small stitches into the teacup. Insert your needle vertically down through the side of your teacup, bringing it out below the round where you alternated between Colour B and Colour C. Thread your needle through the other end of the handle, attach this end to the teacup by working a couple of small stitches into the teacup. Pass the needle through the teacup to hide the yarn tails inside.
We hope you had a wonderful time crocheting this charming Teacup! It’s perfect for adding a touch of handmade magic to any space. We can’t wait to see your unique creations. Share your finished Teacups with the Crochetto community on social media, and remember to tag us! Happy crafting!