Purr-fectly Adorable! Your New Favorite Cat Ear Beanie Crochet Pattern
Free Cat Ear Beanie Crochet Pattern: A Beginner’s Guide
There’s something uniquely satisfying about creating a cozy, stylish accessory with your own two hands. If you’re looking for a fun, quick, and utterly charming project, look no further! This cat ear beanie crochet pattern is the perfect place to start. Whether you’re a seasoned crocheter or just picking up a hook for the first time, this guide will walk you through every step of creating an adorable ribbed beanie that’s as fun to make as it is to wear. Designed for crochet-loving women, this pattern is simple, easy to follow, and yields a wonderfully trendy accessory. In this comprehensive tutorial, we’ll cover everything from the basic materials and stitches to a detailed, step-by-step guide for crocheting the beanie. We’ll even explore ways to customize the size and add your own personal flair. So grab your favorite yarn, and let’s get started on your new favorite cat ear beanie crochet pattern!
Why You’ll Adore This Cat Ear Beanie Crochet Pattern
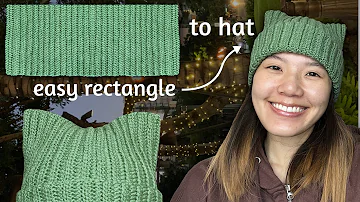
Before we dive into the nuts and bolts—or rather, the loops and stitches—let’s talk about why this particular cat ear beanie crochet pattern is a must-try project. First and foremost, it’s incredibly beginner-friendly. [4] The entire beanie is crocheted as a simple flat rectangle and then seamed together, which means no complicated increasing, decreasing, or working in the round. [4] This construction method is fantastic for building confidence and mastering fundamental stitches. The resulting ribbed texture, created by working into the back loops of the stitches, gives the beanie a beautiful, stretchy, and store-bought look that is both modern and timeless. It’s a fantastic project for a cozy weekend, a thoughtful handmade gift, or even an item to sell at craft fairs. The playful cat ears, which form naturally when the beanie is worn, add a touch of whimsy and personality that is sure to bring a smile to your face. This versatile easy crochet cat hat pattern for beginners can be adapted for any size, from a child to an adult, simply by adjusting the starting chain and the number of rows.
Gather Your Crochet Supplies
To get started on your cozy creation, you’ll need a few basic supplies. Having the right tools will make the process smooth and enjoyable. Here’s what you’ll need for this cat ear beanie crochet pattern:
- Yarn: The original pattern uses approximately 80g of a lightweight (number 3 or DK) yarn. Big Twist Renewal in green is a great choice, but feel free to use any brand or fiber you love. A soft acrylic or a wool blend would be wonderfully warm and easy to care for. Using a slightly thicker, worsted-weight yarn can also work beautifully and will make the project go even faster.
- Crochet Hook: A 4mm (G-6) crochet hook is recommended for DK weight yarn. If you choose a different yarn weight, be sure to check the yarn label for the recommended hook size to achieve the best fabric.
- Scissors: A sharp pair of scissors is essential for cleanly cutting your yarn.
- Yarn Needle (or Tapestry Needle): This is crucial for weaving in your ends and sewing the top of the beanie closed for a neat and professional finish.
- Stitch Markers (Optional but Recommended): While not strictly necessary, stitch markers can be incredibly helpful for marking the fold line when you’re ready to seam the top, ensuring your beanie’s “ears” are perfectly even.
Understanding the Stitches and Abbreviations
Crochet patterns use a standard set of abbreviations to keep instructions concise. [17] Here are the terms you’ll need to know for this cat ear beanie crochet pattern:
- ch: chain
- hdc: half double crochet
- BLO: back loop only
- sl st: slip stitch
- st(s): stitch(es)
If you’re new to these stitches, don’t worry! They are some of the most basic and versatile stitches in crochet, and we’ll walk through how to create them in the pattern below.
The Ultimate Cat Ear Beanie Crochet Pattern: Step-by-Step Instructions
Ready to bring your beanie to life? Follow these detailed steps. This pattern is designed to be straightforward and rewarding. For a visual guide, you can also follow along with this helpful video tutorial:
Part 1: Creating the Foundation Chain
The foundation chain determines the height of your beanie, including the foldable brim. A taller beanie will have a wider brim. For a standard adult size with a nice brim, a length of about 27 cm is perfect.
- Make a slip knot: Create a slip knot and place it on your crochet hook.
- Chain (ch) 60: To make a chain, yarn over your hook and pull the yarn through the loop on your hook. Repeat this 60 times. This will be the main height of your beanie.
- Chain 1 more: Add one extra chain. This will act as your turning chain, for a total of 61 chains. The turning chain provides the height needed to start the first row of stitches.
Part 2: Crocheting the Ribbed Rectangle
Now, we will work in rows of half double crochet stitches to create a ribbed rectangle. This forms the main body of the beanie.
- Row 1: Skip the first chain from the hook (the turning chain you just made) and work a half double crochet (hdc) into the second chain. To make an hdc, yarn over, insert your hook into the chain, yarn over and pull up a loop (you’ll have three loops on your hook), then yarn over and pull through all three loops. Continue to work one hdc in each chain across. You should have 60 hdc stitches at the end of the row.
- Row 2: Chain 1 and turn your work. From now on, you will work all your stitches in the back loops only (BLO). This is what creates the beautiful ribbed texture. Looking at the top of the stitches from the previous row, you’ll see a ‘V’. Insert your hook only through the loop of the ‘V’ that is furthest from you. Work one hdc in the BLO of each stitch across. Make sure not to miss the very last stitch to keep your edges straight. You should still have 60 stitches.
- Subsequent Rows: Repeat Row 2 (ch 1, turn, hdc in BLO of each stitch across) until your rectangle is wide enough to wrap snugly around your head with a bit of a stretch. For an average adult head (about 53 cm circumference), approximately 66 rows should be perfect. Your rectangle will measure about 40 cm in width. Important: Ensure you end with an even number of rows. This will make folding and seaming the top much easier.
Part 3: Seaming the Beanie Tube
Once your rectangle is complete, it’s time to join the two short ends to form a tube.
- Prepare to join: After your last row, chain 1 and turn as usual. Fold your rectangle in half so the first row and the last row are aligned on top of each other.
- Slip stitch the seam: Now, you will slip stitch the two edges together. Insert your hook through the front loop only of the first stitch on the edge closest to you, then insert your hook through the corresponding foundation chain on the opposite edge. Yarn over and pull through all loops on your hook. This creates a slip stitch. Continue to slip stitch across the entire edge, joining the two sides together to create a neat, flat seam.
Part 4: Closing the Top to Form the Ears
With your beanie now in a tube shape, the final step is to close the top in a way that creates the signature cat ears.
- Finish the seam: Once you’ve slip-stitched all the way across, chain 1 and cut a long tail of yarn (about three times the width of the beanie). Pull the hook up to draw the tail completely through the last loop and tighten to secure it.
- Sew the top closed: Thread the long yarn tail onto your yarn needle. Instead of cinching the top closed in a circle like a traditional beanie, you will sew it straight across. [10] You can mark the halfway point of your tube (at row 33 if you made 66 rows) to ensure the beanie folds perfectly in half with the seam at one side. Using a whip stitch or running stitch, sew through both layers of the beanie from one side to the other, matching up the ridges of the ribbing.
- Secure and hide the ends: Once you reach the other side, tie a secure double knot to ensure the seam doesn’t unravel. Weave in this yarn tail, and the starting tail from your foundation chain, into the inside of the hat to hide them.
Part 5: The Finishing Touches
Your beanie is almost complete! Simply turn it right side out and fold up the brim to your desired width. When you place the beanie on your head, the top corners will naturally pop up to form adorable cat ears. You can pinch them to make them pointier or leave them softer for a more subtle look. And there you have it—a stylish and cozy finished cat ear beanie crochet pattern!
Quick Takeaways: Your Beanie at a Glance
- This cat ear beanie crochet pattern is made from a simple rectangle, making it perfect for beginners.
- The ribbed effect is achieved by working half double crochet stitches in the back loops only (BLO).
- The beanie’s height and brim size are determined by the length of your starting foundation chain.
- The circumference is determined by the number of rows you crochet; it should be slightly smaller than your head measurement to allow for a snug stretch.
- The signature cat ears are formed by sewing the top of the beanie tube straight across instead of cinching it.
- Always end with an even number of rows to make folding and seaming the top symmetrical.
- Use stitch markers to help line up the ridges when seaming the top for a perfectly polished look.
Conclusion: Wear Your Creation with Pride!
Congratulations on completing your very own crocheted cat ear beanie! You’ve taken a simple skein of yarn and, with a hook and some creativity, transformed it into a fashionable and functional accessory. This cat ear beanie crochet pattern is more than just a set of instructions; it’s an opportunity to create something personal and filled with character. The beauty of this project lies in its simplicity and the charming result. It’s a testament to the fact that you don’t need complex stitches to create something truly special. Whether you made this for yourself, as a heartfelt gift for a loved one, or as a new product for your craft business, you should be incredibly proud of your work.
We encourage you to experiment with different colors and yarn textures to create a whole collection of these delightful beanies. Imagine a chunky yarn version for extra warmth or a variegated yarn for a pop of color. The possibilities are endless! Now, all that’s left to do is wear your new beanie out and about and enjoy the cozy warmth and the compliments that are sure to come your way. This is a wonderful DIY cat ear hat project to add to your skills.
Frequently Asked Questions (FAQs)
- 1. What is the best yarn for this cat ear beanie crochet pattern?
- While the pattern suggests a #3 DK weight yarn, a #4 worsted weight yarn is also an excellent choice, especially for beginners. [5] It works up a bit faster and creates a wonderfully cozy fabric. Soft acrylic, merino wool, or a cotton blend are all great options that are comfortable to wear and easy to care for.
- 2. Can I make this beanie in a different size?
- Absolutely! To adjust the size, you can change both the starting chain and the number of rows. For a child-sized beanie, you might start with 45-50 chains for the height and work fewer rows for the circumference. It’s always a good idea to measure the head of the person you’re making it for. [8]
- 3. How do I keep the edges of my rectangle straight?
- The key to straight edges is consistent stitch counting. Make sure you have the same number of stitches in every single row. The last stitch of a row can sometimes be tricky to see, so pay close attention and ensure you work into it every time before turning.
- 4. Can I add a pom pom to this beanie?
- While the classic cat ear look is achieved by the pointed corners, you could certainly add small pom poms to the tips of the “ears” for extra flair! Simply make two small pom poms and securely attach one to each corner after the beanie is fully assembled.
- 5. My beanie feels a bit stiff. Will it soften up?
- Yes, most yarns will soften after washing. Be sure to check your yarn’s label for proper washing instructions. Often, a gentle wash with a bit of fabric softener (if appropriate for the fiber) can make a big difference in the drape and feel of your finished beanie.
We’d Love to Hear From You!
Did you enjoy this cat ear beanie crochet pattern? We hope you had a fantastic time creating it! Share your finished beanies with us on social media and let us know what you thought of the pattern in the comments below. What color did you choose for your beanie? Your feedback and creations inspire our community!
References
- Make & Do Crew – “How to Crochet a Hat – Free Beginner Ribbed Beanie Pattern” [4]
- Handy Little Me – “How To Crochet A Hat (Chunky Beanie For Beginners)” [5]
- Lion Brand Notebook – “How to Crochet a Basic Beanie or Hat (A General Formula)” [8]
- delia creates – “Basic SC Beanie – Free Pattern & Video Tutorial” [10]
- Lay it Flat Publishing Group – “How to Read Crochet Patterns: A Beginner’s Guide” [17]