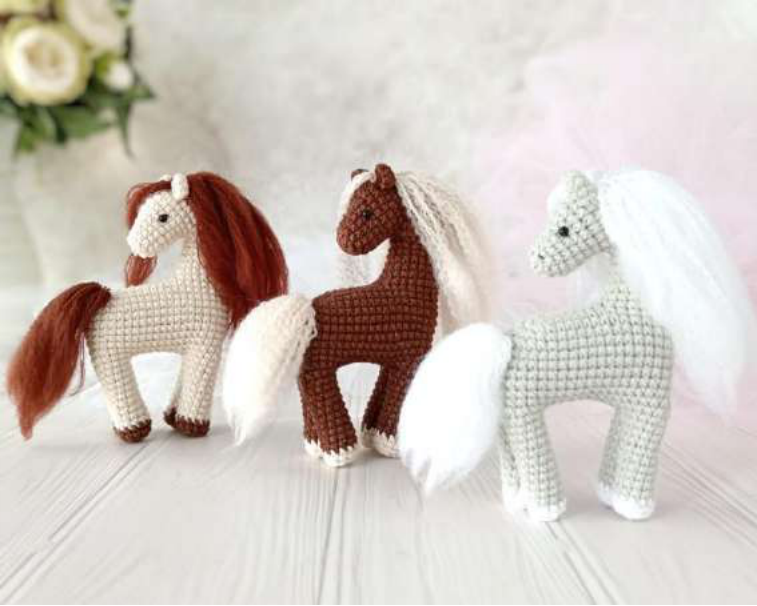
Palm-Sized Pony: Free Crochet Pattern!
Adorable Pony in the Palm: A Delightful Free Crochet Pattern
Welcome, fellow makers, to a truly enchanting project from Crochetto! We’re absolutely thrilled to share this wonderful free crochet patterns master class, brought to you by the talented Vasilyeva Alena of WasilenaToys. Imagine a tiny, adorable pony, perfectly sized to fit in the palm of your hand – isn’t that just the sweetest idea? This pattern is designed for those who already have basic crochet skills and are ready to create a charming, handmade companion. Get ready to bring a little bit of magic into your world with your very own crocheted pony!
This master class does not contain crochet lessons. It assumes basic crochet skills. Difficulty level – medium. Toy height approximately 14 cm.

Materials and Tools
- Yarnart Jeans yarn – “grey 49”, “white 62”, “brown 70”, “beige 05”, etc. You can choose a different color at your discretion. Cotton or semi-cotton from other brands can also be used. The toy will require less than half a skein + a very small amount of contrasting color for the hooves.
- Acrylic yarn is best suited for the mane and tail; it fluffs up very well, and that’s what I use. I use Pekhorka “children’s novelty” yarn – colors “white 01”, “frez 89”, “grilyazh 173”. Any other brand of acrylic yarn will work.
- Hook – 2 mm
- Filler – padding polyester, synthetic fluff, hollowfiber, etc.
- Bead eyes – 3-4 mm.
- Thread and needle for attaching eyes.
- Stitch markers or thread for marking the beginning of rows and stitches.
- Tailor’s pins – for pre-securing parts.
- Scissors
- Slicker brush – for fluffing up the mane and tail.
Abbreviations
- SC – single crochet
- DEC – (decrease) crochet 2 SC together
- INC – (increase) crochet 2 SC in one stitch
- (12) – the number in parentheses indicates the final number of stitches in the row
Toy Creation Process
In this example, we start with brown yarn, 2 mm hook.
Row 1: 6SC in amigurumi ring (6)
Row 2: 2SC in each stitch (12)
Row 3: 1SC, INC – repeat 6 times (18)
Row 4: 2SC, INC – repeat 6 times (24)
Row 5: 3SC, INC – repeat 6 times (30)
Row 6: 4SC, INC – repeat 6 times (36)
Row 7: crochet SC without changes (36)

Do not break the yarn. Divide the piece in half, 18 stitches each. Fold and close in the center into a “figure-eight” with the right side facing out. Crochet each part separately. Count the beginning of the row from the bridge.

Muzzle
Continue crocheting from the same yarn in a circle:
Row 1: crochet SC without changes (18)
Row 2: 6SC; (DEC – repeat 3 times); 6SC (15)

Rows 3-4: crochet 2 rows of SC without changes (15)
Row 5: 3SC, DEC – repeat 3 times (12)
Row 6: crochet SC without changes (12)
Row 7: DEC – repeat 6 times (6)

Break the yarn. Tighten and close the opening with a needle or hook. Hide the yarn ends.

Neck
Crochet the second part of the “figure-eight”. Join the yarn and start crocheting from the bridge, count the beginning of the row from here:

Rows 1-2: crochet 2 rows of SC without changes (18)

Row 3: 17SC, INC (19)
Row 4: crochet SC without changes (19)
Row 5: 18SC, INC (20)
Row 6: crochet SC without changes (20)
Row 7: 19SC, INC (21)
Next, you need to chain 8 stitches for the back. You can direct the chain from where we stopped (this is the option we will be crocheting) or crochet forward 10 stitches so that the horse’s muzzle faces forward.


Body
Crochet 8 chain stitches:
Row 1: crochet single crochets along one side of the chain (insert hook into the next stitch from the hook), after the chain, move to the neck, single crochet around it, and then single crochet along the second side of the chain (35)

Row 2: INC, 32SC, INC, INC (38)

Row 3: INC, 35SC, INC, INC (41)
Row 4: INC, 38SC, INC, INC (44)
Row 5: INC, 41SC, INC, INC (47)
Rows 6-10: crochet 5 rows of SC without changes (47)


Row 11: 19SC; (INC – repeat 6 times); 17SC; (INC – repeat 5 times) (58)
Row 12: INC, INC, 56SC (60)


Legs
Do not break the yarn; from it, we will crochet the right hind leg. But first, divide the stitches, orienting from the center, place markers. Allocate 12 stitches for each leg (see photo).


After the stitches for the legs are distributed, crochet to the point counted up to the 12th stitch and connect it to the center. Close and crochet the right leg in a circle:

Rows 1-10: crochet 10 rows of 12SC (12)


Cut the yarn, switch to light beige yarn:

Rows 11-12: crochet 2 rows of SC without changes (12)


Next, decrease all stitches in the back loop only:
Row 13: DEC – repeat 6 times (6)

Cut the yarn with a tail, sew up the opening, hide the yarn.


Crochet the remaining legs in the same way.

Left hind leg:


Right front leg:


Left front leg:


Firmly stuff the body and legs. Sew up the remaining opening on the belly, hide the remaining yarn ends.


Ears
Row 1: 6 SC in amigurumi ring (6)
Row 3: 1SC, INC – repeat 3 times (9)

Hide the yarn end remaining from the beginning of the row into the fabric. Fold the ears, pinch them, and sew them from the bottom, see photo.


Finishing and Assembly
Sew on the ears, first securing them with pins.

Sew on the bead eyes. The distance between the eyes is approximately 4 stitches. When sewing on the eyes, slightly indent them by pulling the thread a little.


For the mane, cut yarn approximately 15 cm long; for the tail, approximately 12 cm long. Density is as you wish; I don’t make it very dense because after I split the yarn, the mane and tail will become very fluffy.

Tie the tail strands together in the center with a longer piece of yarn. We will use this same yarn to sew on the tail.


Fit and sew on the tail. Trim the length slightly with scissors if needed.


Attach the mane with a hook. To do this, fold the yarn in half and pull it through the stitches along the center of the head and neck with a hook. Pull the free ends of the yarn through the loop created, tighten well (see photo).


Three attachment points per row are sufficient. Start from the ears and end approximately in the middle of the neck, ensure the mane runs symmetrically along the center.


Next, if you have the patience, you need to split each strand of the mane and tail into three constituent threads. To do this, untwist the yarn, use a needle to pick apart and separate the main strand. This will create a wavy, airy, and voluminous mane. However, keep in mind that in this state, the yarn tears easily, and the toy will require gentle handling.


Carefully brush the ends with a slicker brush; the mane and tail will become like a cloud.


The pony is ready! Thank you for your attention!


We hope you enjoyed crafting your very own Pony in the Palm! We love seeing your unique creations, so be sure to share your finished pony with us on social media by tagging @Crochetto. Your creativity inspires our community! For more delightful and easy-to-follow Find Amazing Free Crochet Patterns on Crochetto.