Crochet Adorable Mochi Bunny: Free Pattern
Materials You’ll Need
- Yarn: We used Art Jean & Susan yarn, but any yarn weight can work! Just be aware that changing yarn might mean you need to adjust your hook size, and the size of your safety eyes and nose.
- Hook: 2mm (adjust if using different yarn weight)
- Safety Eyes: Oval, 10×7 mm
- Safety Nose: 10 mm – pink
- Stuffing: Polyester fiberfill
- Tools: Yarn needle, scissors, pins
Abbreviations
- MR: Magic Ring
- sc: Single Crochet
- dc: Double Crochet
- hdc: Half Double Crochet
- sl st: Slip Stitch
- ch: Chain
- dec: Decrease (invisible decrease recommended)
- inc: Increase (2 sc in one stitch)
- hdc-inc: Half Double Crochet Increase (2 hdc in one stitch)
- dc-inc: Double Crochet Increase (2 dc in one stitch)
Important Notes:
- For a neater look, we recommend using invisible decreases throughout the pattern.
- Stuff as you go! Pay attention to the instructions for each part to ensure your bunny is firmly but evenly stuffed.

Gather your yarn and hook, ready to start!
Let’s Start Crocheting!
Ears (Make 2)
We’ll start by making two identical ears for our bunny.
Row 1: 7 sc in MR (7 stitches)
Row 2: 7 sc (7 stitches)
Row 3: 7 inc (14 stitches)
Row 4: 14 sc (14 stitches)
Row 5: (1 sc, inc) x 7 (21 stitches)
Row 6: 21 sc (21 stitches)
Row 7: (6 sc, inc) x 3 (24 stitches)
Row 8: (7 sc, inc) x 3 (27 stitches)
Row 9: 27 sc (27 stitches)
Row 10: (8 sc, inc) x 3 (30 stitches)
Row 11-14: 30 sc (30 stitches) – 4 rows
Row 15: (8 sc, dec) x 3 (27 stitches)
Row 16-17: 27 sc (27 stitches) – 2 rows
Row 18: (7 sc, dec) x 3 (24 stitches)
Row 19-20: 24 sc (24 stitches) – 2 rows
Row 21: (6 sc, dec) x 3 (21 stitches)
Row 22-23: 21 sc (21 stitches) – 2 rows
Cut the yarn, leaving a long tail for sewing. Fold the two edges of the ear together and make a few stitches to close the opening. Then, take another stitch to connect both folded edges, giving the ear a lovely “folded” shape.

A beautifully shaped ear, ready to be attached.
Cheeks (Make 2)
These small rounds will add adorable puffiness to your bunny’s face.
Row 1: 7 sc in MR (7 stitches)
Row 2: 7 inc (14 stitches)
Cut the yarn, leaving a long tail for sewing. You’ll use this tail to attach the cheeks later.
Head
Now for the main part – the head!
Row 1: 8 sc in MR (8 stitches)
Row 2: 8 inc (16 stitches)
Row 3: (1 sc, inc) x 8 (24 stitches)
Row 4: (2 sc, inc) x 8 (32 stitches)
Row 5: (7 sc, inc) x 4 (36 stitches)
Row 6: (5 sc, inc) x 6 (42 stitches)
Row 7: (6 sc, inc) x 6 (48 stitches)
Row 8: (7 sc, inc) x 6 (54 stitches)
Row 9: (8 sc, inc) x 6 (60 stitches)
Row 10: (9 sc, inc) x 6 (66 stitches)
Row 11-12: 66 sc (66 stitches) – 2 rows
Row 13: (21 sc, inc) x 3 (69 stitches)
Row 14: 69 sc (69 stitches)
Row 15: (22 sc, inc) x 3 (72 stitches)
Row 16-20: 72 sc (72 stitches) – 5 rows
Row 21: (23 sc, inc) x 3 (75 stitches)
Row 22: 75 sc (75 stitches)
Row 23: (23 sc, dec) x 3 (72 stitches)
Row 24: (10 sc, dec) x 6 (66 stitches)
Row 25: (9 sc, dec) x 6 (60 stitches)
Row 26: (8 sc, dec) x 6 (54 stitches)
Row 27: (7 sc, dec) x 6 (48 stitches)
Row 28: (6 sc, dec) x 6 (42 stitches)
Row 29: In back loops only! (5 sc, dec) x 6 (36 stitches)
Row 30: (4 sc, dec) x 6 (30 stitches)
Row 31: 30 sc (30 stitches)

Your head should be taking shape beautifully!
Cut the yarn, leaving a long tail for sewing. Now it’s time to bring your bunny’s face to life!
- Eyes: Place the safety eyes between Rows 16 and 17, with 8 stitches apart. Secure them firmly.
- Nose & Mouth: Insert the safety nose, and then embroider a cute mouth line underneath it using pink thread.
- Stuffing: Firmly stuff the head with fiberfill.
- Ears: Sew the ears you made earlier between Rows 3 and 7 on the head.
- Cheeks: Sew the cheeks near the eyes, adding to the bunny’s adorable expression.

The head with facial features added, almost ready for attachment.
Arms (Make 2)
Let’s create the tiny arms for our Mochi Bunny.
Row 1: 6 sc in MR (6 stitches)
Row 2: 6 inc (12 stitches)
Row 3-4: 12 sc (12 stitches) – 2 rows
Row 5: (1 sc, dec) x 4 (8 stitches)
Row 6: In back loops only! 8 inc (16 stitches)
Row 7-9: 16 sc (16 stitches) – 3 rows
Row 10: 8 dec (8 stitches)
Row 11-16: 8 sc (8 stitches) – 6 rows
Fold the edges of each arm together flat. Crochet 4 sc through both layers to close the opening. Cut the yarn and weave in the tail inside the piece to hide it.
Legs and Body
This is where we’ll build the main body of our bunny, starting with the legs.
Legs (Make 2)
Row 1: 8 sc in MR (8 stitches)
Row 2: 8 inc (16 stitches)
Row 3: (1 sc, inc) x 8 (24 stitches)
Row 4-7: 24 sc (24 stitches) – 4 rows
Row 8: 8 sc, 4 dec, 8 sc (20 stitches)
Row 9: 8 sc, 2 dec, 8 sc (18 stitches)
Row 10-13: 18 sc (18 stitches) – 4 rows
For the first leg, cut the yarn and hide the tail. Stuff the leg firmly.
For the second leg, repeat Rows 1-13, but do not cut the yarn! We will continue from here to join the legs and form the body. Remember to stuff the legs as you go.

The two legs joined to begin the body.
Joining Legs and Crocheting Body
You’ve finished the second leg and still have your hook in the loop. Now, we connect the legs:
Chain 3 (3 ch). Connect this chain to the first leg by making a sl st into any stitch on the first leg to bridge the gap. Then, sc into the next stitch on the first leg to begin working around it.
Mark the first stitch of this new Row 14; this will be your new beginning of the round.
Row 14: 18 sc on the first leg, 3 sc into the chain stitches, 18 sc on the second leg, 3 sc into the other side of the chain stitches (42 stitches total around both legs and chain)
Row 15: (6 sc, inc) x 6 (48 stitches)
Row 16: (7 sc, inc) x 6 (54 stitches)
Row 17-21: 54 sc (54 stitches) – 5 rows
Row 22: (7 sc, dec) x 6 (48 stitches)
Row 23: 48 sc (48 stitches)
Row 24: (6 sc, dec) x 6 (42 stitches)
Row 25: 42 sc (42 stitches)
Row 26: (5 sc, dec) x 6 (36 stitches)
Row 27-29: 36 sc (36 stitches) – 3 rows
Row 30: In back loops only! (4 sc, dec) x 6 (30 stitches)
Row 31-32: 30 sc (30 stitches) – 2 rows
Attaching Arms to Body
In the next row, we will crochet the arms directly into the body. Make sure the arms are positioned neatly on the sides of the body before you begin stitching them in. You might need to adjust your stitch count slightly to center them.
Row 33: 7 sc, then work 4 sc through both the body and the first arm (this attaches the arm), 11 sc, then work 4 sc through both the body and the second arm (attaching the second arm), 4 sc (30 stitches total around the body and arms)
Row 34: 34 sc (34 stitches)
Cut the yarn and leave a long tail for sewing. Finish stuffing the body firmly. Use the long tail to sew the head to the body securely.

The body with arms attached, almost ready for its skirt!
Skirt
Let’s add a cute skirt! We’ll start crocheting from Row 30 of the body, where you worked in the back loops only. This creates a ridge for us to attach the skirt.
Attach your yarn to a back loop in the center back of Row 30 on the body.
Row 1: 30 sc (working into the front loops left from Row 30 of the body) (30 stitches)
Row 2: (2 sc, inc) x 10 (40 stitches)
Row 3-5: 40 sc (40 stitches) – 3 rows
Row 6: (3 sc, inc) x 10 (50 stitches)
Row 7-12: 50 sc (50 stitches) – 6 rows
Row 13: 50 inc (100 stitches)
Row 14-16: 100 sc (100 stitches) – 3 rows
Cut the yarn and fasten off. Weave in any loose ends.
Skirt Straps (Make 2)
These straps will hold up your bunny’s adorable skirt.
Chain 14 (14 ch). Now, working from the second chain from your hook, we’ll crochet in rows (turning after each row).
Row 1: 1 sc, 3 hdc-inc, 3 dc-inc, 3 hdc-inc, 2 sc. Chain 1 (1 ch), then turn. (21 stitches)
Row 2: 2 sc, (1 hdc, 1 hdc-inc) x 3, (1 dc, 1 dc-inc) x 3, (1 hdc, 1 hdc-inc) x 3, 1 sc (30 stitches)
Cut the yarn, leaving a long tail for sewing. Use these tails to sew the straps onto the skirt and body, creating the look of overall straps.

Your Mochi Bunny is complete and ready for cuddles!
Congratulations, your Mochi Bunny is ready to bring joy!
Pattern by @conngauuhandmade
Translated by the community: amigurumi pantry
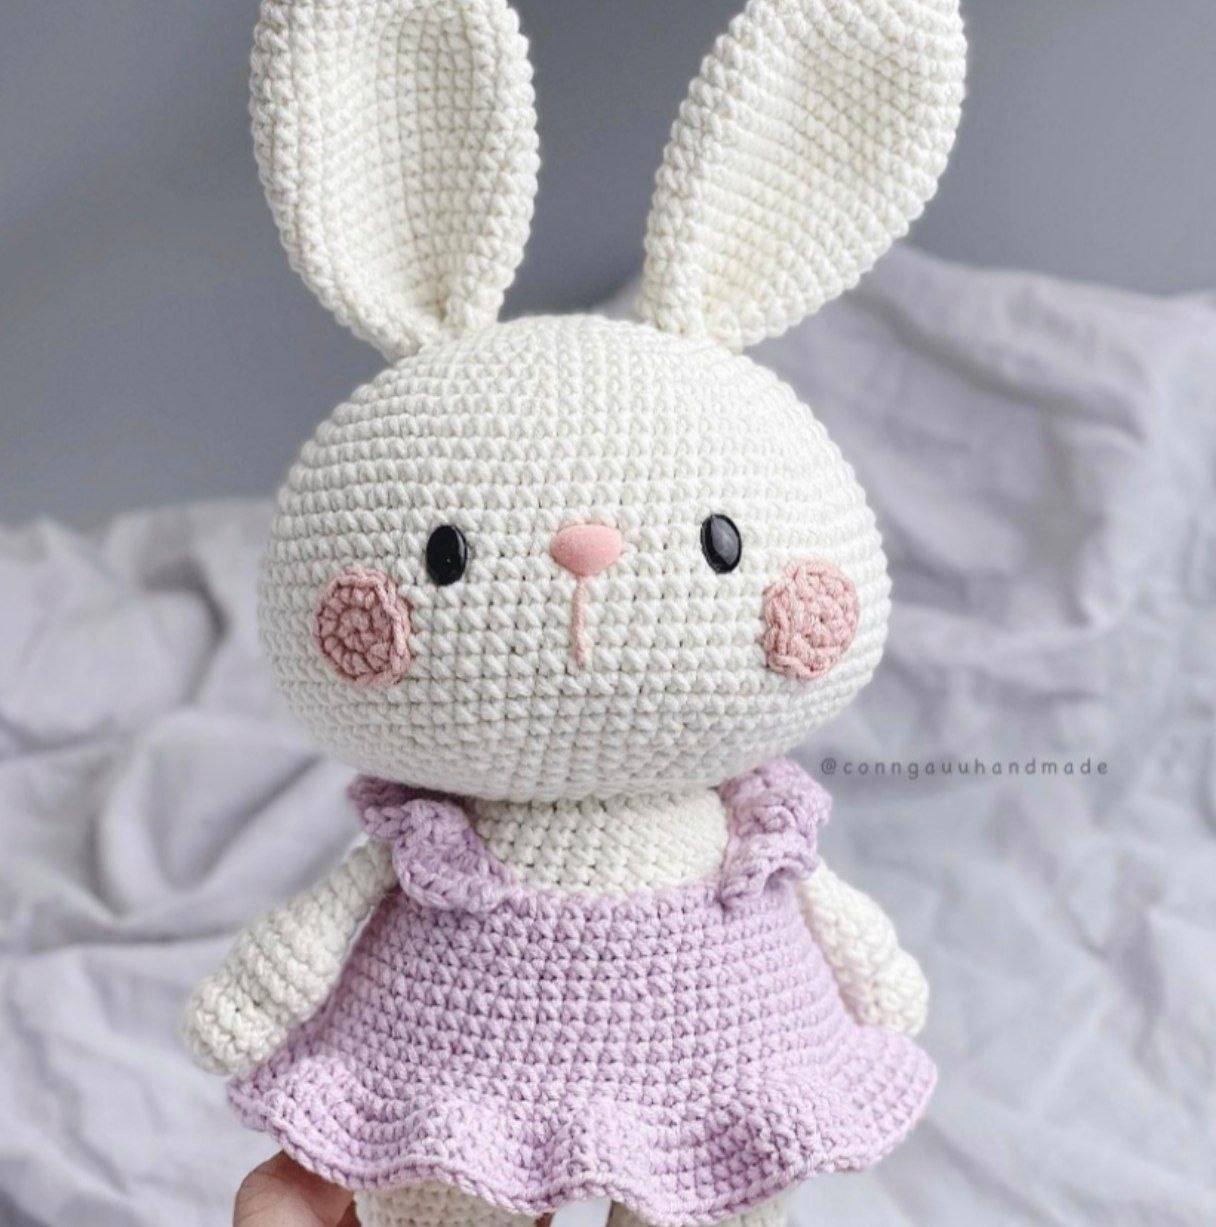
Get ready to crochet the cutest Mochi Bunny! This pattern is designed to be super easy to follow, perfect for creating a charming companion. Let’s gather our supplies and start stitching!

Your finished Mochi Bunny will look something like this!
Materials You’ll Need
- Yarn: We used Art Jean & Susan yarn, but any yarn weight can work! Just be aware that changing yarn might mean you need to adjust your hook size, and the size of your safety eyes and nose.
- Hook: 2mm (adjust if using different yarn weight)
- Safety Eyes: Oval, 10×7 mm
- Safety Nose: 10 mm – pink
- Stuffing: Polyester fiberfill
- Tools: Yarn needle, scissors, pins
Abbreviations
- MR: Magic Ring
- sc: Single Crochet
- dc: Double Crochet
- hdc: Half Double Crochet
- sl st: Slip Stitch
- ch: Chain
- dec: Decrease (invisible decrease recommended)
- inc: Increase (2 sc in one stitch)
- hdc-inc: Half Double Crochet Increase (2 hdc in one stitch)
- dc-inc: Double Crochet Increase (2 dc in one stitch)
Important Notes:
- For a neater look, we recommend using invisible decreases throughout the pattern.
- Stuff as you go! Pay attention to the instructions for each part to ensure your bunny is firmly but evenly stuffed.
Gather your yarn and hook, ready to start!
Let’s Start Crocheting!
Ears (Make 2)
We’ll start by making two identical ears for our bunny.
Row 1: 7 sc in MR (7 stitches)
Row 2: 7 sc (7 stitches)
Row 3: 7 inc (14 stitches)
Row 4: 14 sc (14 stitches)
Row 5: (1 sc, inc) x 7 (21 stitches)
Row 6: 21 sc (21 stitches)
Row 7: (6 sc, inc) x 3 (24 stitches)
Row 8: (7 sc, inc) x 3 (27 stitches)
Row 9: 27 sc (27 stitches)
Row 10: (8 sc, inc) x 3 (30 stitches)
Row 11-14: 30 sc (30 stitches) – 4 rows
Row 15: (8 sc, dec) x 3 (27 stitches)
Row 16-17: 27 sc (27 stitches) – 2 rows
Row 18: (7 sc, dec) x 3 (24 stitches)
Row 19-20: 24 sc (24 stitches) – 2 rows
Row 21: (6 sc, dec) x 3 (21 stitches)
Row 22-23: 21 sc (21 stitches) – 2 rows
Cut the yarn, leaving a long tail for sewing. Fold the two edges of the ear together and make a few stitches to close the opening. Then, take another stitch to connect both folded edges, giving the ear a lovely “folded” shape.
A beautifully shaped ear, ready to be attached.
Cheeks (Make 2)
These small rounds will add adorable puffiness to your bunny’s face.
Row 1: 7 sc in MR (7 stitches)
Row 2: 7 inc (14 stitches)
Cut the yarn, leaving a long tail for sewing. You’ll use this tail to attach the cheeks later.
Head
Now for the main part – the head!
Row 1: 8 sc in MR (8 stitches)
Row 2: 8 inc (16 stitches)
Row 3: (1 sc, inc) x 8 (24 stitches)
Row 4: (2 sc, inc) x 8 (32 stitches)
Row 5: (7 sc, inc) x 4 (36 stitches)
Row 6: (5 sc, inc) x 6 (42 stitches)
Row 7: (6 sc, inc) x 6 (48 stitches)
Row 8: (7 sc, inc) x 6 (54 stitches)
Row 9: (8 sc, inc) x 6 (60 stitches)
Row 10: (9 sc, inc) x 6 (66 stitches)
Row 11-12: 66 sc (66 stitches) – 2 rows
Row 13: (21 sc, inc) x 3 (69 stitches)
Row 14: 69 sc (69 stitches)
Row 15: (22 sc, inc) x 3 (72 stitches)
Row 16-20: 72 sc (72 stitches) – 5 rows
Row 21: (23 sc, inc) x 3 (75 stitches)
Row 22: 75 sc (75 stitches)
Row 23: (23 sc, dec) x 3 (72 stitches)
Row 24: (10 sc, dec) x 6 (66 stitches)
Row 25: (9 sc, dec) x 6 (60 stitches)
Row 26: (8 sc, dec) x 6 (54 stitches)
Row 27: (7 sc, dec) x 6 (48 stitches)
Row 28: (6 sc, dec) x 6 (42 stitches)
Row 29: In back loops only! (5 sc, dec) x 6 (36 stitches)
Row 30: (4 sc, dec) x 6 (30 stitches)
Row 31: 30 sc (30 stitches)
Your head should be taking shape beautifully!
Cut the yarn, leaving a long tail for sewing. Now it’s time to bring your bunny’s face to life!
- Eyes: Place the safety eyes between Rows 16 and 17, with 8 stitches apart. Secure them firmly.
- Nose & Mouth: Insert the safety nose, and then embroider a cute mouth line underneath it using pink thread.
- Stuffing: Firmly stuff the head with fiberfill.
- Ears: Sew the ears you made earlier between Rows 3 and 7 on the head.
- Cheeks: Sew the cheeks near the eyes, adding to the bunny’s adorable expression.
The head with facial features added, almost ready for attachment.
Arms (Make 2)
Let’s create the tiny arms for our Mochi Bunny.
Row 1: 6 sc in MR (6 stitches)
Row 2: 6 inc (12 stitches)
Row 3-4: 12 sc (12 stitches) – 2 rows
Row 5: (1 sc, dec) x 4 (8 stitches)
Row 6: In back loops only! 8 inc (16 stitches)
Row 7-9: 16 sc (16 stitches) – 3 rows
Row 10: 8 dec (8 stitches)
Row 11-16: 8 sc (8 stitches) – 6 rows
Fold the edges of each arm together flat. Crochet 4 sc through both layers to close the opening. Cut the yarn and weave in the tail inside the piece to hide it.
Legs and Body
This is where we’ll build the main body of our bunny, starting with the legs.
Legs (Make 2)
Row 1: 8 sc in MR (8 stitches)
Row 2: 8 inc (16 stitches)
Row 3: (1 sc, inc) x 8 (24 stitches)
Row 4-7: 24 sc (24 stitches) – 4 rows
Row 8: 8 sc, 4 dec, 8 sc (20 stitches)
Row 9: 8 sc, 2 dec, 8 sc (18 stitches)
Row 10-13: 18 sc (18 stitches) – 4 rows
For the first leg, cut the yarn and hide the tail. Stuff the leg firmly.
For the second leg, repeat Rows 1-13, but do not cut the yarn! We will continue from here to join the legs and form the body. Remember to stuff the legs as you go.
The two legs joined to begin the body.
Joining Legs and Crocheting Body
You’ve finished the second leg and still have your hook in the loop. Now, we connect the legs:
Chain 3 (3 ch). Connect this chain to the first leg by making a sl st into any stitch on the first leg to bridge the gap. Then, sc into the next stitch on the first leg to begin working around it.
Mark the first stitch of this new Row 14; this will be your new beginning of the round.
Row 14: 18 sc on the first leg, 3 sc into the chain stitches, 18 sc on the second leg, 3 sc into the other side of the chain stitches (42 stitches total around both legs and chain)
Row 15: (6 sc, inc) x 6 (48 stitches)
Row 16: (7 sc, inc) x 6 (54 stitches)
Row 17-21: 54 sc (54 stitches) – 5 rows
Row 22: (7 sc, dec) x 6 (48 stitches)
Row 23: 48 sc (48 stitches)
Row 24: (6 sc, dec) x 6 (42 stitches)
Row 25: 42 sc (42 stitches)
Row 26: (5 sc, dec) x 6 (36 stitches)
Row 27-29: 36 sc (36 stitches) – 3 rows
Row 30: In back loops only! (4 sc, dec) x 6 (30 stitches)
Row 31-32: 30 sc (30 stitches) – 2 rows
Attaching Arms to Body
In the next row, we will crochet the arms directly into the body. Make sure the arms are positioned neatly on the sides of the body before you begin stitching them in. You might need to adjust your stitch count slightly to center them.
Row 33: 7 sc, then work 4 sc through both the body and the first arm (this attaches the arm), 11 sc, then work 4 sc through both the body and the second arm (attaching the second arm), 4 sc (30 stitches total around the body and arms)
Row 34: 34 sc (34 stitches)
Cut the yarn and leave a long tail for sewing. Finish stuffing the body firmly. Use the long tail to sew the head to the body securely.
The body with arms attached, almost ready for its skirt!
Skirt
Let’s add a cute skirt! We’ll start crocheting from Row 30 of the body, where you worked in the back loops only. This creates a ridge for us to attach the skirt.
Attach your yarn to a back loop in the center back of Row 30 on the body.
Row 1: 30 sc (working into the front loops left from Row 30 of the body) (30 stitches)
Row 2: (2 sc, inc) x 10 (40 stitches)
Row 3-5: 40 sc (40 stitches) – 3 rows
Row 6: (3 sc, inc) x 10 (50 stitches)
Row 7-12: 50 sc (50 stitches) – 6 rows
Row 13: 50 inc (100 stitches)
Row 14-16: 100 sc (100 stitches) – 3 rows
Cut the yarn and fasten off. Weave in any loose ends.
Skirt Straps (Make 2)
These straps will hold up your bunny’s adorable skirt.
Chain 14 (14 ch). Now, working from the second chain from your hook, we’ll crochet in rows (turning after each row).
Row 1: 1 sc, 3 hdc-inc, 3 dc-inc, 3 hdc-inc, 2 sc. Chain 1 (1 ch), then turn. (21 stitches)
Row 2: 2 sc, (1 hdc, 1 hdc-inc) x 3, (1 dc, 1 dc-inc) x 3, (1 hdc, 1 hdc-inc) x 3, 1 sc (30 stitches)
Cut the yarn, leaving a long tail for sewing. Use these tails to sew the straps onto the skirt and body, creating the look of overall straps.
Your Mochi Bunny is complete and ready for cuddles!
Congratulations, your Mochi Bunny is ready to bring joy!
Pattern by @conngauuhandmade
Translated by the community: amigurumi pantry