Add Whimsy: Free Crochet Butterfly Amigurumi
Crochet Butterfly Amigurumi: A Free Pattern Addition to Your Zaika Zlata Bunny

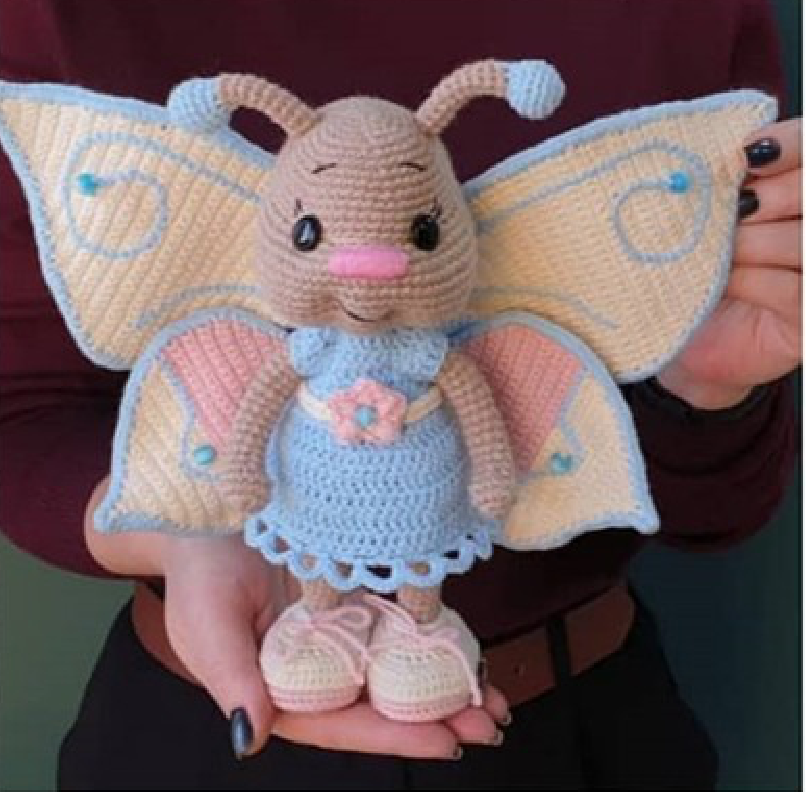
Welcome, fellow crochet enthusiasts, to another delightful pattern from Crochetto! We know how much you love adding charming details to your amigurumi creations, and today we’re thrilled to share a fantastic accessory that will bring a touch of whimsy to your beloved Zaika Zlata Bunny or any other cherished toy. This free pattern, originally designed by Buba.Toy as an addition to Tatyana Makarova’s “Zaika Zlata” (Goldie the Bunny), guides you through crocheting beautiful butterflies, complete with delicate antennae and adorable boots. Get ready to dive into these detailed instructions and create something truly special. As professional SEO crochet patterns, we ensure every step is clear, easy to follow, and crafted with your creative journey in mind!
Antennae (Make 2)
The body, head, arms, and legs are crocheted according to Tatyana Makarova’s “Zaika Zlata” (Goldie the Bunny) pattern.
- 6 sc in MR
- 6 inc (12)
- (1 sc, inc)*6 (18)
- 4-5) 18 sc
- (1 sc, dec)*6 (12)
- 6 dec (6)
Change color to main color
- 8-17) (10 rows) 6 sc
Leave a tail for sewing. Insert wire inside. I don’t attach the wire to the head; I just insert the tips into the stuffed head and sew the antennae to the head.
Boots (Make 2)
Sole
- Chain 9: starting from the 2nd chain from the hook, 7 sc, 3 sc in one stitch, on the other side: 6 sc, inc (18)
- 2 inc, 4 sc, 5 inc, 4 sc, 3 inc (28)
- (1 sc, inc)*2, 4 sc, (1 sc, inc)*5, 4 sc, (1 sc, inc)*3 (38)
- (2 sc, inc)*2, 4 sc, (2 sc, inc)*5, 4 sc, (2 sc, inc)*3 (48)
- 48 sc
The boot sole is ready. The soles should be steamed with an iron (through a cloth).
To make the transition from the sole to the sides of the boot at a right angle, row 6 (48 sc) is worked into the posts (not into the loops).
Then, continue crocheting in the usual way, into the loops of the previous row, for rows 7 and 8 without changes (48 sc).
Insert insoles and a weight (optional). You can also glue a wire frame to the insole.
- (6 sc, dec)*6 (42)
- 10 sc, 9 dec in BLO, 14 sc (33)
- (9 sc, dec)*3 (30)
- 7 sc, 6 dec, 11 sc (24)
Boot finished, start crocheting the leg in gray
- in BLO (2 sc, dec)*6 (18)
Then crochet according to the diagram (from row 13 of the diagram).
Along the front loops of row 13, work slip stitches (sl st) to form the edge of the boot.
Wings
Center
- 6 sc in MR
- 6 inc (12)
- (1 sc, 1 inc)*6 (18)
Continue crocheting
1st Upper Wing
At the end of each row, ch 1 (turning chain)
- 3 sc
- 1 inc, 1 sc, 1 inc (5)
- 1 inc, 3 sc, 1 inc (7)
- 6 sc, 1 inc (8)
- 1 inc, 7 sc (9)
- 8 sc, 1 inc (10)
- 1 inc, 9 sc (11)
- 10 sc, 1 inc (12)
- 1 inc, 11 sc (13)
- 1 inc, 11 sc, 1 inc (15)
- 1 inc, 14 sc (16)
- 16 sc
- 1 inc, 15 sc (17)
- 16 sc, 1 inc (18)
- 1 inc, 17 sc (19)
- 18 sc, 1 inc (20)
- 1 inc, 19 sc (21)
- 20 sc, 1 inc (22)
- 1 inc, 21 sc (23)
- 22 sc, 1 inc (24)
- 1 inc, 23 sc (25)
- 24 sc, 1 inc (26)
- 23-29) (7 rows) 26 sc
- 30) 24 sc, 1 dec (25)
- 31) 25 sc
- 32) 23 sc, 1 dec (24)
- 33) 1 dec, 20 sc, 1 dec (22)
- 34) 20 sc, 1 dec (21)
- 35) 1 dec, 19 sc (20)
- 36) 20 sc
- 37) 1 dec, 18 sc (19)
- 38) 17 sc, 1 dec (18)
- 39) 1 dec, 14 sc, 1 dec (16)
- 14 sc, 1 dec (15)
- 1 dec, 13 sc (14)
- 12 sc, 1 dec (13)
- 1 dec, 11 sc (12)
- 1 dec, 8 sc, 1 dec (10)
- 1 dec, 8 sc (9)
- 7 sc, 1 dec (8)
- 1 dec, 6 sc (7)
- 1 dec, 3 sc, 1 dec (5)
- 1 dec, 3 sc (4)
- 2 dec (2)
- 1 dec
Fasten off, cut yarn
2nd Upper Wing
Count 5 stitches ALONG THE DIRECTION OF CROCHETING and from the WRONG SIDE attach yarn in the 5th stitch.
- Ch 1, 1 sc in the same stitch, then crochet 2 sc (3)
Row 2 and further are crocheted according to the description of the 1st wing (they should be mirror images).
There should be 2 stitches left between the upper wings.
1st Lower Wing
From the 2nd upper wing, count 2 stitches from the WRONG SIDE, in the third stitch, attach yarn.
- Ch 1, 1 sc in the same stitch, then crochet 1 sc (2)
- 2 inc (4)
- 1 inc, 2 sc, 1 inc (6)
- 1 inc, 4 sc, 1 inc (8)
- 1 inc, 6 sc, 1 inc (10)
- 1 inc, 8 sc, 1 inc (12)
- 1 inc, 10 sc, 1 inc (14)
- 1 inc, 12 sc, 1 inc (16)
- 1 inc, 14 sc, 1 inc (18)
- 1 inc, 16 sc, 1 inc (20)
- 1 inc, 18 sc, 1 inc (22)
- 1 inc, 20 sc, 1 inc (24)
- 1 inc, 22 sc, 1 inc (26)
- 14-20) (7 rows) 26 sc
- 21) 1 dec, 22 sc, 1 dec (24)
- 22) 1 dec, 20 sc, 1 dec (22)
- 23) 1 dec, 18 sc, 1 dec (20)
- 24) 1 dec, 16 sc, 1 dec (18)
- 18 sc
- 1 dec, 14 sc, 1 dec (16)
- 1 dec, 12 sc, 1 dec (14)
- 1 dec, 10 sc, 1 dec (12)
- 1 dec, 8 sc, 1 dec (10)
- 1 dec, 6 sc, 1 dec (8)
- 31) 18 sc
- 1 dec, 4 sc, 1 dec (6)
- 1 dec, 2 sc, 1 dec (4)
- 2 dec (2)
- 1 dec
Fasten off, cut yarn
2nd Lower Wing
From the first upper wing, count two stitches, join yarn in the third stitch.
- Ch 1, 1 sc in the same stitch, then crochet 1 sc (2)
Row 2 and further are crocheted according to the description of the 3rd wing (they should be mirror images).
Edging of the Wings
Starting from the crocheted center that connects the wings, edge the wings with single crochets (sc).
When edging, crochet wire along the contour. When starting and finishing the edging, leave small ends (a few cm) of wire for reinforcing the center.
After all parts have been edged, bring both wire ends out from the wrong side of the center and twist them into spirals (they need to lie as flat as possible on the center in one layer and be invisible from the right side).
Then carefully sew the wire to the center.
After you have dressed your butterflies, you can sew the wings by the reinforced center. I sew the wings at the very end, stitching through the entire toy (without catching the front part of the clothing).
We hope you enjoyed crafting these adorable butterfly additions! They’re perfect for personalizing your amigurumi collection and adding a whimsical touch to any project. Don’t forget to share your finished butterflies with us on social media—we love seeing your creative interpretations! Happy crocheting, and keep an eye out for more delightful and professional SEO crochet patterns from Crochetto.
Find Amazing Free Crochet Patterns on Crochetto.