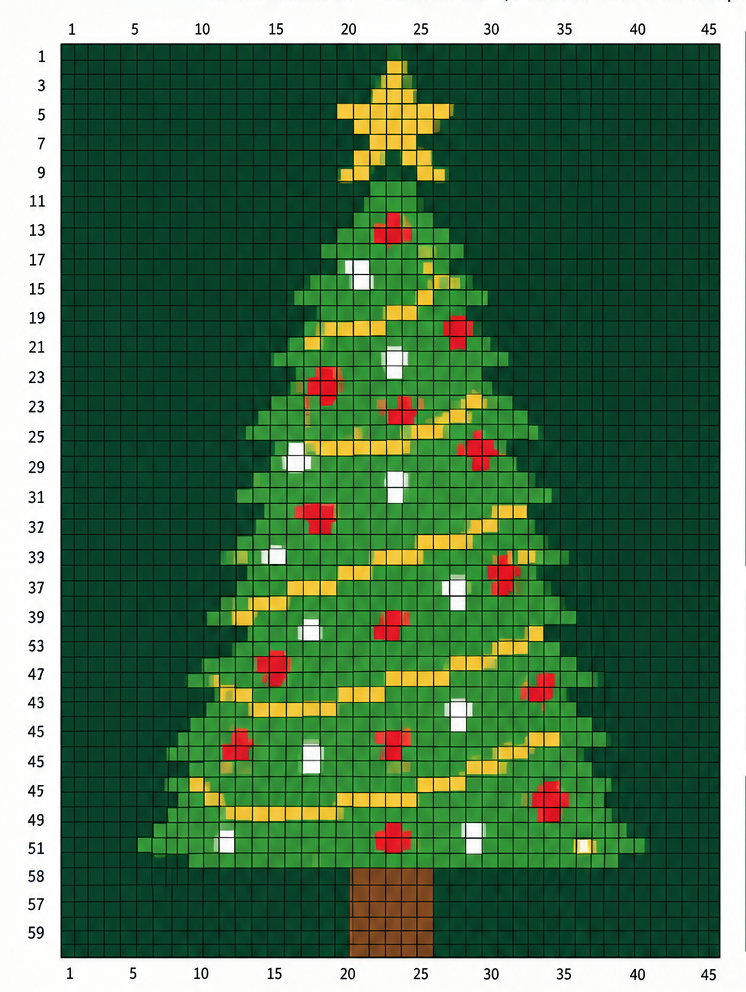
Christmas Tree Tapestry Crochet Pattern
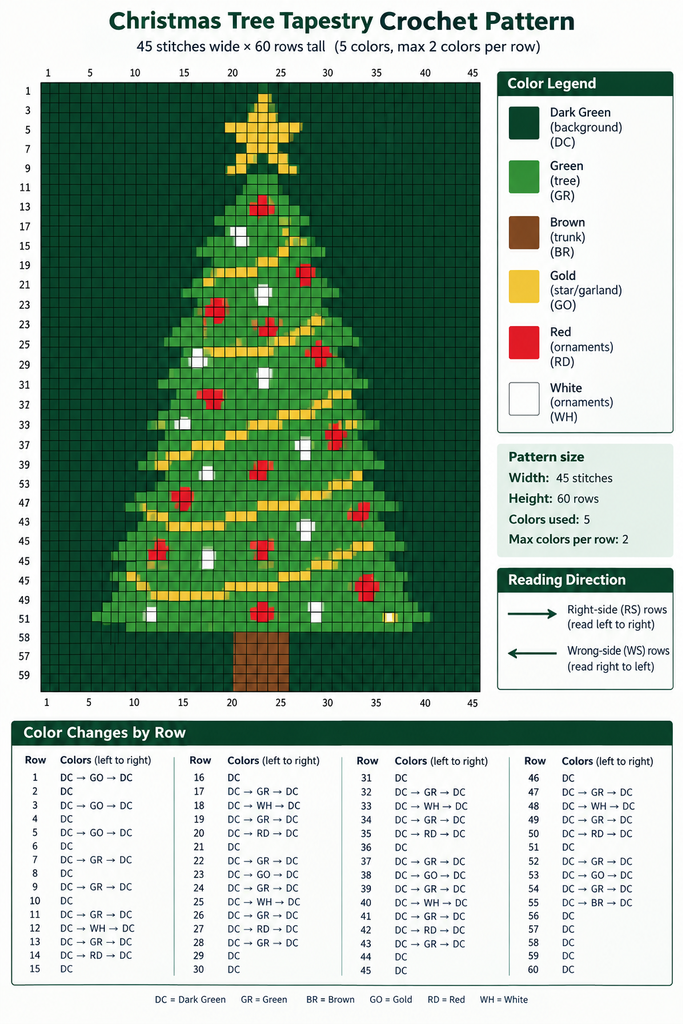
Create a festive Christmas tree using this 45-stitch-wide × 60-row-tall tapestry crochet chart. The design features a decorated Christmas tree, golden star, colorful ornaments, garland, and a brown tree trunk on a dark green background.
Pattern Details
- Width: 45 stitches
- Height: 60 rows
- Stitch: Single crochet (SC)
- Technique: Tapestry crochet
- Shape: Christmas tree
- Difficulty: Intermediate
- Finished design: 45 × 60 stitches
Colors
The chart uses the following colors:
| Code | Color | Used for |
|---|---|---|
| DC | Dark Green | Background |
| GR | Green | Christmas tree |
| BR | Brown | Tree trunk |
| GO | Gold | Star and garland |
| RD | Red | Ornaments |
| WH | White | Ornaments |
Important: The supplied chart actually contains six colors, despite the graphic stating five.
How to Read the Pattern
Each square represents one single crochet stitch.
Read the chart from bottom to top if you are constructing the tree from its base, or follow the numbered rows shown on the chart.
For each row:
- Make the indicated number of single crochet stitches.
- Change color where the chart changes color.
- Carry the unused yarn inside the stitches when appropriate.
- Keep your stitches fairly even so the Christmas tree maintains its shape.
- Follow the grid rather than trying to enlarge or shrink the tree manually.
Color abbreviations
- DC = Dark Green
- GR = Green
- BR = Brown
- GO = Gold
- RD = Red
- WH = White
Step-by-Step Construction
Rows 1–10: Christmas Star
Begin with the dark green background.
The first section creates the gold star at the top of the Christmas tree.
Work across each row in single crochet, changing between Dark Green (DC) and Gold (GO) according to the chart.
The star gradually widens toward its center and then narrows again, creating the five-pointed star shape.
Pay particular attention to the center of the star because the gold stitches are surrounded by the dark green background.
Rows 11–20: Top of the Tree
The Christmas tree begins below the star.
Switch between:
- DC: background
- GR: tree
- GO: decorative garland
- RD: red ornament
- WH: white ornament
The green tree begins as a narrow point and gradually becomes wider as you work downward.
Add the ornaments exactly where they appear in the chart.
Rows 21–30: Upper Tree Branches
Continue working in single crochet.
The tree becomes noticeably wider in this section.
You will begin seeing:
- Green branches
- Red ornaments
- White ornaments
- Gold garland
- Dark green background
When changing colors, make the final yarn-over of the previous stitch with the new color. This keeps the color transitions cleaner.
Garland
The gold stitches form a diagonal garland that travels across the branches.
Follow the chart carefully because the position of the gold stitches moves from row to row.
Rows 31–40: Middle of the Tree
Continue following the 45-stitch grid.
The branches become wider toward both sides while the dark green background remains visible around the tree.
This section contains several decorative elements:
- GR: main tree
- GO: garland
- RD: ornaments
- WH: ornaments
The ornaments are small blocks of contrasting color, so count carefully rather than relying only on the overall shape.
Rows 41–54: Lower Tree
The tree reaches its widest point in this section.
Continue working each row across all 45 stitches.
The green area expands toward the edges while the dark green background becomes narrower.
Continue placing:
- Gold garland
- Red ornaments
- White ornaments
according to the chart.
By the final tree rows, the branches form a broad triangular silhouette.
Rows 55–60: Tree Trunk
The final six rows create the brown trunk.
Work:
20 DC → 5 BR → 20 DC
for each of the six trunk rows.
So each row contains:
- 20 Dark Green stitches
- 5 Brown stitches
- 20 Dark Green stitches
Total:
45 stitches
The five brown stitches form the center of the trunk.
Finishing
After completing Row 60:
- Fasten off.
- Leave a yarn tail for weaving.
- Weave in all loose ends on the wrong side.
- Gently straighten the piece.
- Block if necessary.
For tapestry crochet, blocking can help the grid become more rectangular and make the Christmas tree design easier to see.
Tips for a Clean Tapestry Crochet Design
Keep your tension consistent
Because this is a pixel-style design, uneven tension can distort the tree.
Change colors neatly
When you are one stitch away from a color change, use the new color for the final yarn-over of the preceding stitch.
Don’t pull carried yarn too tightly
If you carry yarn behind your stitches, leave enough slack for the fabric to remain flexible. Tight floats can cause the tree to pucker.
Count frequently
Because the design is only 45 stitches wide, one misplaced stitch can noticeably alter the symmetry of the tree.
A useful habit is to count your stitches at the end of every row.
Quick Pattern Summary
Foundation: 45 stitches
Rows 1–54: Follow the Christmas tree chart, changing colors according to each square.
Rows 55–60:
20 DC, 5 BR, 20 DC
Repeat for 6 rows.
Finished size: 45 stitches × 60 rows.