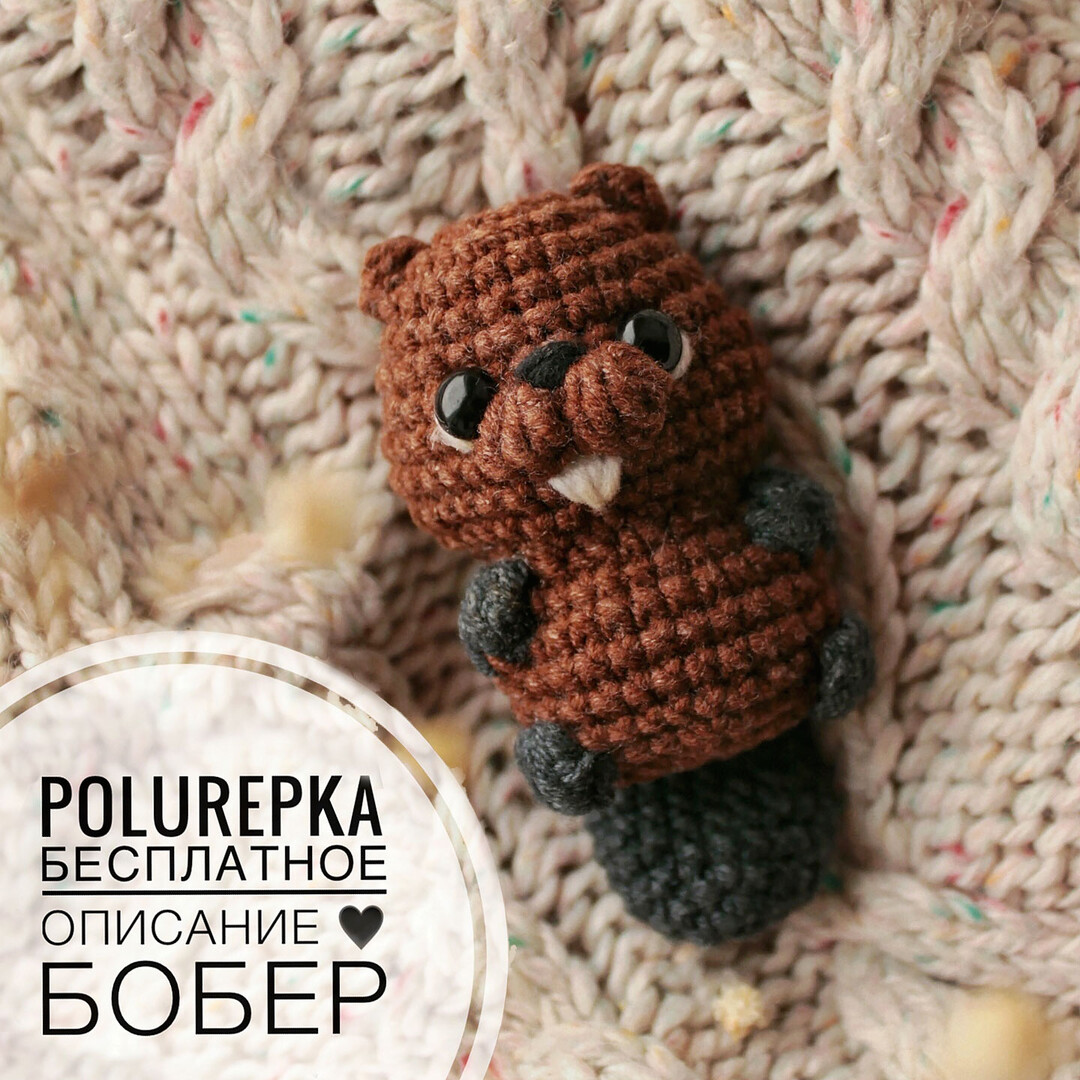
Craft Your Own Woodland Cutie: Free Beaver Amigurumi Crochet Pattern
“`html
DIY Crochet Beaver Amigurumi: A Step-by-Step Free Pattern
Looking for a cute and forest-inspired project? This adorable crochet beaver amigurumi is the perfect weekend craft. Whether you are an experienced crocheter or looking for a fun new challenge, this detailed pattern will guide you through creating your very own woodland friend. With its signature flat tail and tiny buck teeth, this little beaver is sure to steal hearts!
Materials Needed
- Yarn: Sport weight cotton/acrylic blend (e.g., YarnArt Jeans) in Brown (Main Color) and Dark Gray/Black (Secondary Color).
- Hook: 1.7mm crochet hook.
- Eyes: 7mm safety eyes.
- Stuffing: Fiberfill or poly-fill.
- Tools: Tapestry needle, scissors, and a stitch marker.
- Embroidery: Small amount of white and black yarn for facial details.
Crochet Abbreviations (US Terms)
- MR: Magic Ring
- Sc: Single Crochet
- Inc: Increase (2 sc in one stitch)
- Dec: Decrease (sc 2 together)
- Dc: Double Crochet
- Ch: Chain
- Sl st: Slip stitch
- Bobble: Bobble stitch (4 or 5 dc cluster worked in one stitch)
The Pattern
1. The Tail
Use the secondary color (Gray/Black). Do not stuff the tail; it should remain flat.
- Round 1: 6 sc in MR (6)
- Round 2: 6 inc (12)
- Round 3: (1 sc, inc) x 6 (18)
- Rounds 4-7: 18 sc (4 rounds)
- Round 8: (1 sc, dec) x 6 (12)
- Rounds 9-10: 12 sc (2 rounds)
Flatten the tail and crochet 6 sc through both layers to close the opening. Fasten off and set aside.
2. Head and Body
The head and body are worked as one continuous piece. Stuff as you go. Use the main color (Brown).
- Round 1: 8 sc in MR (8)
- Round 2: 8 inc (16)
- Round 3: (1 sc, inc) x 8 (24)
- Rounds 4-5: 24 sc (2 rounds)
- Round 6: (3 sc, inc) x 6 (30)
- Round 7: 30 sc
Round 8 (Shaping the Cheeks and Muzzle): 7 sc, 2 inc, 5 sc, Bobble stitch (4 dc in one), 1 sc, Bobble stitch (4 dc in one), 5 sc, 2 inc, 6 sc (34)
- Round 9: 34 sc
Note: Place safety eyes between rounds 7 and 8.
- Round 10: 7 sc, 2 dec, 13 sc, 2 dec, 6 sc (30)
- Round 11: 30 sc
- Round 12 (Neck): 15 dec (15)
- Round 13 (Shoulders): 15 inc (30)
Round 14 (Adding Front Paws): Switch to secondary color for bobbles.
9 sc, Bobble stitch (5 dc in one), 10 sc, Bobble stitch (5 dc in one), 9 sc (30)
- Rounds 15-16: 30 sc (2 rounds)
Round 17 (Attaching the Tail): 28 sc, then 3 sc worked through both the body and the tail base (31)
(Note: Shift your starting stitch if necessary to ensure the tail is centered on the back).
Round 18 (Adding Back Paws): 3 sc (continuing with tail attachment if needed), 6 sc, Bobble stitch (5 dc in one), 10 sc, Bobble stitch (5 dc in one), 9 sc (30)
- Round 19: (3 sc, dec) x 6 (24)
- Round 20: 12 dec (12)
- Round 21: 6 dec (6)
Fasten off, weave the tail through the front loops of the last 6 stitches, pull tight to close, and hide the yarn end.
3. The Ears (Make 2)
Attach the yarn directly to the head at Round 3 from the top.
- Ch 2, in the next stitch (at Round 4), work 2 hdc (inc), then sl st into the same stitch.
- Repeat for the second ear on the opposite side.
Finishing Touches
- Nose: Using black yarn, embroider a small nose between the two bobble stitches on the muzzle.
- Teeth: Using white yarn, embroider two small vertical lines just below the nose for the signature beaver buck teeth.
- Eyes: You can add white highlights around the safety eyes for more expression.
Congratulations! Your crochet beaver is ready. This little guy makes a wonderful desk companion or a gift for a nature lover. Happy crocheting!
“`