
Crochet Adorable Avocado Amigurumi: Free Pattern!
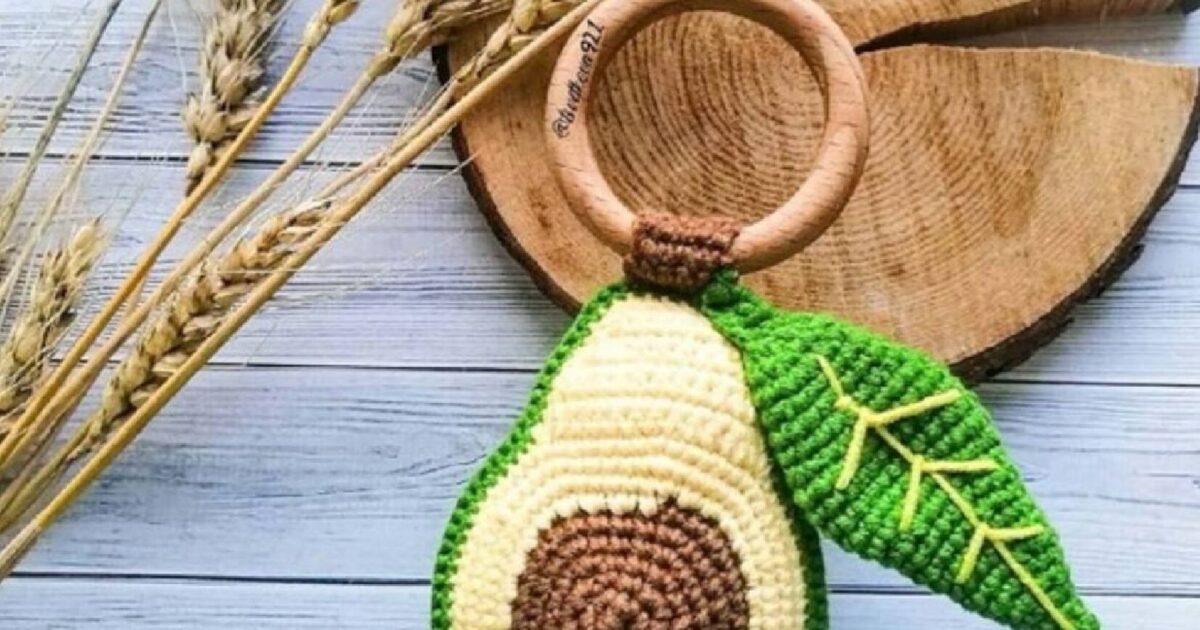
Hey there, fellow makers! Ready to add a touch of whimsy to your handmade collection? This free amigurumi avocado pattern is designed to be super easy to follow, guiding you through each step to create your own adorable plushie. Whether you’re making a gift for a friend, a cute market item, or just for fun, this pattern is perfect. Let’s grab our hooks and yarn, and get started! (Pattern adapted from @hudieun921 and @TSVETKOVA921)
Materials You’ll Need
- Yarn in **Brown** (for the seed and stem), **Cream-Yellow** (for the pulp), and **Dark Green** (for the skin and leaf) – A worsted weight or DK yarn is generally good for amigurumi.
- Crochet Hook (size appropriate for your chosen yarn, usually 2.5mm – 3.5mm for amigurumi to get tight stitches)
- Stuffing (polyester fiberfill)
- Round Rattle (optional, to place inside the seed for a fun sound!)
- Yarn Needle (for sewing parts together and weaving in ends)
- Scissors
- Stitch Marker (essential for keeping track of your rounds in amigurumi!)
Crochet Abbreviations Used
- sc: Single Crochet
- inc: Increase (make 2 single crochets in the same stitch)
- dec: Decrease (single crochet 2 together, also known as sc2tog)
- MR: Magic Ring (also called Magic Circle)
- ch: Chain
- sl st: Slip Stitch
- FLO: Front Loops Only (insert hook into the front loop of the stitch only)
- (X) x Y: Repeat the instructions inside the parentheses Y times
Part 1: The Front Avocado Half (Pulp & Seed)
We’ll begin with the brown seed, then transition to the creamy yellow pulp.
Seed (Brown Yarn)
- Round 1: 6 sc in MR (6 stitches)
- Round 2: 6 inc (12 stitches)
- Round 3: (1 sc, inc) x6 (18 stitches)
- Round 4: (2 sc, inc) x6 (24 stitches)
- Round 5: (3 sc, inc) x6 (30 stitches)
- Rounds 6-7: 30 sc (30 stitches)
Pulp (Cream-Yellow Yarn)
Switch to your cream-yellow yarn for the juicy pulp section.
- Round 8: 30 inc in FLO (front loops only) (60 stitches)
- Round 9: (9 sc, inc) x6 (66 stitches)
- Round 10: (10 sc, inc) x4, then 22 sc (66 stitches)
- Row 11: 7 sc, ch 1, turn. (7 stitches) This starts shaping the opening for the avocado half.
Shaping the Front Opening (Turning Rows)
These rows create the curved top edge of your avocado half.
- Row 12: 14 sc, ch 1, turn. (14 stitches)
- Row 13: Dec, 10 sc, dec, ch 1, turn. (12 stitches)
- Row 14: 12 sc, ch 1, turn. (12 stitches)
- Row 15: Dec, 8 sc, dec, ch 1, turn. (10 stitches)
- Row 16: Dec, 6 sc, dec, ch 1, turn. (8 stitches)
- Row 17: Dec, 4 sc, dec. (6 stitches)
- Rows 18-19: Ch 1, 6 sc. (6 stitches)
Edging the Front Half
Now, we’ll crochet around the entire perimeter of this piece to create a neat, finished edge. Be sure to make increases at the corners to maintain a smooth curve.
- Starting in the same stitch, make 1 sc.
- Then, work 6 sc.
- Make an inc at the first corner.
- Work 57 sc along the long curved edge.
- Make an inc at the second corner.
- Work 6 sc.
- Make an inc at the third corner.
- Work 5 sc.
- Finish with a sl st to join.
You should now have a total of 82 single crochet stitches around the entire edge.

Part 2: The Back Avocado Half (Dark Green Skin)
This section forms the dark green outer skin of your avocado. It’s crocheted similarly to the front half but without the color change for the seed.
Back Half (Dark Green Yarn)
- Round 1: 6 sc in MR (6 stitches)
- Round 2: 6 inc (12 stitches)
- Round 3: (1 sc, inc) x6 (18 stitches)
- Round 4: (2 sc, inc) x6 (24 stitches)
- Round 5: (3 sc, inc) x6 (30 stitches)
- Round 6: (4 sc, inc) x6 (36 stitches)
- Round 7: (5 sc, inc) x6 (42 stitches)
- Round 8: (6 sc, inc) x6 (48 stitches)
- Round 9: (7 sc, inc) x6 (54 stitches)
- Round 10: (8 sc, inc) x6 (60 stitches)
- Round 11: (9 sc, inc) x6 (66 stitches)
- Row 12: (10 sc, inc) x4, then 22 sc (66 stitches)
- Row 13: 7 sc, ch 1, turn. (7 stitches) This begins the shaping for the back opening.
Shaping the Back Opening (Turning Rows)
Just like the front, these rows create the curved top edge of the back half.
- Row 14: 14 sc, ch 1, turn. (14 stitches)
- Row 15: Dec, 10 sc, dec, ch 1, turn. (12 stitches)
- Row 16: 12 sc, ch 1, turn. (12 stitches)
- Row 17: Dec, 8 sc, dec, ch 1, turn. (10 stitches)
- Row 18: Dec, 6 sc, dec, ch 1, turn. (8 stitches)
- Row 19: Dec, 4 sc, dec. (6 stitches)
- Rows 20-21: Ch 1, 6 sc. (6 stitches)
Edging the Back Half
Again, crochet around the entire edge, ensuring increases at the corners for a smooth shape.
- Starting in the same stitch, make 1 sc.
- Then, work 6 sc.
- Make an inc at the first corner.
- Work 57 sc along the long curved edge.
- Make an inc at the second corner.
- Work 6 sc.
- Make an inc at the third corner.
- Work 5 sc.
- Finish with a sl st to join.
You should have a total of 82 single crochet stitches around the entire edge, matching your front piece.
Preparation Rounds for Joining
Continue with dark green yarn to create a small ‘wall’ before joining.
- Rounds 22-26: 82 sc (82 stitches)

Part 3: Assembling Your Avocado
This is where your avocado really starts to take shape! We’ll join the two halves and add the stem.
Joining and Stuffing
- Carefully align the front (pulp/seed) part with the back (skin) part, making sure the edges match up.
- Using single crochet (sc), begin to join both parts together. Insert your hook through a stitch on the front piece AND the corresponding stitch on the back piece, then complete a single crochet.
- Stuffing Tip: As you join, gradually add your polyester fiberfill stuffing. Make sure to stuff firmly but evenly, shaping the avocado as you go.
- If you are including a round rattle, place it directly inside the brown seed area. It’s best not to add stuffing underneath the rattle; simply place it in the seed cavity and then fill the rest of the avocado body around it.
- Continue joining and stuffing until the avocado is firm and fully formed. Finish joining all stitches, then fasten off and weave in any loose ends securely.

Stem (Brown Yarn)
The stem adds a charming, realistic detail to your avocado.
- Join your brown yarn to the top opening of the avocado (where the turning rows for both halves met).
- Crochet 5 sc into the edge, forming a small ring for the stem base.
- Rows 2-9: Ch 1, turn. Make 1 sc in each of the 5 stitches across. (5 stitches per row)
- Feel free to adjust the length: crochet more or fewer rows as needed to achieve your desired stem length.
- Fasten off and carefully weave in ends.
Part 4: The Avocado Leaf
Complete your avocado with a sweet little leaf!
Leaf (Green Yarn)
- Round 1: 4 sc in MR (4 stitches)
- Round 2: 4 sc (4 stitches)
- Round 3: 1 inc, 3 sc (5 stitches)
- Round 4: 1 inc, 4 sc (6 stitches)
- Round 5: (1 sc, inc) x3 (9 stitches)
- Round 6: 9 sc (9 stitches)
- Round 7: (2 sc, inc) x3 (12 stitches)
- Round 8: 12 sc (12 stitches)
- Round 9: (3 sc, inc) x3 (15 stitches)
- Rounds 10-11: 15 sc (15 stitches)
- Round 12: (4 sc, inc) x3 (18 stitches)
- Rounds 13-14: 18 sc (18 stitches)
- Round 15: (2 sc, inc) x6 (24 stitches)
- Rounds 16-20: 24 sc (24 stitches)
- Round 21: (2 sc, dec) x6 (18 stitches)
- Rounds 22-23: 18 sc (18 stitches)
- Round 24: (4 sc, dec) x3 (15 stitches)
- Round 25: 15 sc (15 stitches)
- Round 26: (3 sc, dec) x3 (12 stitches) This reduces your stitches for shaping.
- Round 27: 6 dec (6 stitches)
Finishing the Leaf Point
This method creates a neat, flat point for your leaf.
- Row 28: Flatten the opening (6 stitches) and make 3 sc through both layers of stitches, ch 1, turn. (3 stitches)
- Row 29: 3 sc back into the 3 stitches just made. (3 stitches)
- Row 30: 2 sc, ch 1, turn. (2 stitches) This reduces to 2 stitches, likely by skipping the last stitch or decreasing one.
- Row 31: 2 sc. (2 stitches)
Attaching the Leaf
Sew the finished leaf onto your avocado. A great spot is at the “shoulder” of the avocado, next to where the stem is attached.

Congratulations! You’ve successfully crocheted an adorable amigurumi avocado! We hope you loved following this free pattern.
Don’t forget to show off your fantastic creations! Share your photos on social media and tag us using **#hudieun921** and **#TSVETKOVA921** so we can admire your work!
Happy Crocheting!