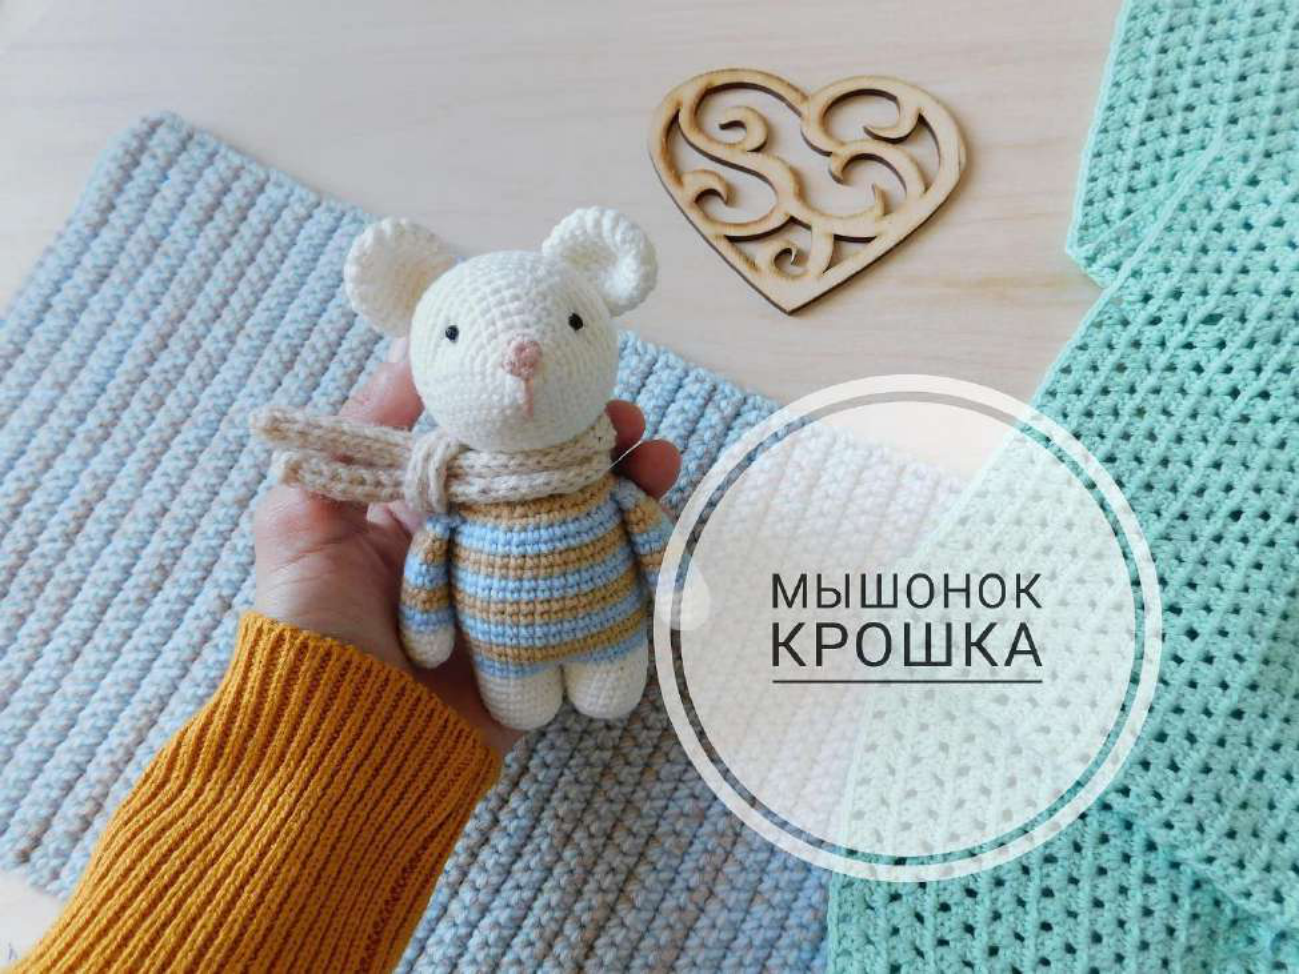
Crochet An Adorable Tiny Mouse FREE!
Get ready to create the most adorable little friend with this free crochet pattern for a “Tiny Mouse”! Measuring approximately 13 cm (about 5 inches) tall, this charming amigurumi is the perfect project for using up scrap yarn. With its sweet striped sweater and tiny features, it’s sure to bring a smile to anyone’s face. Let’s get our hooks ready and start crocheting!
Materials You’ll Need
- Yarn: Semi-cotton yarn for the mouse’s body and clothes. You’ll also need a small amount of thin cotton yarn for the nose.
- Crochet Hook: 1.6 mm – 1.75 mm.
- Stuffing: Toy stuffing like synthetic padding, synthetic down, or hollow fiber.
- Eyes: Small beads for the eyes.
- Needle: A yarn needle for assembly.
- Knitting Needles (Optional): For knitting the scarf.
Abbreviations (US Terms)
- sc: single crochet
- inc: increase (work two single crochets into the same stitch)
- dec: decrease (work two single crochets together)
- st(s): stitch(es)
- rnd(s): round(s)
Let’s Get Started!
Legs & Body (Worked as one piece)
We’ll start by making the two legs and then join them to form the body.

Left Leg
Use the main mouse color yarn.
- Rnd 1: Start with 6 sc in a magic ring. (6 sts)
- Rnd 2: Work an inc in each st around. (12 sts)
- Rnd 3: (1 sc, inc) x 6. (18 sts)
- Rnds 4-8 (5 rows): Work 18 sc around. (18 sts)
Fasten off and cut the yarn.
Right Leg
Use the main mouse color yarn.
- Rnd 1: Start with 6 sc in a magic ring. (6 sts)
- Rnd 2: Work an inc in each st around. (12 sts)
- Rnd 3: (1 sc, inc) x 6. (18 sts)
- Rnds 4-8 (5 rows): Work 18 sc around. (18 sts)
Do not cut the yarn! We will now join the legs.
Joining Legs & Creating the Body
Continuing from the right leg:
- Rnd 9: Crochet 18 sc around the left leg, then continue by crocheting 18 sc around the right leg to join them. Place a stitch marker to mark the beginning of the round. (36 sts)
Change to your first sweater color. For the sweater, you will alternate between two different colors every two rows.
- Rnds 10-24 (15 rows): Work 36 sc around. Remember to alternate your two sweater colors every two rows. (36 sts)
Start stuffing the legs and body firmly as you go.
- Rnd 25: (4 sc, dec) x 6. (30 sts)
- Rnd 26: (3 sc, dec) x 6. (24 sts)
Change back to the main mouse color for the neck.
- Rnd 27: Work 24 sc around. (24 sts)
Finish stuffing the body. Do not cut the yarn; we will attach the head directly to the body later.

Arms (Make 2)
Start with the main mouse color.
- Rnd 1: Start with 6 sc in a magic ring. (6 sts)
- Rnd 2: Work an inc in each st around. (12 sts)
- Rnds 3-5 (3 rows): Work 12 sc around. (12 sts)
Change to your sweater colors. Alternate between two colors every two rows, just like you did for the body.
- Rnds 6-14 (9 rows): Work 12 sc around. (12 sts)
- Rnd 15: (2 sc, dec) x 3. (9 sts)
Do not stuff the arms.
- Rnd 16: Fold the opening of the arm flat and crochet through both layers with 4 sc to close.
Leave a long tail for sewing the arm to the body.
Head
Use the main mouse color.
- Rnd 1: 6 sc in a magic ring. (6 sts)
- Rnd 2: (1 sc, inc) x 3. (9 sts)
- Rnd 3: (2 sc, inc) x 3. (12 sts)
- Rnd 4: (2 sc, inc) x 4. (16 sts)
- Rnd 5: (3 sc, inc) x 4. (20 sts)
- Rnd 6: (4 sc, inc) x 4. (24 sts)
- Rnd 7: (5 sc, inc) x 4. (28 sts)
- Rnd 8: (6 sc, inc) x 4. (32 sts)
- Rnd 9: (7 sc, inc) x 4. (36 sts)
- Rnd 10: Work 36 sc around. (36 sts)
- Rnd 11: (5 sc, inc) x 6. (42 sts)
- Rnds 12-18 (7 rows): Work 42 sc around. (42 sts)
- Rnd 19: (5 sc, dec) x 6. (36 sts)
- Rnd 20: Work 36 sc around. (36 sts)
- Rnd 21: (4 sc, dec) x 6. (30 sts)
- Rnd 22: (3 sc, dec) x 6. (24 sts)
At this point, you can attach the eyes and nose before stuffing the head. See the Assembly section for placement details. Once details are added, begin to stuff the head firmly.
- Rnd 23: (2 sc, dec) x 6. (18 sts)
- Rnd 24: (1 sc, dec) x 6. (12 sts)
- Rnd 25: Work 6 dec around. (6 sts)
Fasten off, leaving a long tail. Use your needle to weave the tail through the front loops of the final 6 stitches and pull tight to close the hole. Hide the end inside the piece. You can now sew the head to the body.
Ears (Make 2)
Use the main mouse color.
- Rnd 1: 6 sc in a magic ring. (6 sts)
- Rnd 2: Work an inc in each st around. (12 sts)
- Rnd 3: (1 sc, inc) x 6. (18 sts)
- Rnds 4-6 (3 rows): Work 18 sc around. (18 sts)
- Rnd 7: (4 sc, dec) x 3. (15 sts)
- Rnd 8: (3 sc, dec) x 3. (12 sts)
Fasten off, leaving a long tail for sewing. Do not stuff the ears.
Nose
Use thin black or pink cotton yarn.
- Rnd 1: 6 sc in a magic ring. (6 sts)
- Rnd 2: (1 sc, inc) x 3. (9 sts)
Fasten off, leaving a tail. Use a needle to weave the tail through the front loops of the last round’s stitches and pull slightly to give it a rounded shape.
Tail
Use the main mouse color.
- Rnd 1: 6 sc in a magic ring. (6 sts)
- Rnd 2: (1 sc, inc) x 3. (9 sts)
- Rnds 3-20 (18 rows): Work 9 sc around. (9 sts)
- Rnd 21: Fold the tail flat and crochet 4 sc through both layers to close.
Leave a long tail for sewing.

Assembly & Finishing Touches
Now for the fun part! Let’s bring your Tiny Mouse to life.
- Nose & Mouth: Sew the nose to the very tip of the muzzle. With the same thread, embroider a small, simple mouth below the nose.
- Eyes: Sew the bead eyes on between Rnds 9 and 10 of the head. Leave a space of about 10-11 stitches between them.
- Head: Securely sew the head to the body.
- Ears: Sew the ears to the head between Rnds 17 and 18. Position them about 7 stitches apart.
- Arms: Attach the arms to the sides of the body, just below the head, between Rnds 24 and 25 of the body.
- Tail: Sew the tail to the back of the body, centered at the bottom.
- Scarf (Optional): For a knitted scarf, cast on 6 stitches. Knit all odd rows and purl all even rows (stockinette stitch) until the scarf reaches your desired length. Fasten off and wrap it around your mouse’s neck!
And you’re done! We hope you enjoyed making your Tiny Mouse. If you share your creation online, please credit the designer, Svetlana Bolotova. Happy Crocheting!