Crochet Bublik the Puppy: Free Amigurumi Pattern.

Welcome, crochet enthusiasts, to a heartwarming project that will bring a new furry friend into your life! Today, we’re thrilled to share the detailed pattern for Bublik the Puppy, an absolutely adorable amigurumi creation designed by @OCSANA_TOYS. Whether you’re making it for a child, a gift, or simply to add a touch of cuteness to your home, Bublik promises to be a delightful and rewarding crochet experience. Get your hooks ready, because this charming little puppy is waiting to be brought to life by your skillful hands!

Materials You’ll Need
Gather your supplies to begin your Bublik adventure:
- KROKHA BABY YARN (You can also use any yarn you are comfortable crocheting with)
- Hook 2 mm (Hook size should be chosen according to yarn thickness for best results)
- Filler (Hollowfiber, Syntepuh)
- Embroidery floss, black color (for the nose)
- Safety Eyes 8mm
- Moment Crystal Glue
Once finished, your adorable Bublik the Puppy will stand approximately 14 cm tall!
Essential Abbreviations
To help you follow along seamlessly, here are the abbreviations used in this pattern:
- MR – Magic Ring
- SC – Single Crochet
- INC – Increase
- DEC – Decrease
- SL ST – Slip Stitch
- CH – Chain Stitch
Back Paws (Make 2)
Let’s start with the foundation of our puppy, the back paws:
- 6 SC in MR (6)
- (SC, INC) x 3 times (9)
- – 4. 9SC (9)
On the first paw, cut the yarn and weave in the end. On the second paw, do not cut the yarn; you will continue crocheting the body directly from here.
Body
Now, let’s connect the paws and form Bublik’s main body:
- CH 8 from the second paw. Join the first paw. Crochet 9SC along the first paw, 8SC along the chains, 9SC along the 2nd paw, 8SC along the chains. (34) (Place marker here)
- 34SC (34)
- INC, 24SC, INC, 8SC (36)
- 36 SC (36)
- (5SC, INC) x 6 times (42)
- – 15. 42 SC (42)
- (5SC, DEC) x 6 times (36)
- 36 SC (36)
- (4SC, DEC) x 6 times (30)
- 39SC (39)
- (3SC, DEC) x 6 times (24)
- 24 SC (24)
- (2SC, DEC) x 6 times (18)
- (SC, DEC) x 6 times (12)
Continue crocheting the head directly from here.
Head
Now, let’s shape Bublik’s adorable head:
- 12 SC (12)
- 12INC + 1 SC, Place marker! (24)
- (SC, INC) x 3 times, 7SC, (INC, SC) x 3 times, 5SC (30)
- (2SC, INC) x 3 times, 7SC, (INC, 2SC) x 3 times, 5SC (36)
- (3SC, INC) x 3 times, 7SC, (INC, 3SC) x 3 times, 5SC (42)
- (4SC, INC) x 3 times, 7SC, (INC, 4SC) x 3 times, 5SC (48)
- 30. 48SC (48)
- – 35. 48SC (48)
- (4SC, DEC) x 3 times, 7SC, (DEC, 4SC) x 3 times, 5SC (42)
- 37. 42SC (42)
- (3SC, DEC) x 3 times, 7SC, (DEC, 3SC) x 3 times, 5SC (36)
- 39. 36SC (36)
- (2SC, DEC) x 3 times, 7SC, (DEC, 2SC) x 3 times, 5SC (30)
- (SC, DEC) x 3 times, 7SC, (DEC, SC) x 3 times, 5SC (24)
- 12DEC (12)
- Pull hole tight, fasten yarn, weave in.
Tail
A small but essential detail for Bublik’s charm:
- 6SC in MR (6)
- – 3. 6SC (6)
Fasten yarn, leave a longer tail for sewing.
Ears (Make 2)
Give Bublik his characteristic floppy ears:
- 5SC in MR (5)
- 5INC (10)
- 4SC, INC, 4SC, INC (12)
- – 6. 12SC (12)
- (2SC, DEC) x 3 times (9)
- 9SC (9)
- (SC, DEC) x 3 times (6)
Fold in half, crochet 3SC through both loops. Fasten yarn, leave a tail for sewing.
Front Paws (Make 2)
Complete Bublik’s limbs with these front paws:
- CH 4, in the 2nd CH from hook crochet 2SC, 3SC in the next CH, 1 SC in the next CH, 2SC in the same CH as the first 2SC (8)
- 3SC, 3SC in 1 stitch, 3SC, 3SC in 1 stitch (12)
- 12SC (12)
- SC, 2DEC, 7SC (10)
- 2DEC, 6SC (8)
Stuff only the lower part.
- – 8. 8SC (8)
- SC, DEC, 5SC. (7)
Pull hole tight, leave a tail for sewing.
Assembly
Now comes the exciting part: bringing all the pieces together to create your charming Bublik!
- Sew arms from the head, 2 rows down.
- Sew tail from the bottom, 4 rows up. Pull yarn through the belly (from the bottom, 5-6 rows), make a belly button by pulling two stitches tight. (Fasten yarn, cut and weave in)
- Ears: Position 3 rows down from the crown, to the sides.
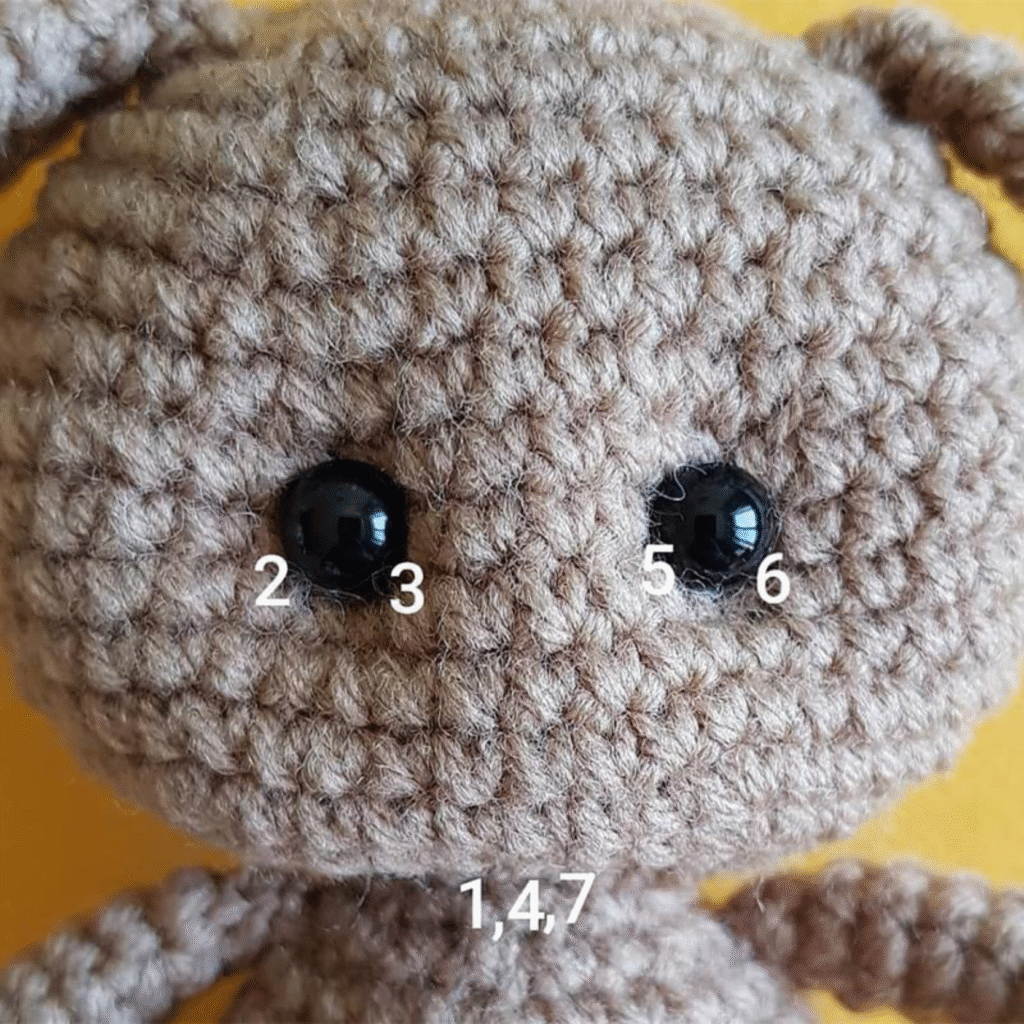
- For eye indentation, glue eyes from the crown, rows 10-11.
- Embroider nose on rows 12-13 (you can also glue your own nose if preferred).
- Embroider eyebrows and eye whites for added expression.
Congratulations! You’ve just created your very own Bublik the Puppy! We hope you enjoyed every stitch of this delightful pattern. Sharing your finished creations truly brightens our day, so please tag Crochetto on social media or share your pictures with our community. Happy crocheting, and we look forward to seeing your adorable Bubliks!