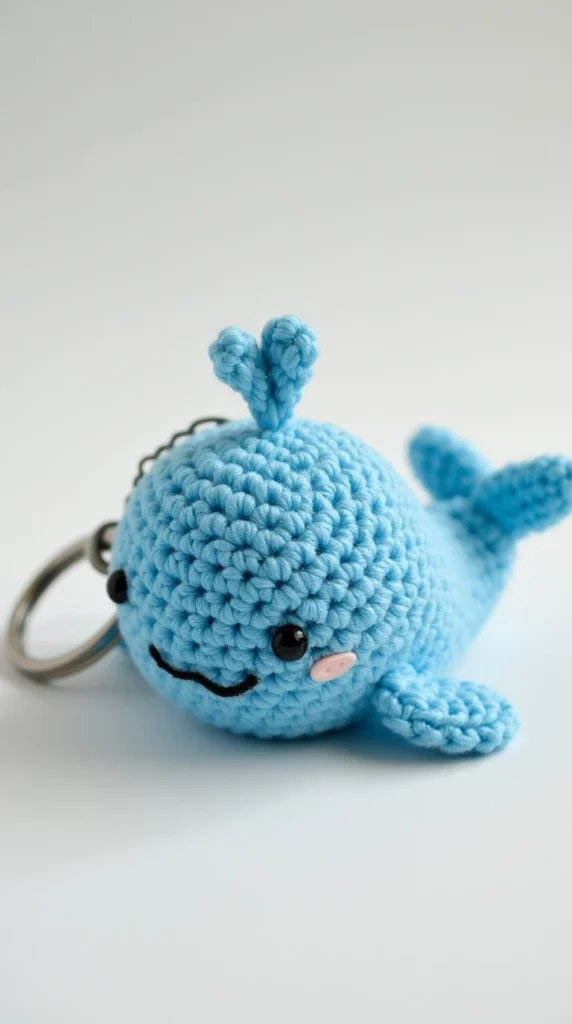
Crochet Pattern: Wavy the Whale Keychain
Okay, fellow yarn enthusiast! Get ready to dive into a super cute project! Look at this adorable little whale keychain – isn’t he just the sweetest thing splashing around?
Why you’ll love making this whale:
- So Darn Cute: Seriously, that little face and spout are pure charm!
- Quick Project: Being small, this whale works up surprisingly fast, perfect for a weekend craft session.
- Great Stash Buster: It uses only small amounts of yarn, ideal for using up leftovers.
- Perfect Gift: Who wouldn’t want this little guy brightening up their keys or bag?
Difficulty Level: I’d rate this pattern as Advanced Beginner to Easy Intermediate. You’ll need to be comfortable with basic amigurumi techniques like working in a spiral, single crochet, increases, decreases, making small parts, and sewing them together neatly. The embroidery and optional felt cheeks add a touch of finesse.
Let’s Get Hooking!
Materials:
- Light Blue Yarn (DK or Worsted Weight)
- Small amount of Black Embroidery Floss or Thin Black Yarn
- Tiny scrap of Pink Felt OR Pink Embroidery Floss/Thin Yarn
- Crochet Hook (Size appropriate for your yarn, e.g., 3.0mm – 4.0mm)
- 2 x Small Black Safety Eyes (approx 6mm)
- Polyester Fiberfill Stuffing
- Yarn Needle (Tapestry Needle)
- Scissors
- Stitch Marker
- Keychain Ring with Chain
- Fabric Glue (Optional, if using felt cheeks)
Abbreviations (US Terms):
- MR: Magic Ring
- sc: Single Crochet
- inc: Increase (work 2 sc in the next stitch)
- dec: Invisible Decrease
- sl st: Slip Stitch
- st(s): Stitch(es)
- rnd(s): Round(s)
- […] x …: Repeat instructions in brackets … times
- (…): Number of stitches at the end of the round
Instructions:
(Work in continuous rounds unless specified otherwise. Use a stitch marker.)
Main Body: (Using Light Blue Yarn)
- Rnd 1: Start 6 sc in a MR (6)
- Rnd 2: inc in each st around (12)
- Rnd 3: x 6 (18)
- Rnd 4: x 6 (24)
- Rnd 5: x 6 (30)
- Rnd 6: x 6 (36)
- Rnd 7 – Rnd 12 (6 rounds): sc in each st around (36)
- Insert Safety Eyes: Place eyes between Rnd 9 and Rnd 10, about 7-8 stitches apart. Look at the image for placement reference – they are quite wide-set. Secure the backs firmly.
- Rnd 13: x 6 (30)
- Rnd 14: x 6 (24)
- Rnd 15: x 6 (18)
- Start stuffing the body firmly, shaping it as you go.
- Rnd 16: x 6 (12)
- Rnd 17: dec x 6 (6)
- Finish stuffing firmly. Cut yarn, leaving a long tail. Thread the tail through the front loops of the remaining 6 stitches and pull tight to close the hole. Weave in the end securely.
Tail Fin (Make 2 Identical Pieces): (Using Light Blue Yarn)
- Rnd 1: Start 4 sc in a MR (4)
- Rnd 2: x 2 (6)
- Rnd 3: x 2 (8)
- Rnd 4: sc in each st around (8)
- Sl st to the next st to finish. Fasten off, leaving a tail for sewing. Do not stuff. Flatten the pieces.
Side Fins (Make 2): (Using Light Blue Yarn)
- Rnd 1: Start 6 sc in a MR (6)
- Rnd 2: x 3 (9)
- Sl st to the next st to finish. Fasten off, leaving a tail for sewing. Do not stuff. Flatten the pieces.
Water Spout (Make 2 Identical Pieces): (Using Light Blue Yarn)
- Rnd 1: Start 5 sc in a MR (5)
- Rnd 2: inc in each st around (10)
- Rnd 3: dec x 5 (5)
- Fasten off, leaving a tail for sewing. Stuff very lightly (almost just a pinch) or leave unstuffed.
Assembly:
- Attach Tail Fins: Position the two flattened tail fin pieces side-by-side at the rear end of the whale body (opposite the eyes). Sew them securely to the body using their yarn tails. You can slightly overlap their bases where they meet in the middle.
- Attach Side Fins: Sew one side fin to each side of the body. Position them slightly below the eye line and angled slightly upwards towards the back, referring to the image.
- Attach Water Spout: Sew the two small spout pieces close together onto the top of the whale’s head, slightly forward from the center point. Use the tails to secure them firmly.
- Embroider Smile: Using black embroidery floss and a yarn needle, embroider a simple curved smile below and centered between the eyes.
- Add Cheeks:
- Option 1 (Felt): Cut two tiny circles or ovals from pink felt. Carefully glue them in place just below the outer corners of the eyes.
- Option 2 (Embroidery): Using pink embroidery floss, make a small French knot or a few small satin stitches for each cheek in the same position.
- Attach Keychain: Decide where you want the keychain attached (likely near the base of the water spout or just behind it on the top center). Securely sew the keychain hardware’s chain or jump ring directly to the whale’s body stitches. Go through the stitches multiple times for strength. Alternatively, you could crochet a tiny loop (ch 4, sl st back to start) onto the whale first, then attach the keychain hardware to the loop.
Tips:
- Keep your stitches tight and consistent for a neat look.
- Use stitch markers! Especially crucial when working in continuous rounds.
- Refer back to the photo frequently for placement of features.
- Sew all parts on very securely, especially if it’s going to be used as a keychain.
There you have it! Your very own adorable Wavy the Whale keychain. Enjoy your new little ocean buddy! Happy Crocheting!