Crochet poncho pattern: Easy & Stunning Patterns!
The Ultimate Crochet Poncho Pattern for Effortless, Year-Round Style
There is a special kind of magic in creating something beautiful and functional with just a hook and a skein of yarn. For women who love the gentle rhythm of crochet, finding the perfect project is a joy in itself. If you’re looking for a garment that is as versatile and stylish as it is comforting, then this crochet poncho pattern is your next must-make project. It’s a timeless piece that drapes beautifully, offers incredible comfort, and can be styled in multiple ways to suit any occasion.
Whether you are settling in for a quiet evening at home, heading out for a brisk autumn walk, or looking for a chic layering piece for a casual brunch, a handmade poncho is the perfect companion. This article will guide you through every step of creating your very own elegant poncho. We will explore the simple yet beautiful V-stitch, detail the materials you’ll need, and provide a clear, round-by-round tutorial. This isn’t just a pattern; it’s an invitation to create a piece of wearable art that you will cherish for years to come. Get ready to hook into a project that is both relaxing to make and delightful to wear—the ideal crochet poncho pattern for every skill level.

Why Every Crocheter Needs a Go-To Poncho Pattern
In the world of crochet, some patterns stand the test of time, becoming beloved staples in a crafter’s collection. The poncho is undoubtedly one of those classic garments. Its enduring popularity isn’t just a matter of fashion trends; it’s rooted in its incredible versatility, comfort, and the sheer joy it brings to the creative process. For crocheters, having a reliable crochet poncho pattern is like having a favorite recipe—it’s something you can turn to again and again, confident in the beautiful result.
Versatility and Timeless Appeal
A crochet poncho is the epitome of effortless style. It can be dressed up or down with ease, making it suitable for a wide range of settings. Throw it on over a simple t-shirt and jeans for a cozy, bohemian vibe, or layer it over a dress for a more sophisticated, artistic look. Unlike more structured garments, the forgiving drape of a poncho flatters every body type, providing a comfortable fit without sacrificing elegance. The design featured in this article is particularly adaptable; it can be worn with the points at the front and back for a classic silhouette or at the sides for a modern, asymmetrical look. This adaptability ensures that your handmade creation will remain a cherished part of your wardrobe through changing seasons and evolving styles.
The Perfect Project for Any Skill Level
Ponchos are an excellent project for both beginners and experienced crocheters. [9] For those new to the craft, the straightforward construction, often involving simple rectangles or working in the round with basic stitches, provides a fantastic opportunity to build confidence. [9] There’s typically minimal shaping or complex seaming involved, which can be intimidating for novices. [9] For the seasoned crafter, a crochet poncho pattern offers a relaxing and satisfying experience—a chance to play with color, texture, and stitch variations. This particular pattern utilizes the rhythmic and visually appealing V-stitch, which is easy to master yet creates a fabric with a lovely, intricate appearance. It’s the kind of project you can work on while watching a movie or chatting with friends, making the process itself as enjoyable as the finished product.
Gathering Your Materials for the Perfect Crochet Poncho
Before you begin this exciting project, let’s gather all the necessary supplies. Having the right tools and yarn will not only make the crocheting process smoother but will also ensure your finished poncho is beautiful and durable. This simple crochet poncho pattern doesn’t require anything out of the ordinary, making it accessible for everyone.
Choosing the Right Yarn
The yarn you select will define the drape, warmth, and overall look of your poncho. For this pattern, a size 4 medium weight yarn (often referred to as worsted or aran weight) is recommended. [1, 4] This weight is a favorite among beginners and experts alike because it’s easy to handle and works up relatively quickly. [4] You will need approximately 700 yards of yarn to complete the poncho as described.
When selecting your yarn, consider the fiber content. A soft acrylic or an acrylic-wool blend is a great choice as it’s affordable, easy to care for, and available in a vast array of colors. For a more luxurious feel, consider a merino wool or a cotton blend, which would be perfect for a multi-season garment. The Craft Yarn Council provides standardized guidelines that can help you confidently select the right type of yarn for your project. [2, 3]
Essential Tools of the Trade
Beyond the yarn, you will need a few key tools to bring your crochet poncho to life:
- Crochet Hook: A size H (5mm) crochet hook is used for this pattern. This size pairs perfectly with medium-weight yarn to create a fabric that is neither too dense nor too loose.
- Scissors: A sharp pair of scissors is a must-have for any yarn project for clean cuts.
- Blunt Needle (or Darning Needle): This is essential for weaving in the ends once you’ve finished crocheting, giving your poncho a neat, professional look.
- Stitch Markers: These small but mighty tools are incredibly helpful for marking your corners, especially in the beginning rounds. This helps you keep track of where to place your increase stitches without having to count constantly.
- Tape Measure: To ensure your starting chain and final measurements are accurate, a flexible tape measure is indispensable.
Understanding the Core Stitches and Techniques
This beautiful crochet poncho pattern is built upon a foundation of basic stitches that combine to create a stunning, textured fabric. Before diving into the step-by-step instructions, let’s take a moment to familiarize ourselves with the key stitches and concepts. A solid understanding of these fundamentals will make the entire process feel intuitive and enjoyable.
Mastering the V-Stitch
The star of this pattern is the elegant V-stitch. A V-stitch is not a single stitch but a small cluster of stitches worked into the same space to create a “V” shape. In this specific pattern, a V-stitch consists of: (two double crochets, chain two, two double crochets) all worked into the same stitch or space. This creates a beautiful, shell-like appearance with a built-in opening (the chain-two space) that becomes the perfect spot to place the V-stitch of the next round. This creates a wonderfully rhythmic and easy-to-memorize pattern repeat. The structure of the V-stitch gives the poncho its fantastic drape and eye-catching texture.
The Importance of Gauge and Sizing
While this poncho has a forgiving, flowing design, understanding the concept of gauge is still beneficial. Gauge refers to the number of stitches and rows within a certain measurement (e.g., a 4×4 inch square) and is determined by your yarn, hook size, and personal tension. For a garment like this, a precise gauge is less critical than for a fitted sweater. [9] However, being aware of it can help you predict the final size and drape. The pattern’s sizing is primarily determined by the length of the initial foundation chain. The instructions begin with a chain of 98, which sets the circumference of the neck opening. The pattern cleverly notes that one V-stitch cluster corresponds to five chains, so you can easily customize the starting size by adding or subtracting chains in multiples of five. This built-in adjustability makes it a fantastic crochet poncho pattern to tailor to your exact preference.
Step-by-Step Guide: Your Easy Crochet Poncho Pattern
Now that you have your materials and understand the basic stitches, it’s time to begin creating your beautiful poncho. This pattern is worked from the top down in seamless rounds, which means no sewing pieces together at the end! Just follow along round by round, and you’ll see the elegant design emerge.
Creating the Foundation Ring and Round 1
The journey of this crochet poncho pattern starts with a simple ring.
- Foundation Chain: Start with a slip knot and chain 98. Be careful not to twist the chain, and then join with a slip stitch to the very first chain to form a large ring.
- Round 1 – First V-Stitch: Chain 5 (this counts as your first double crochet and a chain-2 space). Then, work two double crochets into the very next chain. This forms the first half of your initial V-stitch group.
- Forming the Pattern: *Skip the next three chains. In the next chain, work two double crochets, chain 2, and then work two double crochets in the chain right after it.* This creates your first full V-stitch. Repeat this sequence four more times. You will now have a total of five V-stitches.
- Creating the First Corner: Chain 3, then skip the next two chains. Work a V-stitch (2 dc in next ch, ch 2, 2 dc in the following ch). This chain-3 space is your first corner, where you’ll be making increases. Place a stitch marker in this space to easily identify it.
- Working the Long Side: Continue the V-stitch pattern nine more times for a total of 10 V-stitches along this side.
- Creating the Second Corner: Just like the first corner, chain 3, skip two chains, and make a V-stitch in the next two chains. Place a marker here as well.
- Finishing the Round: Continue with the V-stitch pattern four more times. To complete the round, skip the final three chains, work one double crochet in the same stitch as your beginning chain-5, and then join with a slip stitch to the 3rd chain of that initial chain-5. You should have 10 V-stitches on each long side.
Working the Body and Increasing (Rounds 2-4)
The next few rounds establish the increase pattern that gives the poncho its shape.
- Round 2 (Increase Round): Slip stitch into the first chain-2 space. Chain 3 (counts as a dc) and complete a V-stitch in that same space. Continue by working one V-stitch into the chain-2 space of every V-stitch from the previous round. When you reach a marked corner (the chain-3 space), you’ll work an increase: (2 dc, ch 2, 2 dc, ch 2, 2 dc) all in that same corner space. Continue this pattern all the way around, working the same increase in the second corner, and join with a slip stitch.
- Round 3 (Even Increase): This round is simpler. Work a V-stitch in every V-stitch’s chain-2 space from the previous round. When you get to the corners from Round 2, you will now have two chain-2 spaces. Simply work one V-stitch in each of these spaces. This method continues to widen the poncho evenly.
- Round 4 (Corner Chain Increase): Work in the established pattern of one V-stitch per chain-2 space. When you reach the corner, work a V-stitch in the first chain-2 space, chain 3, and then work another V-stitch in the next chain-2 space. This chain-3 creates the new corner for the next increase round.
Visual Guide: Watch the Pattern in Action
For those who are visual learners, watching the stitches come to life can be incredibly helpful. This video tutorial provides a clear, step-by-step demonstration of this fantastic crochet poncho pattern.
Repeating the Pattern for Length (Rounds 5-30)
The main body of the poncho is created by simply repeating the logic of Rounds 2, 3, and 4 consecutively. You will continue this three-round repeat until your poncho reaches the desired length. The pattern suggests working up to Round 30, which creates a length of approximately 19 inches from top to bottom. This repetitive, rhythmic process is what makes this crochet poncho pattern so wonderfully relaxing and meditative.
Finishing Your Poncho with a Professional Touch
Once the main body of your poncho is complete, a few finishing details will elevate it from a handmade project to a polished, professional-looking garment. Taking the time to craft a neat neckline and securely weave in your ends is the key to a lasting and beautiful piece.
Crafting the Cozy Mock Neck
A mock neck collar adds a touch of sophistication and extra warmth, making this a truly cozy crochet poncho pattern. The collar is worked in rounds directly onto the neck opening.
- Round 1 of Neck: Attach your yarn in one of the V-stitch spaces at the neckline. Chain 3 (counts as the first double crochet). Then, work a pattern of 3 double crochets in each chain-3 space and 1 double crochet in the space between the V-stitches. Continue this sequence around the entire neck opening and join with a slip stitch to the top of the beginning chain-3.
- Rounds 2 & 3 (Shaping): For the next two rounds, you will simply work one double crochet in each stitch around. To add a subtle shaping and prevent the neck from flaring out, the pattern suggests incorporating two decrease stitches (a “double crochet two together” or dc2tog) on opposite sides of the neck (near the corners) in each of these rounds. This will gently taper the collar.
- Optional Additional Rounds: If you prefer a taller, more prominent mock neck, you can add two or more rounds of straight double crochet (one dc in each stitch) without any further decreases. This part is entirely up to your personal preference.
Weaving in Ends for a Flawless Finish
This is the final, crucial step to completing your project. Do not be tempted to simply snip the yarn tails close to your work! They will unravel over time. Using your blunt needle, carefully weave each yarn tail back and forth through the back side of your stitches for at least a few inches. Change direction a couple of times to ensure it’s extra secure. A proper finish ensures your hard work will be enjoyed for many years to come, making this crochet poncho pattern a lasting treasure.
Styling and Customizing Your Crochet Poncho
One of the greatest joys of creating your own clothing is the ability to infuse it with your personal style. This crochet poncho pattern is a perfect canvas for both styling and customization. Its simple elegance allows for a multitude of looks, and its basic structure is easy to modify.
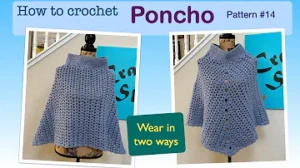
Two Stylish Ways to Wear Your Creation
The thoughtful, symmetrical construction of this poncho allows for two distinct looks from one single garment:
- Classic V-Shape: Wear the poncho with the corner points centered at the front and back. This creates a classic, elongating silhouette that drapes gracefully over the body. It’s a timeless look that pairs beautifully with everything from leggings to a simple dress.
- Modern Asymmetrical Drape: For a more contemporary feel, simply shift the poncho so that the corner points fall over your shoulders, creating a straight hemline in the front and back. This transforms the garment, giving it the look of a chic, boat-necked capelet. This versatility makes your handmade piece twice as valuable in your wardrobe.
Ideas for Customization
Don’t be afraid to make this crochet poncho pattern your own! Here are a few ideas to spark your creativity:
- Add Fringe: For a true bohemian flair, add a fringe along the bottom edge. This is a simple way to add movement and texture.
- Play with Color: While the original is shown in a beautiful solid neutral, imagine the possibilities with color! You could work in stripes, use a self-striping yarn for an effortless color-fade effect, or even make each round a different color for a vibrant, scrappy look.
- Experiment with Edging: Instead of a plain edge, consider adding a simple scallop or picot stitch border around the bottom for a more delicate, decorative finish.
- Adjust the Length: Customizing the length is as easy as adding or subtracting rounds. Create a shorter, capelet-style version, or continue the pattern for a dramatic, full-length poncho.
Quick Takeaways
- Versatile Design: This top-down crochet poncho pattern can be worn two ways, with the points in the front/back or at the sides.
- Beginner-Friendly Stitch: The pattern primarily uses the V-stitch (2 dc, ch 2, 2 dc), which is easy to learn and creates a beautiful, textured fabric.
- Customizable Size: The neck opening and overall size can be easily adjusted by adding or subtracting chains in multiples of five from the foundation chain.
- Seamless Construction: Crocheted in the round from the neckline down, this project requires no seaming of panels.
- Key Materials: You’ll need approximately 700 yards of medium weight (size 4) yarn and a 5mm (H) crochet hook.
- Finishing is Key: Adding the mock neck collar and carefully weaving in all ends provides a polished, professional look to your finished poncho.
- Creative Freedom: The simple structure is a perfect base for customizations like adding fringe, using different color schemes, or altering the length.
Frequently Asked Questions (FAQ)
- 1. Can I use a different weight of yarn for this crochet poncho pattern?
- Yes, you can, but it will affect the final size and drape of the poncho. If you use a lighter yarn (like DK), your poncho will be smaller and more lightweight; you may need to start with more chains. If you use a bulkier yarn, it will be larger and warmer, and you may need fewer starting chains. Always make a gauge swatch to see how the yarn works up with your chosen hook.
- 2. How can I make this poncho in a different size (e.g., for a child or plus size)?
- The easiest way to adjust the size is by altering the foundation chain. The pattern states that each V-stitch section requires five chains. To make a smaller neck opening for a child, reduce the starting chain count in a multiple of five. For a larger size, increase the starting chain count in a multiple of five until it comfortably fits over the head and rests on the shoulders.
- 3. Is this free crochet poncho pattern suitable for an absolute beginner?
- This pattern is excellent for a confident beginner. [9] You should be comfortable making a chain, slip stitch, and double crochet. The V-stitch is a simple combination of these stitches, and the top-down construction is very straightforward. Using stitch markers for the corners, as suggested, is highly recommended for anyone new to this type of project.
- 4. How do I keep my edges from curling?
- This pattern is worked in the round, which naturally prevents the kind of curling you might see in flat, back-and-forth projects. The V-stitch pattern also creates a stable, flat fabric. If you notice any waviness, it might be due to your tension being too loose or too tight, especially on the increase rounds. Blocking your finished poncho can also help it lay perfectly flat.
- 5. What is the best way to care for my finished crochet poncho?
- Care instructions depend entirely on the yarn fiber you used. If you used an acrylic or acrylic-blend yarn, it can likely be machine washed on a gentle cycle and tumbled dry on low heat. For natural fibers like wool or cotton, it’s often best to hand wash in cool water with a gentle detergent, gently squeeze out excess water (do not wring), and lay it flat to dry on a towel to retain its shape.
Conclusion
Embracing a new project is one of the most exciting parts of the crochet journey, and this versatile crochet poncho pattern offers a truly rewarding experience from the first chain to the final woven end. We’ve walked through every stage of its creation, from selecting the perfect medium-weight yarn to mastering the elegant V-stitch and adding a polished mock neck collar. The beauty of this design lies in its simplicity and its adaptability. It’s a pattern that invites you to relax and enjoy the rhythmic process, creating a garment that is both a cozy comfort and a stylish statement piece.
More than just a set of instructions, we hope this guide has inspired you to make this pattern your own. Whether you stick to the classic design or venture into customizing it with fringes, bold colors, or a different length, the result will be a unique reflection of your creativity. This poncho is destined to become a go-to item in your wardrobe, a piece you’ll reach for time and again for its effortless charm and handmade warmth. So pick up your hook, choose your favorite yarn, and get started on a beautiful garment that you’ll be proud to say you made yourself. This is more than just a crochet poncho pattern; it’s your next favorite creation.
We’d love to see your creations! What color will you choose for your poncho? Share your progress and finished projects with our community in the comments below, and don’t forget to share this pattern with your fellow crochet lovers!
References
- [1] Sarah Maker. (2022). Yarn Weight Chart and Guide.
- [2] I Wool Knit. Standard Yarn Weight System.
- [3] Craft Yarn Council. Standard Yarn Weight System.
- [4] TLYC Blog. (2022). The Skinny on Yarn Weight for Crocheters.
- [5] Craft Yarn Council. Standards and Guidelines for Crochet and Knitting.