
Crochet Tigger Rattle Pattern — Free Step-by-Step Baby Toy Tutorial (So Adorable!)
Crochet Tigger Rattle Pattern: The Cutest Baby Toy You’ll Ever Make
He’s Bouncy, Trouncy, Flouncy, Pouncy — And You’re About to Make Him
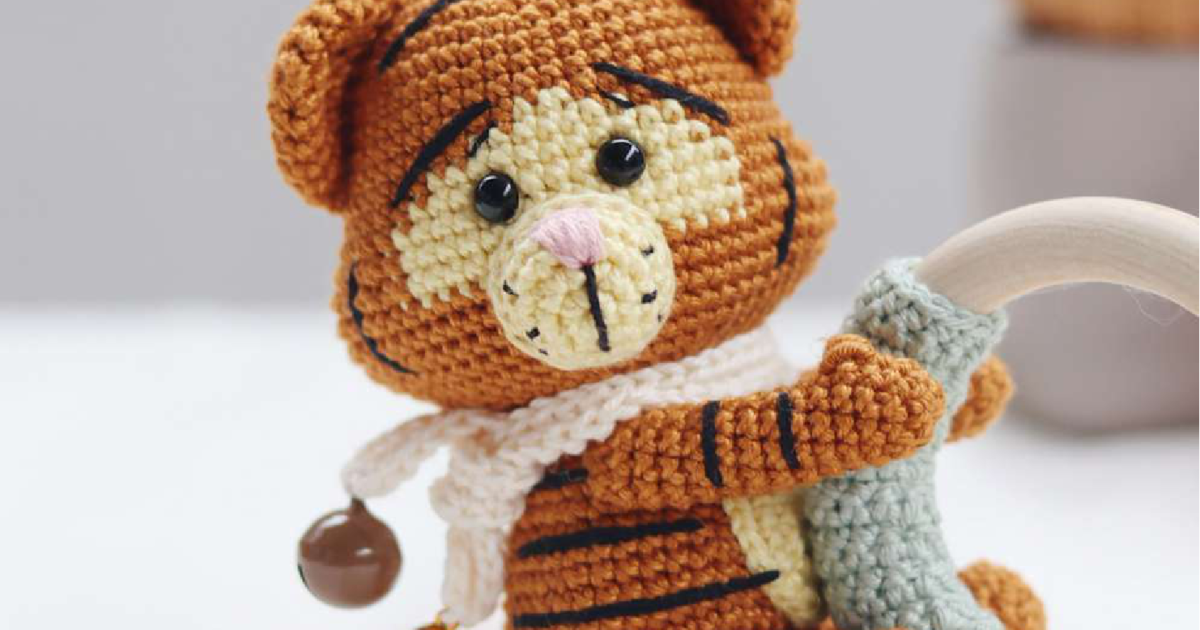
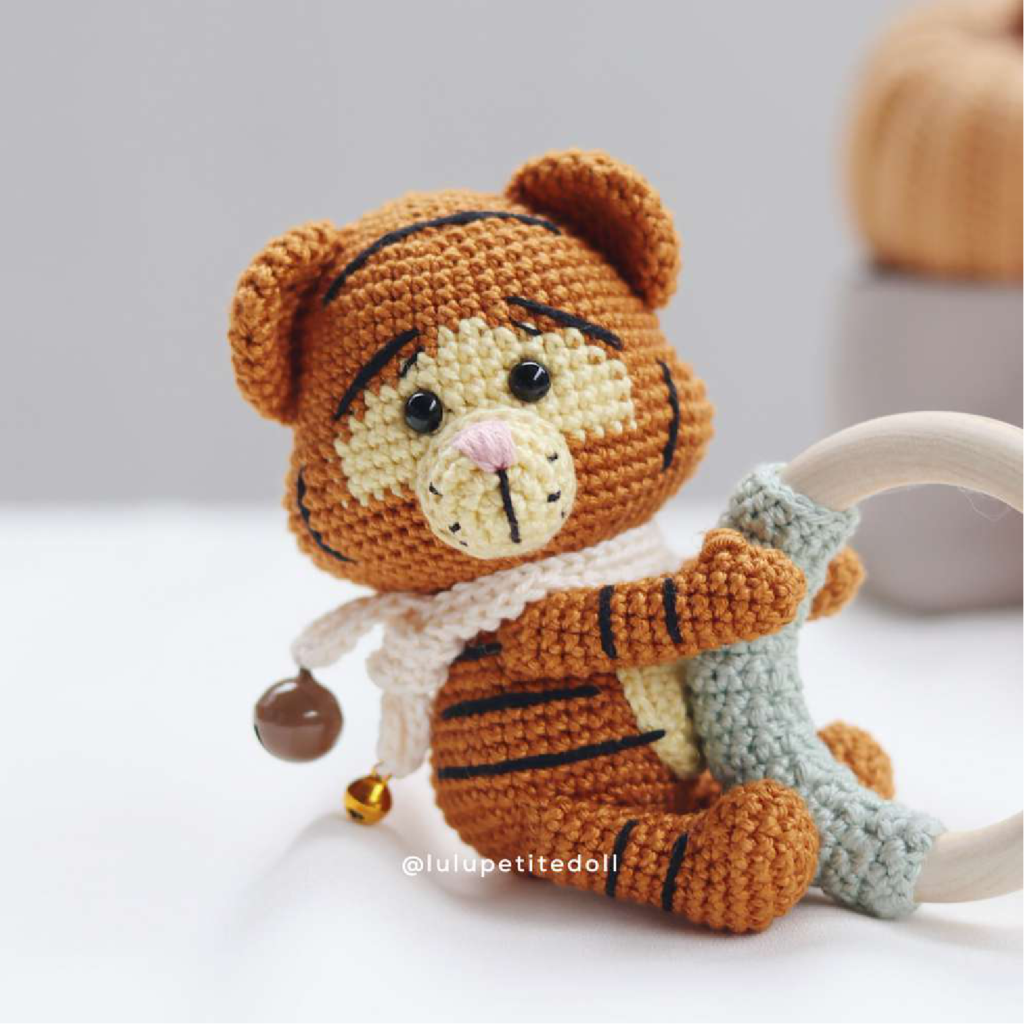
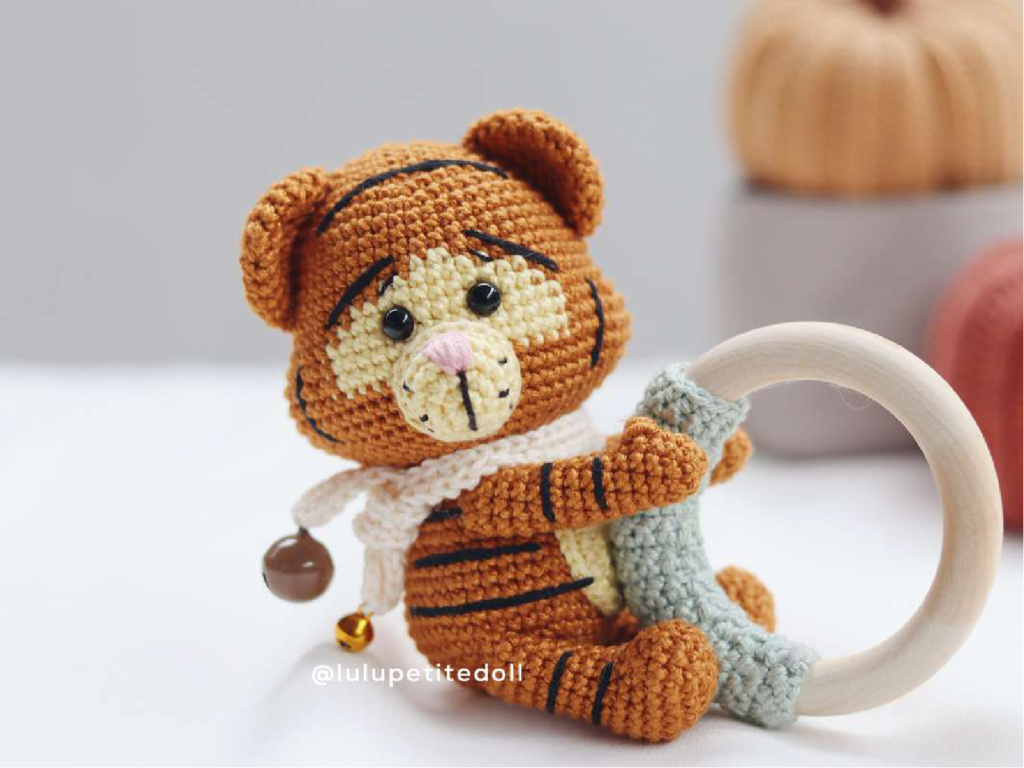
Picture this: a tiny orange-and-black striped tiger, round belly stuffed with love, a cream lace scarf draped around his neck with two little bells jingling from the ends, and a smooth wooden teething ring tucked under one arm. Now picture that little treasure sitting in a gift bag for the newest baby in your life.
That’s the Crochet Tigger Rattle — and oh my goodness, this little guy is everything.

From the moment you see him, you just know this isn’t your average baby toy. He’s got personality. He’s got stripes. He’s got the most squishy, huggable proportions you’ve ever crocheted into existence. And the best part? This beginner crochet baby rattle tutorial breaks down every single step so you can bring him to life with confidence — even if amigurumi is still a little new to you.
By the end of this post, you’ll have everything you need to make this yourself — even if you’re still working on your gauge consistency.
Why You’ll Love This Crochet Tigger Rattle Pattern
- 🐯 Instantly recognizable and irresistibly adorable — that classic tiger face with embroidered stripes makes this a total showstopper
- 🎁 The ultimate handmade baby gift — unique, thoughtful, and something no big-box store could ever sell
- 🪵 Combines crochet with a natural wooden teething ring — sensory-rich and safe for little hands to grip and chew
- 🔔 Built-in bells add a gentle rattle sound — babies absolutely love it, and so do their parents
- ⏱️ Satisfying weekend project — achievable in a few focused sessions for an intermediate crocheter
- 🧶 Teaches great skills — you’ll practice bobble stitches, color changes, BLO/FLO techniques, and flat panel assembly all in one project
Materials & Tools You’ll Need
Here’s your complete checklist before you cast on (well, chain up!):
Yarn:
- [ ] Color #383 — burnt orange/amber (main body color) — DK light weight or sport weight yarn
- [ ] Color #403 — cream/pale yellow (muzzle, belly detail)
- [ ] Color #130 — off-white/ivory (scarf)
- [ ] Color #402 — sage/dusty green (ring clamp)
- [ ] Small amount of black yarn for embroidering stripes and facial details
- [ ] Small amount of pink yarn for the nose
💡 The original pattern uses Schachenmayr Catania (a lovely sport weight cotton). Great USA substitutes include Lion Brand 24/7 Cotton or Paintbox Simply DK — both give you that clean stitch definition that makes amigurumi look crisp and professional.
Hook:
- [ ] 2.0 mm crochet hook (no standard US letter equivalent — look for a 2.0 mm steel or aluminum hook)
💡 Yarn and hook size work together. If your stitches are loose and floppy, try a 1.75 mm hook. The goal is a tight, firm fabric so your fiberfill doesn’t show through.

Other Supplies:
- [ ] 6 mm black safety eyes — 2 pieces
- [ ] Fiberfill stuffing (polyfill)
- [ ] Wooden teething ring — 7 cm outer diameter
- [ ] 2 small bells (one brown/copper tone, one gold tone, as shown in photos)
- [ ] Tapestry/yarn needle for sewing and embroidering
- [ ] Scissors
- [ ] Stitch markers (optional but helpful!)
⚠️ Safety Note: This toy is designed as a decorative rattle or supervised play toy. If gifting to a baby under 3 years, always ensure safety eyes are secured firmly and check with the recipient’s parents about their comfort level with small parts like bells.
Abbreviations & Stitch Guide
Every abbreviation you’ll need, spelled out clearly:
| Abbreviation | Meaning |
|---|---|
| Rnd | Round |
| Rw | Row |
| MR | Magic Ring (also called a magic circle) — a slip-knot loop you start your rounds from, which can be pulled closed tightly. [LINK: how to make a magic ring tutorial] |
| st / sts | Stitch / Stitches |
| ch | Chain |
| sc | Single crochet |
| inc | Increase — work 2 single crochets into the same stitch |
| dec | Single crochet decrease — use the invisible decrease method for the neatest result: insert your hook through the front loops only of the next two stitches, yarn over, pull through both loops, yarn over, pull through remaining loops. [LINK: invisible decrease technique guide] |
| BLO | Back Loop Only — insert your hook under only the back loop of the stitch. This creates a subtle ridge on the front of your work. |
| FLO | Front Loop Only — insert your hook under only the front loop of the stitch. This creates that lovely ridged texture on the back! |
| hdc | Half double crochet — yarn over, insert hook, pull up a loop, yarn over, pull through all 3 loops |
| dc | Double crochet — yarn over, insert hook, pull up a loop, (yarn over, pull through 2 loops) twice |
| sl st | Slip stitch — insert hook, yarn over, pull through both the stitch AND the loop on your hook in one motion |
| ( … ) * x | Repeat the instructions inside parentheses the stated number of times |
| Bobble (3 dc) | A bobble stitch made of 3 double crochets worked into the same stitch, all joined at the top — creates a little raised bump, perfect for Tigger’s adorable paw pads! To make it: [yarn over, insert hook into stitch, pull up loop, yarn over, pull through 2 loops] 3 times into the same stitch, then yarn over and pull through all 4 remaining loops. |
💡 Tip on the invisible decrease: This one technique will level up your amigurumi game instantly. It closes more tightly than a standard sc2tog and leaves no visible “bump.” Practice it a few times before you start — you’ll never go back!
Step-by-Step Crochet Tigger Rattle Pattern Instructions
Work in continuous rounds (spiral style) unless otherwise noted. Use a stitch marker to track the beginning of each round — it’s a lifesaver!
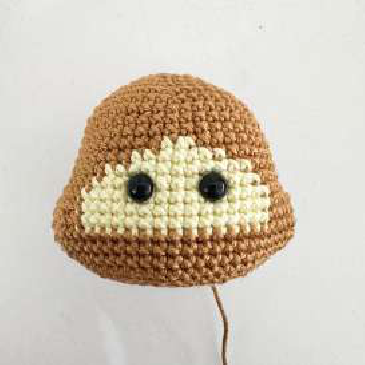
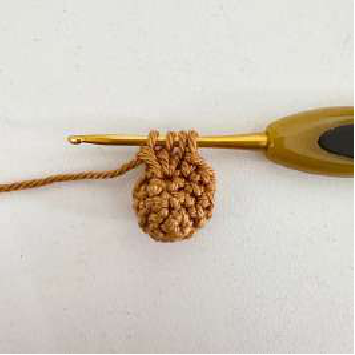
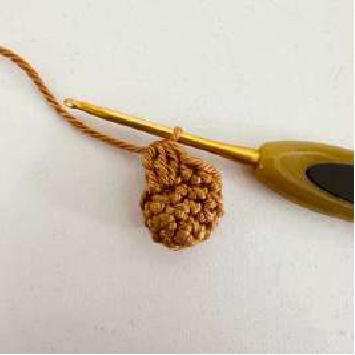
🐯 Head
Colors used: #383 (orange) and #403 (cream) — begin with #383. Anywhere you see instructions highlighted in the original pattern in red, switch to color #403.
Step 1 — Rnd 1: Start with a magic ring. Work 6 sc into the ring. Pull the tail to close. [6 sts]
Step 2 — Rnd 2: Work 1 inc in every stitch around. [12 sts]
Step 3 — Rnd 3: (sc, inc) — repeat 6 times. [18 sts]
Step 4 — Rnd 4: (2 sc, inc) — repeat 6 times. [24 sts]
Step 5 — Rnd 5: (3 sc, inc) — repeat 6 times. [30 sts]
💡 Pro Tip: After every increase round, count your stitches. It takes 10 seconds and saves you from ripping back 20 rows later. Future you says thank you!
Step 6 — Rnd 6: (4 sc, inc) — repeat 6 times. [36 sts]
Step 7 — Rnd 7: (5 sc, inc) — repeat 6 times. [42 sts]
Step 8 — Rnd 8: (6 sc, inc) — repeat 6 times. [48 sts]
Steps 9–11 — Rnds 9–11: Work 48 sc straight, no increases or decreases. (3 rounds total) [48 sts]
Step 12 — Rnd 12: 11 sc, inc, 10 sc, sc, inc (in color #403), (11 sc, inc) — repeat 2 times. [52 sts]
This is where the muzzle area starts to take shape — those stitches in cream are the beginning of Tigger’s signature face!
Step 13 — Rnd 13: 21 sc, 7 sc (in #403), 24 sc. [52 sts]
Step 14 — Rnd 14: 19 sc, 11 sc (in #403), 22 sc. [52 sts]
Step 15 — Rnd 15: 18 sc, 13 sc (in #403), 21 sc. [52 sts]
Step 16 — Rnd 16: 10 sc, (sc, inc) × 3, sc, 15 sc (in #403), 4 sc, (inc, sc) × 3, 10 sc. [58 sts]
Step 17 — Rnd 17: 10 sc, (2 sc, inc) × 3, sc, 15 sc (in #403), 4 sc, (inc, 2 sc) × 3, 10 sc. [64 sts]
Step 18 — Rnd 18: 23 sc, 15 sc (in #403), 26 sc. [62 sts]
💡 Pro Tip: Place your safety eyes NOW. Before continuing, insert your 6 mm black safety eyes between Rounds 15 and 16, with 5 stitches between them. It’s much harder to place them correctly once the head is more closed up. Secure the washers firmly on the inside.
Steps 19–20 — Rnds 19–20: Work 64 sc straight. [64 sts]
Step 21 — Rnd 21 (begin decreasing): 10 sc, (2 sc, dec) × 3, 20 sc, (dec, 2 sc) × 3, 10 sc. [58 sts]
Step 22 — Rnd 22: 10 sc, (sc, dec) × 3, 20 sc, (dec, sc) × 3, 10 sc. [52 sts]
Step 23 — Rnd 23: (11 sc, dec) — repeat 4 times. [48 sts]
Step 24 — Rnd 24: (4 sc, dec) — repeat 8 times. [40 sts]
Step 25 — Rnd 25: (3 sc, dec) — repeat 8 times. [32 sts]
Step 26 — Rnd 26: (2 sc, dec) — repeat 8 times. [24 sts]
Fasten off. Stuff the head firmly with fiberfill — really pack it in so the head holds its round shape nicely. Leave a long yarn tail for sewing later.
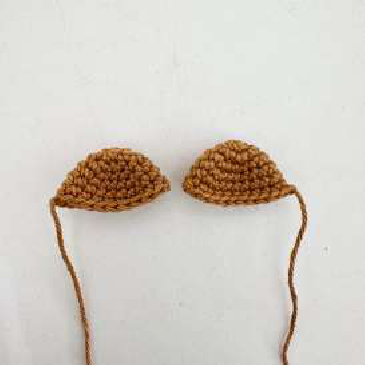
👂 Ears (Make 2)
Color: #383 (orange)
Step 1 — Rnd 1: MR, 6 sc. [6 sts]
Step 2 — Rnd 2: 6 inc (one in every stitch). [12 sts]
Step 3 — Rnd 3: (sc, inc) — repeat 6 times. [18 sts]
Step 4 — Rnd 4: (5 sc, inc) — repeat 3 times. [21 sts]
Steps 5–6 — Rnds 5–6: Work 21 sc straight. [21 sts]
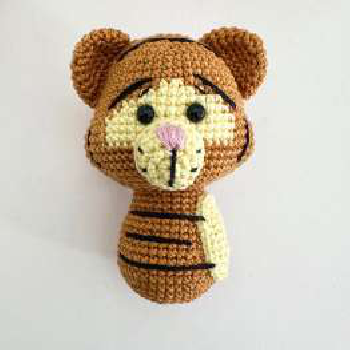
Fasten off, leaving a long tail. Fold the ear in half, then sew the two side edges together to close the opening and give it that rounded ear shape. Sew each ear to the head spanning from Round 4 to Round 13 of the head.
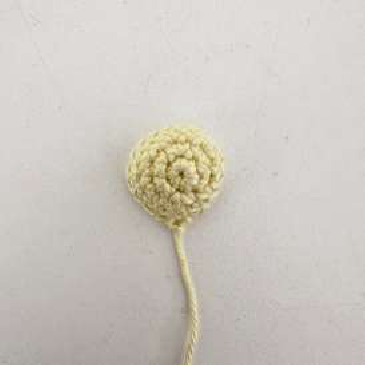
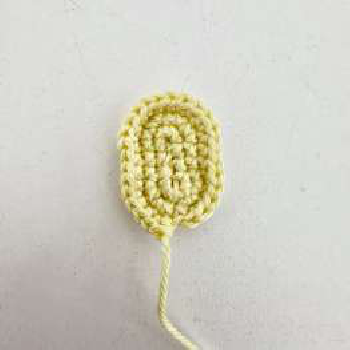

👃 Snout
Color: #403 (cream)
Step 1 — Rnd 1: MR, 6 sc. [6 sts]
Step 2 — Rnd 2: 6 inc. [12 sts]
Step 3 — Rnd 3: (sc, inc) — repeat 6 times. [18 sts]
Steps 4–5 — Rnds 4–5: Work 18 sc straight. [18 sts]
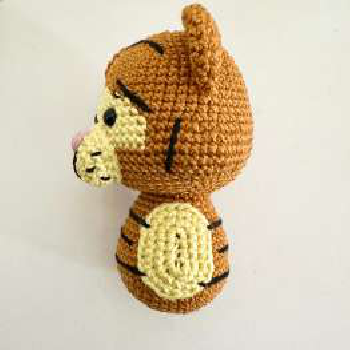
Fasten off, leaving a long tail. Stuff lightly with fiberfill. Sew the snout to the head spanning from Round 14 to Round 20 of the head, centered on the cream-colored muzzle area. Once attached, embroider the nose in pink yarn and the mouth and whisker lines in black yarn.
💡 Don’t worry if your first attempt at embroidery looks a little wonky — we’ve all been there! Work slowly, use a photo of the finished toy for reference, and remember: a slightly imperfect nose just adds charm.
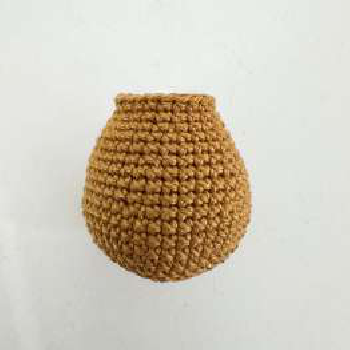
🫁 Body
Color: #383 (orange)
Step 1 — Rnd 1: MR, 6 sc. [6 sts]
Step 2 — Rnd 2: 6 inc. [12 sts]
Step 3 — Rnd 3: (sc, inc) — repeat 6 times. [18 sts]
Step 4 — Rnd 4: (2 sc, inc) — repeat 6 times. [24 sts]
Step 5 — Rnd 5: (3 sc, inc) — repeat 6 times. [30 sts]
Step 6 — Rnd 6: (4 sc, inc) — repeat 6 times. [36 sts]
Step 7 — Rnd 7: (5 sc, inc) — repeat 6 times. [42 sts]
Steps 8–10 — Rnds 8–10: Work 42 sc straight (3 rounds). [42 sts]
Step 11 — Rnd 11: (5 sc, dec) — repeat 6 times. [36 sts]
Steps 12–14 — Rnds 12–14: Work 36 sc straight (3 rounds). [36 sts]
Step 15 — Rnd 15: (4 sc, dec) — repeat 6 times. [30 sts]
Steps 16–17 — Rnds 16–17: Work 30 sc straight. [30 sts]
Step 18 — Rnd 18: (3 sc, dec) — repeat 6 times. [24 sts]
Steps 19–20 — Rnds 19–20: Work 24 sc straight. [24 sts]
Fasten off and stuff with fiberfill. Set aside.
💡 Belly Detail: Before closing the body entirely, make the belly panel in color #403 (cream): Make 5 chains, starting in the second chain from the hook. Rnd 1: inc, 2 sc, 4 sc into the last stitch, work along the other side: 2 sc, inc. [12 sts] Rnd 2: 2 inc, 2 sc, 4 inc, 2 sc, 2 inc. [20 sts] Rnd 3: (sc, inc) × 2, 2 sc, (sc, inc) × 4, 2 sc, (sc, inc) × 2. [28 sts] Fasten off and sew this oval panel to the front center of the body. Then embroider the tiger stripe details in black yarn across the body.
🦵 Legs (Make 2)
Color: #383 (orange)
Make 5 chains, starting in the second chain from the hook.
Step 1 — Rnd 1: 3 sc, 3 sc into the last stitch, work along the other side: 2 sc, inc. [10 sts]
Step 2 — Rnd 2: inc, 2 sc, 3 inc, 2 sc, 2 inc. [16 sts]
Step 3 — Rnd 3: sc, inc, 2 sc, (sc, inc) × 3, 2 sc, (sc, inc) × 2. [22 sts]
Step 4 — Rnd 4: Work 22 sc straight. [22 sts]
Step 5 — Rnd 5: 5 sc, (sc, dec) × 3, 6 sc, dec. [18 sts]
Step 6 — Rnd 6: 5 sc, 3 dec, 7 sc. [15 sts]
Step 7 — Rnd 7: 3 sc, 4 dec, 2 sc, dec. [10 sts]
Steps 8–14 — Rnds 8–14: Work 10 sc straight (7 rounds). [10 sts]
Fasten off, stuff with fiberfill, and leave a long tail for sewing.
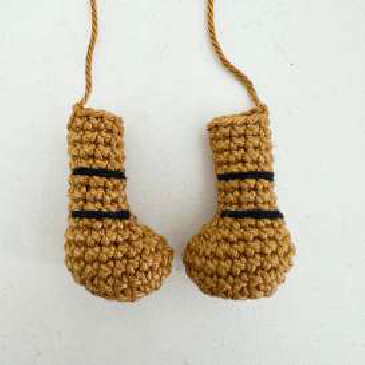
💪 Arms (Make 2)
Color: #383 (orange)
Step 1 — Rnd 1: MR, 5 sc. [5 sts]
Step 2 — Rnd 2: 5 inc. [10 sts]
Steps 3–4 — Rnds 3–4: Work 10 sc straight. [10 sts]
Step 5 — Rnd 5 (Bobble paw pad!): Work 1 bobble stitch (3 dc), then 9 sc. [10 sts]
💡 That little bobble is Tigger’s adorable paw pad! See the Abbreviations section above for exactly how to make a bobble stitch — it’s easier than it looks, we promise.
Step 6 — Rnd 6: dec, 8 sc. [9 sts]
Steps 7–14 — Rnds 7–14: Work 9 sc straight (8 rounds). [9 sts]
Crochet 1–2 extra sc so that the final stitch lands in the middle/center of the arm. Stuff lightly with fiberfill. Fasten off, leaving a long tail. Fold the top opening flat and sew the two sides together to close it — this gives the arm its flat top for sewing neatly onto the body.
💡 Pro Tip: Stuff the arms only very lightly — you want them to stay flexible and pose-able, not stiff.
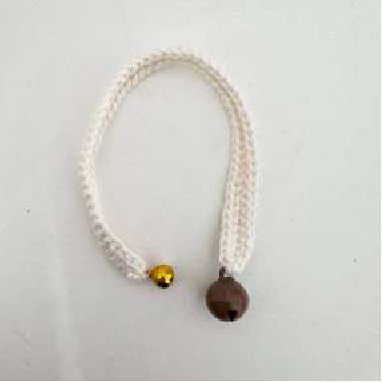
🧣 Scarf
Color: #130 (ivory/off-white)
Leave a long starting tail. Make 56 chains, starting in the second chain from the hook.
Work along the chain: 54 sc, then 3 sc into the last stitch (to turn the corner), then work along the other side: 53 sc, inc, sl st. [113 sts total]
Fasten off, leaving a long tail. Sew one bell to each end of the scarf.
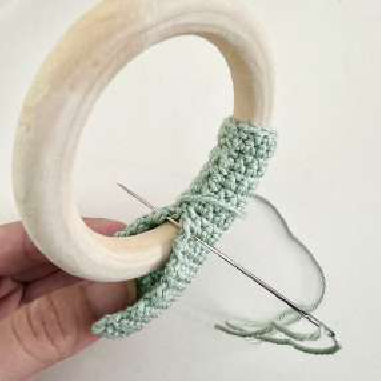
🪵 Ring Clamp (the crochet cover for the wooden teething ring)
Color: #402 (sage green)
Make 13 chains, starting in the second chain from the hook.
Rows 1–23: Work 12 sc across, chain 1, turn. [12 sts per row]
Row 24: Work 12 sc across (no turning chain). [12 sts]
Fasten off, leaving a long tail for sewing.
Wrap this crocheted rectangle around the wooden ring and sew the short ends together to cover it completely. Sew the arms and legs to the body, then attach the hands and feet to the clamp so Tigger is “hugging” the ring.
💡 Assembly tip: Lay everything out before you start sewing. Getting the positioning right first (taking a quick photo with your phone for reference) saves a lot of unsewing!
Finishing & Assembly
You’ve made all the pieces — look at that pile of tiny tiger parts, it’s adorable! Now let’s put your little guy together.
Assembling Tigger
- Attach the ears to the head, using your long yarn tails and a tapestry needle. Refer to the pattern photos for positioning — they sit high on the head, spaced wide.
- Sew the snout to the center-front of the head at Rounds 14–20. Embroider the pink nose and black mouth details now, using the finished photo as your guide.
- Embroider the tiger stripes across the head and body using black yarn. Work in a back-stitch or satin-stitch style for clean, confident lines.
- Sew the head to the body, using your long tail and working all the way around for a secure join.
- Sew the arms to the sides of the body.
- Sew the legs to the bottom of the body.
- Wrap the ring clamp around the wooden teething ring and sew it closed.
- Attach Tigger’s hands and feet to the clamp so he’s holding the ring snugly.
- Drape the scarf around his neck and secure it with a few stitches — the two bells should dangle at the front.
Weaving in Ends
Thread each yarn tail onto your tapestry needle and weave it through several stitches in different directions — no need to knot. Give it a gentle tug and trim. For sport weight yarn, 2–3 passes in a zigzag is plenty.
A Quick Note on Blocking
Since this is a stuffed toy, you won’t need to wet block it. But if any piece looks a little uneven before stuffing, a light steam (hold the iron a few inches away and let the steam do the work — don’t press!) can smooth things out beautifully.
🎉 You Did It!
Step back and look at what your hands just created. A bouncy little tiger. A handmade baby toy. A future heirloom. Give yourself a genuine round of applause — you absolutely earned it!
Styling & Usage Ideas
This little guy is way too cute to hide in a drawer. Here’s how to show him off:
- Baby shower centerpiece gift: Nestle Tigger into a wicker basket lined with a soft muslin cloth, alongside a matching crochet baby blanket — it’s an instant Pinterest moment.
- Nursery shelf display: Prop him up on a wooden shelf in a woodland or storybook-themed nursery. That wooden ring looks gorgeous against natural textures.
- Craft fair bestseller: Crocheted baby rattles like this one are consistently among the top sellers at local markets. Pair with a hand-stamped tag and a ribbon for a boutique look.
- Holiday gifting: With his warm amber tones and cozy little scarf, Tigger fits right into a fall or holiday gift spread — imagine him tucked under the tree at a Christmas baby shower!
Save This Pattern & Share Your Tigger! 🐯
If this free crochet Tigger rattle tutorial made you reach for your hook, I want to hear about it! Drop a comment below with how yours turned out — first-timers and seasoned amigurumi pros alike, I genuinely love seeing every single one.
📌 Pin this post so you can find it again when you’re ready to make your next one (because you will want to make another — maybe a whole Hundred Acre Wood?).
📸 Share your finished Tigger on Instagram and tag the original designer @lulupetitedoll with the hashtag #lulupetitedoll — she absolutely loves seeing her patterns come to life in your hands.
And if you’re hungry for more crochet baby toy inspiration, check out these posts:
- [LINK: beginner amigurumi tips post]
- [LINK: crochet baby shower gift ideas roundup]
- [LINK: best yarn for baby toys post]
Happy hooking, friend. You’ve got this. 🧶🧡