Crochet Your Own Adorable Baby Corgi
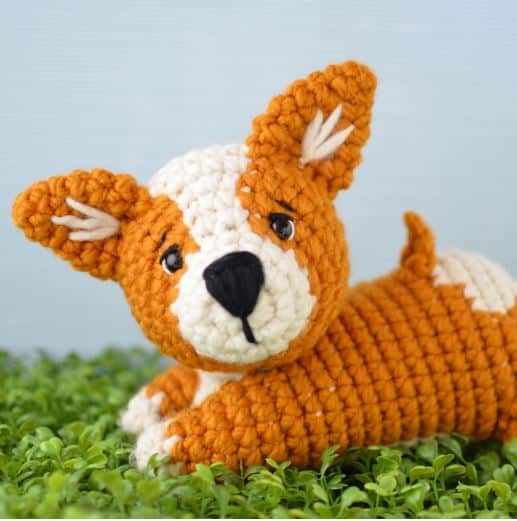
Who can resist the adorable charm of a corgi? With their big ears, happy smiles, and fluffy loaf-like bodies, they are simply one of the cutest dogs around. Now, you can crochet your very own cuddly companion with this free Baby Corgi pattern from Lion Brand!
This pattern is perfect for a confident beginner ready to dive into the world of amigurumi. Using chunky yarn, this little pup works up surprisingly fast, making it a wonderfully satisfying project. The clever construction and colorwork create those classic corgi markings, and the finished toy is a huggable, sturdy friend perfect for gifting or keeping all to yourself.
Get your hooks ready, because it’s time to make the most charming pup on the block!
What You’ll Need for Your Corgi
This pattern uses a super bulky yarn, which helps create a wonderfully chunky and quick-to-make toy. Here’s everything you’ll need to gather.
- Yarn: Lion Brand® Wool-Ease® Thick & Quick® (Super Bulky #6)
- Color A: 1 ball of #099 Fisherman (the white/cream color)
- Color B: 1 ball of #189 Butterscotch (the main orange/tan color)
- Crochet Hook: 7 mm
- Other Essentials:
- One pair of 10mm black plastic safety eyes
- A small amount of black yarn or embroidery floss for the nose
- Black and white embroidery floss for eye details
- Fiberfill stuffing
- A large-eyed blunt needle (tapestry needle) for assembly
Pattern Details & Key Techniques
- Finished Size: About 7.5 inches (19 cm) tall and 10.5 inches (26.5 cm) long.
- Gauge: 10 sc + 10 rounds = 4 inches (10 cm).
- Abbreviations (US Terms):
- ch: chain
- st(s): stitch(es)
- sl st: slip stitch
- sc: single crochet
- hdc: half double crochet
- sc2tog: single crochet 2 stitches together (a decrease)
- RS: right side
Key Techniques to Know
- Magic Ring: This is the standard way to start amigurumi in the round without a hole in the center.
- Invisible Join: This pattern uses a special join to create a seamless look. Here’s how you do it: After making your last stitch of the round, remove the loop from your hook. Insert the hook from the wrong side (back) to the right side (front) through the first stitch of that same round. Place the loop back on your hook and pull it through to the back. Chain 1, and you’re ready to start the next round!
- Color Changes: To get those clean corgi markings, you’ll change colors mid-round. To do this, work the last stitch of the old color up to the final yarn over. Then, yarn over with the new color and pull through to complete the stitch. Carry the color you aren’t using along the inside (wrong side) of your work.
A Quick Safety Note: If this toy is for a baby or small child, please embroider the eyes instead of using plastic safety eyes. This piece is not intended as a toy, so never leave a baby or child unattended with it.
Let’s Start Crocheting! Your Baby Corgi Pattern
This corgi is worked in 7 pieces: the Front Legs-Body, the Head, two Back Legs, two Ears, and a Tail. Let’s begin with the main body!
Part 1: The Front Legs & Body
First Front Leg:
- Rnd 1 (RS): With Color A (Fisherman), make a magic ring and work 6 sc into it. Use an invisible join. (6 sts)
- Rnd 2: With Color A, ch 1, sc in each stitch around. Change to Color B (Butterscotch) in the last stitch. Invisible join. (6 sts)
- Rnd 3: With Color B, ch 1. Repeat this sequence twice: . Invisible join. (8 sts)
- Rnd 4: With Color B, ch 1. Repeat this sequence twice: . Invisible join. (10 sts)
Fasten off.
Second Front Leg:
Make the exact same as the first leg, but when you finish Round 4, change to Color A in the last stitch and DO NOT fasten off! We will now join the two legs together.
Joining the Legs to Start the Body:
Rnd 5:
- With Color A still attached to the second leg, ch 3. This chain will create the space for the corgi’s chest between the legs.
- Now, grab your first leg. With Color B, sl st into the first stitch of the last round of the first leg.
- Ch 1, and with Color B, sc in that same stitch and in the next 9 stitches around the first leg.
- You’ve now reached the chain between the legs. Switch to Color A. Working into the back bumps of the chain, hdc in each of the 3 chains.
- You are now at the second leg. Switch back to Color B. Sc in the first stitch of the second leg and in the next 9 stitches around.
- You’re back at the chain bridge. With Color A, hdc in each of the 3 chains on the opposite side.
- Use an invisible join. Do not fasten off. (26 sts)
You should now have a single piece with two little legs at the front!
Continuing the Body:
- Rnd 6: With A, ch 1, 2 sc in first st. With B, sc in next 8 sts. With A, 2 sc in next st, sc in next 3 sts, 2 sc in next st. With B, sc in next 8 sts. With A, 2 sc in next st, sc in next 3 sts. Invisible join. (30 sts)
- Rnds 7-8: With A, ch 1, sc in next 3 sts. With B, sc in next 7 sts. With A, sc in next 7 sts. With B, sc in next 8 sts. With A, sc in next 5 sts. Invisible join.
- Rnd 9: With A, ch 1, sc in next 3 sts. With B, sc in next 22 sts. With A, sc in next 5 sts. Invisible join.
- Rnds 10-16: With A, ch 1, sc in next 4 sts. With B, sc in next 21 sts. With A, sc in next 5 sts. Invisible join.
- Start stuffing the legs and body now, and continue adding stuffing as you go.
- Rnd 17: With A, ch 1, sc in next 4 sts. With B, work [2 sc in next st, sc in next 9 sts] twice, then 2 sc in next st. With A, sc in next 5 sts. Invisible join. (33 sts)
- Rnd 18: With A, ch 1, sc in next 3 sts. With B, sc in next 11 sts. With A, sc in next 5 sts. With B, sc in next 10 sts. With A, sc in next 4 sts. Invisible join.
- Rnd 19: With A, ch 1, sc in next 2 sts. With B, sc in next 10 sts. With A, sc in next 9 sts. With B, sc in next 9 sts. With A, sc in next 3 sts. Change to B in the last stitch. Invisible join.
- Rnd 20: With B, ch 1, sc in next 12 sts. With A, sc in next 9 sts. With B, sc in next 12 sts. Invisible join.
- Rnd 21: With B, ch 1, sc in next 10 sts, sc2tog, sc in next st. With A, sc in next 8 sts. With B, sc2tog, sc in next 8 sts, sc2tog. Invisible join. (30 sts)
- Rnd 22: With B, ch 1, twice, sc in next 3 sts. With A, sc2tog, sc in next 3 sts, sc2tog. With B, twice. Invisible join. (24 sts)
- Cut Color A. Work the rest of the body with Color B only.
- Rnd 23: With B, ch 1, repeat around. Invisible join. (18 sts)
- Rnd 24: With B, ch 1, repeat around. Invisible join. (12 sts)
- Finish stuffing the body firmly.
- Rnd 25: With B, ch 1, [sc2tog] repeat around. Invisible join. (6 sts)
Fasten off, leaving a long tail. Thread the tail through the front loops of the last 6 stitches and pull tight to close the opening. Knot securely and hide the end.
Part 2: The Head
- Rnd 1: With A, make a magic ring, 8 sc in ring. Invisible join. (8 sts)
- Rnd 2: With A, ch 1, 2 sc in each st around. Invisible join. (16 sts)
- Rnd 3: With A, ch 1, sc in each st around. Invisible join.
- Rnd 4: With A, ch 1, sc in each st around, change to B in last st. Invisible join.
- Rnd 5: With B, ch 1, 3 times, sc in next st. With A, 2 sc in each of next 2 sts. With B, 3 times, sc in next st. Invisible join. (24 sts)
- Rnd 6: With B, ch 1, 3 times, sc in next 2 sts. With A, sc in next 3 sts. With B, 3 times, sc in next st. Invisible join. (30 sts)
- Rnd 7: With B, ch 1, sc in next 14 sts. With A, sc in next st, 2 sc in next st, sc in next st. With B, sc in next 13 sts. Invisible join. (31 sts)
- Rnd 8: With B, ch 1, sc in next 14 sts. With A, 2 sc in next st, sc in next 2 sts, 2 sc in next st. With B, sc in next 13 sts. Invisible join. (33 sts)
- Rnd 9: With B, ch 1, sc2tog, sc in next 12 sts. With A, sc in next 7 sts. With B, sc in next 12 sts. Invisible join. (32 sts)
- Rnd 10: With B, ch 1, sc in next 13 sts. With A, sc in next 7 sts. With B, sc in next 12 sts. Invisible join.
- Insert safety eyes between Rnds 5 and 6, about 7 stitches apart on the front of the head. Begin stuffing the head.
- Rnd 11: With B, ch 1, sc in next 13 sts. With A, sc2tog, sc in next 3 sts, sc2tog. With B, sc in next 12 sts. Invisible join. (30 sts)
- Rnd 12: With B, ch 1, twice, sc in next 2 sts. With A, sc in next 2 sts, sc2tog. With B, twice. Invisible join. (25 sts)
- Cut Color A. Work the remainder of the head with Color B only.
- Rnd 13: With B, ch 1, repeat around. Invisible join. (20 sts)
- Rnd 14: With B, ch 1, repeat around. Invisible join. (15 sts)
- Finish stuffing the head firmly.
- Rnd 15: With B, ch 1, repeat around. Invisible join. (10 sts)
Fasten off, leaving a long tail. Thread the tail through the front loops of the last 10 stitches, pull to close, and knot securely. We will use the remaining tail for sewing later.
Part 3: The Back Legs (Make 2)
- Rnd 1: With A, make a magic ring, 6 sc in ring. Invisible join. (6 sts)
- Rnd 2: With A, ch 1, sc in each st around, change to B in last st. Invisible join.
- Cut Color A. Work the remainder of the leg with Color B only.
- Rnd 3: With B, ch 1, twice. Invisible join. (8 sts)
- Rnd 4: With B, ch 1, twice. Invisible join. (10 sts)
- Rnd 5: With B, ch 1, twice. Invisible join. (12 sts)
Fasten off, leaving a long tail for sewing. Stuff the legs lightly.
Part 4: The Ears (Make 2)
- Rnd 1: With B, make a magic ring, 5 sc in ring. Invisible join. (5 sts)
- Rnd 2: Ch 1, 2 sc in first st, sc in next 4 sts. Invisible join. (6 sts)
- Rnd 3: Ch 1, twice. Invisible join. (8 sts)
- Rnd 4: Ch 1, twice. Invisible join. (10 sts)
- Rnd 5: Ch 1, twice. Invisible join. (12 sts)
- Rnd 6: Ch 1, sc in each st around. Invisible join.
Fasten off, leaving a long tail for sewing. Do not stuff the ears; they should be flat.
Part 5: The Tail
The tail is worked in flat rows.
- With B, ch 4.
- Row 1: Sl st in 2nd ch from hook, hdc in next ch, dc in next ch. (3 sts)
Fasten off, leaving a long tail for sewing.
Assembly & Finishing Touches
Now it’s time to bring your corgi to life! Use the photos as a guide for placement.
- Embroider the Face:
- Using black yarn or floss, embroider a nose on the front of the muzzle.
- With black embroidery floss, add some straight-stitch eyebrows above the eyes.
- With white embroidery floss, add a small curve along the outer edge of each safety eye to create the “whites” of the eyes.
- Attach the Ears: Using Color A, embroider a straight line down the center of each ear for detail. Then, using the long tail from Color B, sew the ears to the top of the head between Rounds 8 and 10, about 7 stitches apart.
- Attach the Head: Sew the head securely to the front of the body.
- Attach the Back Legs: Sew the back legs to the sides of the body, positioning them between Rounds 18 and 23.
- Attach the Tail: Sew the tail to the back of the body, between Rounds 16 and 17.
- Weave in all remaining ends.
Make It Your Own!
- Different Colors: Corgis come in different colors! Try making a tricolor corgi with black, white, and tan, or a fluffy cardigan corgi with a grey brindle pattern.
- Add a Collar: Crochet a simple chain and slip stitch it around your corgi’s neck for a cute little collar. Add a tiny bell or charm for extra personality!