Crochet Your Own Adorable Bunny Keychain Free!
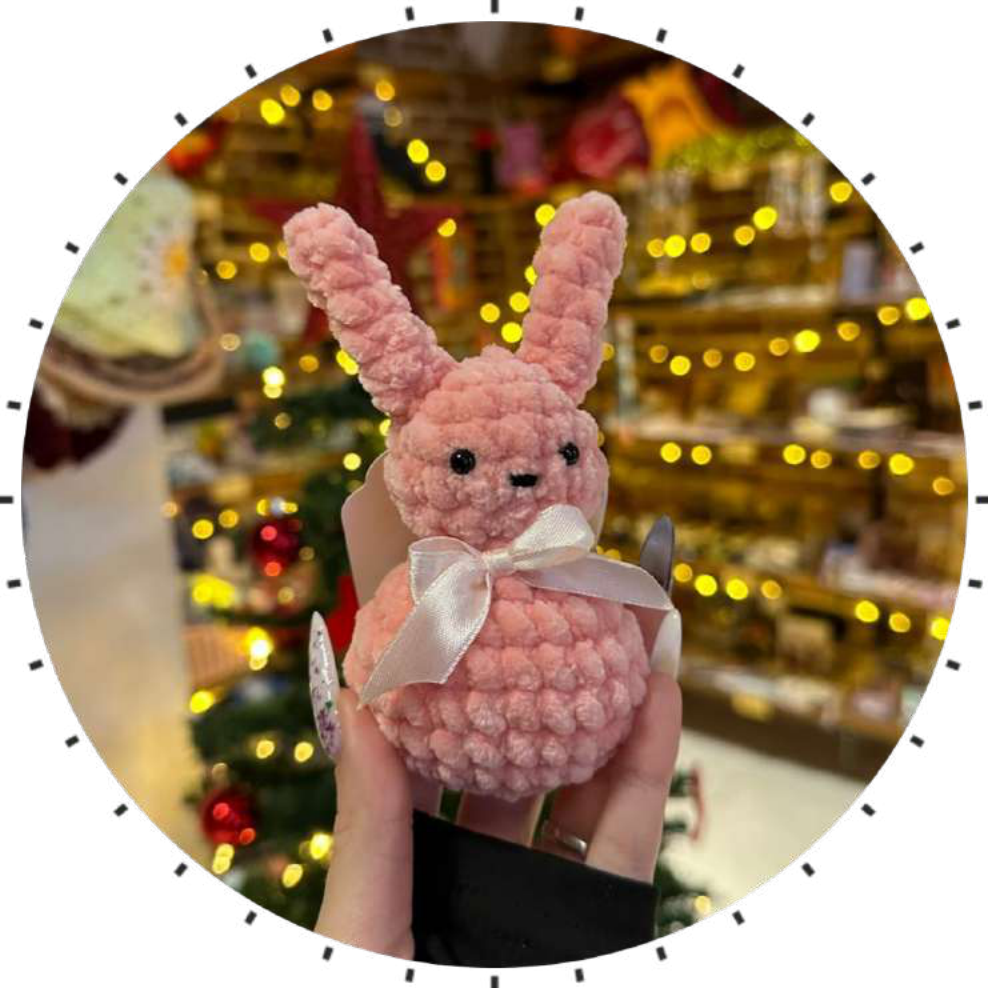
Adorable Crochet Rabbit Keychain – Free Pattern!
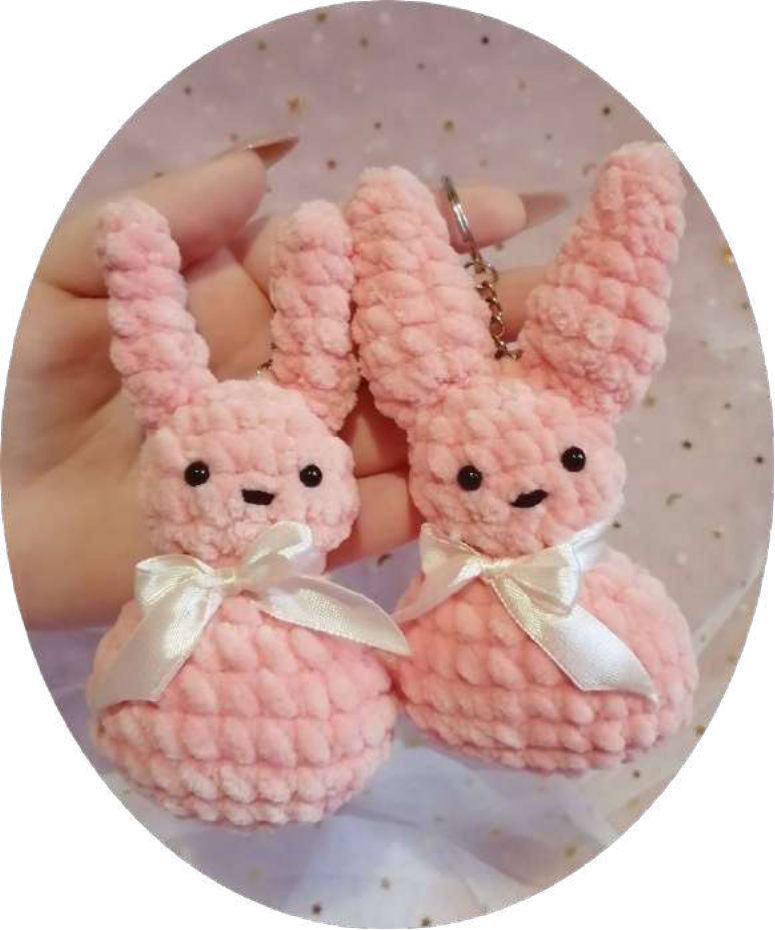
Hop into your next crochet project with this incredibly cute and quick Rabbit Keychain! Perfect for using up leftover plush yarn, this little bunny makes a wonderful gift, bag charm, or a sweet companion for your keys. This free pattern, designed by the talented Bylka_mk, is easy to follow and works up in no time.
Materials and Tools
Here’s what you’ll need to create your own fluffy friend:
- Yarn: Any plush/chenille yarn (e.g., Wolans Bunny Baby 65)
- Safety Eyes: 5mm or 6mm
- Embroidery Floss: Black, for the nose
- Ribbon: Satin ribbon, 12mm wide, for the bow
- Stuffing: Poly-fil, Holofiber, or similar synthetic stuffing
- Keychain: A keychain clasp or ring
- Crochet Hook: 3.5 mm (or size appropriate for your yarn)
- Essentials: Scissors, a yarn needle for sewing, and a stitch marker
Abbreviations (US Terms)
- MR: Magic Ring
- sc: Single Crochet
- inc: Increase (2 sc in the same stitch)
- dec: Decrease (sc 2 stitches together)
- ch: Chain Stitch
- (…)*X: Repeat the instructions in the parentheses X times
Crochet Pattern Instructions
Head & Body (Worked as one piece)
We’ll start from the top of the head and work our way down.
- R1: Ch 4. Starting from the second chain from the hook, crochet: 1 sc, inc, 2 sc, inc, 1 sc. (8)
- R2: (3 sc, inc) * 2 (10)
- R3: (3 sc, 2 inc) * 2 (14)
- R4: 14 sc around. (14)
Pro Tip: Try to keep your increases and decreases aligned on the sides of your work. This will help create the bunny’s flat, charming shape.
- R5: (3 sc, 2 dec) * 2 (10)
- R6: (3 sc, dec) * 2 (8)
Lightly stuff the head with filling before continuing.

- R7: inc, 2 sc, 2 inc, 2 sc, inc (12)
- R8: inc, 3 sc, 3 inc, 3 sc, 2 inc (18)
- R9: (6 sc, 3 inc) * 2 (24)
- R10-12 (3 rounds): 24 sc around. (24)
- R13: (6 sc, 3 dec) * 2 (18)
Now, stuff the body, making sure to keep it relatively flat as shown in the photo.

- R14: dec, 3 sc, 3 dec, 3 sc, 2 dec (12)
- R15: 6 dec (6)
Fasten off, leaving a long tail. Use your yarn needle to weave the tail through the front loops of the final 6 stitches and pull tight to close the opening. Weave in the end securely.
Ears (Make 2)
You have two fun options for the ears!
Option 1: Simple & Thin

- R1: 4 sc in MR. (4)
- R2-8 (7 rounds): 4 sc around. (4)
Do not stuff. Fasten off, leaving a long tail for sewing.
Option 2: Shaped & Fuller

- R1: 4 sc in MR. (4)
- R2: 4 sc around. (4)
- R3: (inc, sc) * 2 (6)
- R4: 6 sc around. (6)
- R5: (inc, 2 sc) * 2 (8)
- R6-7 (2 rounds): 8 sc around. (8)
- R8: (dec, 2 sc) * 2 (6)
Stuff very lightly only at the wider, shaped part. Fasten off, leaving a long tail for sewing.
Assembly & Decoration
Let’s bring your bunny to life!
-
- Attach the Ears: Pin the ears to the top of the head in a position you like, then use the yarn tails to sew them securely in place.

-
- Add the Eyes: Insert or glue the safety eyes between Rounds 3 and 4 of the head, with about 3 stitches of space between them.


-
- Embroider the Nose: Use your black embroidery floss to stitch a small, cute nose centered below and between the eyes.

-
- Attach the Keychain: Securely sew the keychain clasp to the top of the head, right between the ears.

-
- Tie the Bow: Create a beautiful bow with your satin ribbon and attach it to the bunny’s neck or ear.
Tip: To prevent the ribbon from fraying, you can carefully seal the edges with a lighter, clear nail polish, or a dab of fabric glue.

You’re All Done!
Congratulations on finishing your adorable crochet rabbit keychain! We hope you enjoyed this pattern and found it fun and easy to follow.