
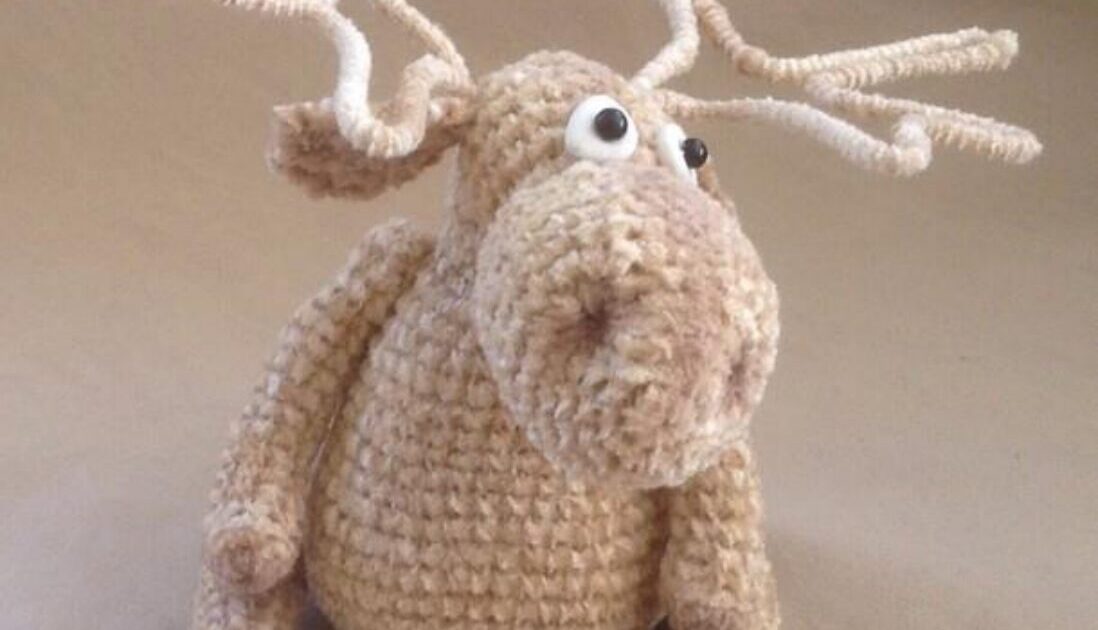
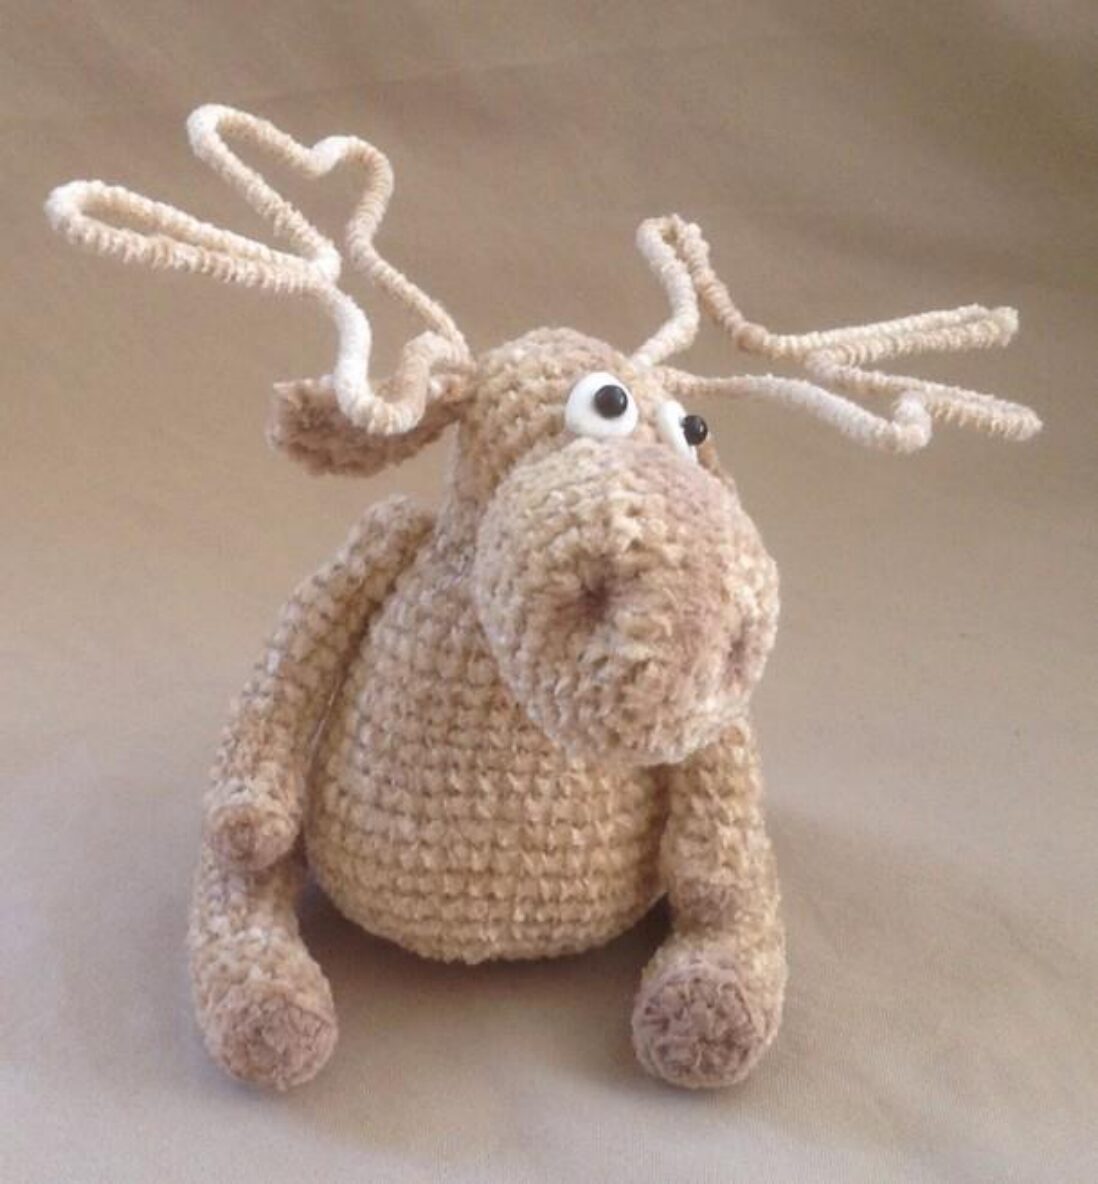
Crochet Your Own Adorable Moose Veniaminych!
By Trofimova Natalia (Chuda) | Email: Chuda.Nata@bk.ru
Welcome to this detailed master class on creating your very own adorable moose, Veniaminych! This pattern is designed to guide you through each step, ensuring a delightful crafting experience.
Using velour yarn (260m/50g), your finished moose will be approximately 10cm tall when sitting. Let’s gather our supplies and begin!
Materials You’ll Need
To crochet your moose, you will need the following:
- Yarn: Faux fur, velour, or any short-pile yarn. Approximately 20g.
- Hook: 1.6mm (or a size suitable for your chosen yarn).
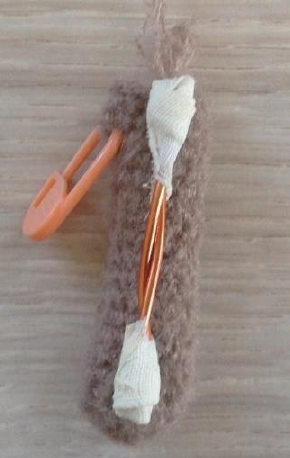
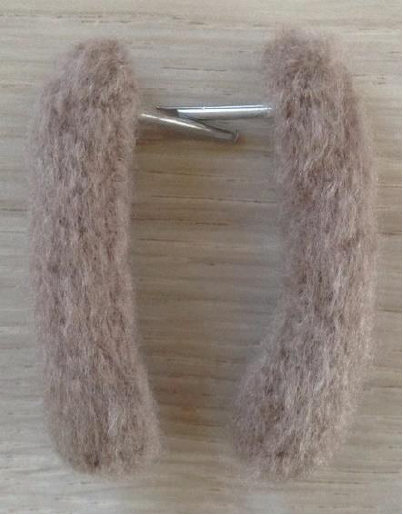
- Wire: For armature (limbs and antlers).
- Fabric Medical Tape: To wrap the wire.
- Filler: Stuffing material.
- Discs and Cotter Pins: 10-12mm for jointed arms and legs.
- Strong Thread: For tightening and sculpting facial features.
- Needles: One for sculpting/tightening, another for general sewing.
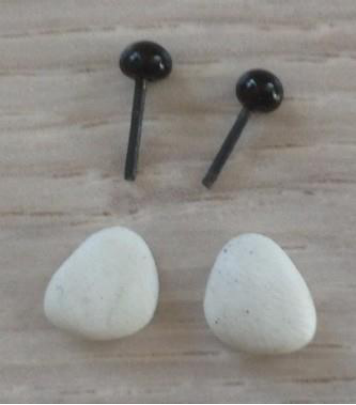
- Polymer Clay: White and black for eyes.
- Clear Glue: Such as “Moment Crystal”.
Abbreviations Used
- Sc: Single Crochet
- Ch: Chain Stitch
- Inc: Increase (two single crochets in one stitch)
- Dec: Decrease (two stitches crocheted together)
- () xN: Repeat what is indicated in brackets N times
- Sl st: Slip Stitch
- 3tog: Three single crochets crocheted together
General Crochet Tips
When working with faux fur or velour yarn, the fabric can sometimes shift. Always keep an eye on your stitch marker and make offset stitches if needed to keep your work centered and even.
Let’s Start Crocheting!
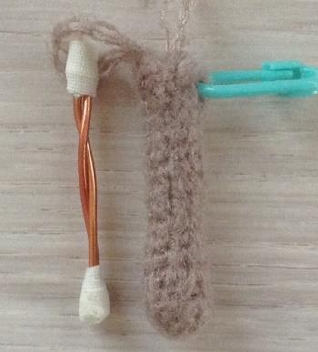
Left Leg (Make 1)
Remember to follow your stitch marker and make offset stitches if necessary. Stuff the leg firmly as you go.
- Chain 2. Crochet into the second stitch from the hook: 6sc (6)
- 6inc (12)
- Working in back loops only: 12sc. All subsequent rows will be crocheted into both loops. (12)
- Rows 4-6: 12sc (12)
- 3sc, 1dec, 4sc, 1inc, 2sc (12)
- Rows 8-9: 12sc (12)
- 3sc, 1dec, 4sc, 1inc, 2sc (12)
- Rows 11-12: 12sc (12)
- 3sc, 1dec, 4sc, 1inc, 2sc (12)
- 12sc (12)
- 3sc, 1dec, 4sc, 1inc, place cotter pin marker, 2sc (12)
- 12sc (12)
- Now, insert your wire and the disc with the cotter pin. Continue stuffing firmly.
- 4dec, 4sc (8)
- Decrease until the opening is closed. Fasten off and weave in ends.
Right Leg (Make 1)
Just like the left leg, keep an eye on your marker and stuff as you go.
- Chain 2. Crochet into the second stitch from the hook: 6sc (6)
- 6inc (12)
- Working in back loops only: 12sc. All subsequent rows will be crocheted into both loops. (12)
- Rows 4-6: 12sc (12)
- 2sc, 1inc, 4sc, 1dec, 3sc (12)
- Rows 8-9: 12sc (12)
- 2sc, 1inc, 4sc, 1dec, 3sc (12)
- Rows 11-12: 12sc (12)
- 2sc, 1inc, 4sc, 1dec, 3sc (12)
- 12sc (12)
- 2sc, 1inc, 4sc, 1dec, 3sc (12)
- 12sc (12)
- 2sc, place cotter pin marker, 1inc, 4sc, 1dec, 3sc (12)
- 12sc (12)
- Now, insert your wire and the disc with the cotter pin. Continue stuffing firmly.
- 4sc, 4dec (8)
- Decrease until the opening is closed. Fasten off and weave in ends.
Left Arm (Make 1)
Follow the marker and stuff the arm as you crochet.
- Chain 2. Crochet into the second stitch from the hook: 6sc (6)
- (1sc, 1inc) x3 (9)
- Working in back loops only: 9sc. All subsequent rows will be crocheted into both loops. (9)
- Rows 4-6: 9sc (9)
- 2sc, 1inc, 3sc, 1dec, 1sc (9)
- 9sc (9)
- 2sc, 1inc, 3sc, 1dec, 1sc (9)
- Rows 10-11: 9sc (9)
- 2sc, 1inc, 3sc, 1dec, 1sc (9)
- 9sc (9)
- 4sc, place cotter pin marker, 5sc (9)
- 9sc (9)
- Now, insert your wire and the disc with the cotter pin. Continue stuffing firmly.
- 2dec, 1sc, 2dec (5)
- Decrease until the opening is closed. Fasten off and weave in ends.
Right Arm (Make 1)
Work your right arm the same way, paying attention to the stitch count and stuffing.
- Chain 2. Crochet into the second stitch from the hook: 6sc (6)
- (1sc, 1inc) x3 (9)
- Working in back loops only: 9sc. All subsequent rows will be crocheted into both loops. (9)
- Rows 4-6: 9sc (9)
- 1sc, 1dec, 3sc, 1inc, 2sc (9)
- 9sc (9)
- 1sc, 1dec, 3sc, 1inc, 2sc (9)
- Rows 10-11: 9sc (9)
- 1sc, 1dec, 3sc, 1inc, 2sc (9)
- 9sc (9)
- 5sc, place cotter pin marker, 4sc (9)
- 9sc (9)
- Now, insert your wire and the disc with the cotter pin. Continue stuffing firmly.
- 2dec, 1sc, 2dec (5)
- Decrease until the opening is closed. Fasten off and weave in ends.
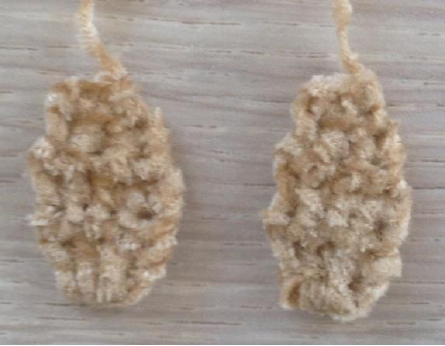
Ears (Make 2)
The ears are crocheted in turning rows. Remember to chain 1 at the beginning of each row for turning.
- Chain 2. Crochet into the second stitch from the hook: 3sc (3)
- 3sc (3)
- 1sc, 1inc, 1sc (4)
- 4sc (4)
- 1sc, 1dec, 1sc (3)
- 3sc (3)
- 3tog (1)
- Fasten off, leaving a tail for sewing.
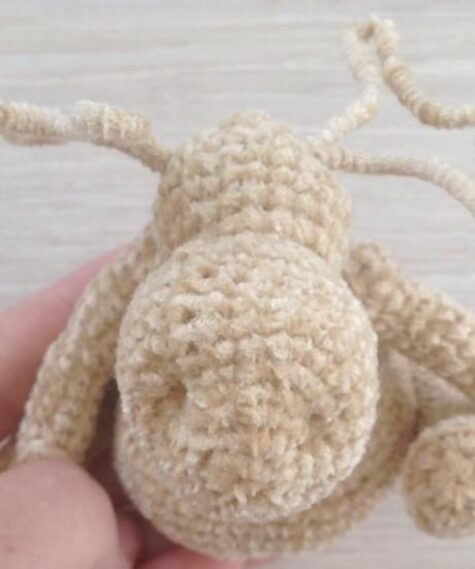
Head and Body (One Piece)
This is the main part of your moose. The marker should run along the center of the muzzle. Pay close attention to its position and make offset stitches if the marker starts to shift. Stuff firmly as you go.
- Chain 2. Crochet into the second stitch from the hook: 6sc (6)
- 6inc (12)
- 1sc, (1inc, 2sc) x3, 1inc, 1sc (16)
- (2sc, 1inc) x2, 4sc, (1inc, 2sc) x2 (20)
- 2sc, 1inc, 14sc, 1inc, 2sc (22)
- 2sc, 1inc, 16sc, 1inc, 2sc (24)
- Rows 7-11: 24sc (24)
- 5sc, 1dec, 10sc, 1dec, 5sc (22)
- 9sc, 2dec, 9sc (20)
- 2sc, 1dec, 12sc, 1dec, 2sc (18)
- 2sc, place tightening marker 1, 2sc, 1dec, 6sc, 1dec, 2sc, place tightening marker 2, 2sc (16)
- (2sc, 1inc) x2, 4sc, (1inc, 2sc) x2 (20)
- 5sc, 1inc, 8sc, 1inc, 5sc (22)
- 22sc (22)
- Rows 19-20: 9sc, 4sl st, 9sc (22)
- 1sc, (1dec, 2sc) x2, 4sl st, (2sc, 1dec) x2, 1sc (18)
- 1sc, 1dec, 1ch, skip 1 stitch and then 3sc, 4sl st, 3sc, 1ch, skip 1 stitch and then 1dec, 1sc (16)
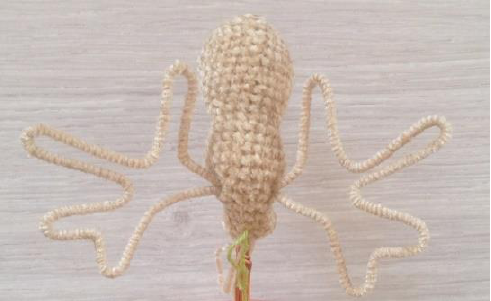
You’ve now created two 1-chain arches, which are for the antlers. - 1dec, 1sc in ch arch, 3sc, 4sl st, 3sc, 1sc in ch arch, 1dec (14)
- 5sc, 4sl st, 5sc (14)
Antler Preparation
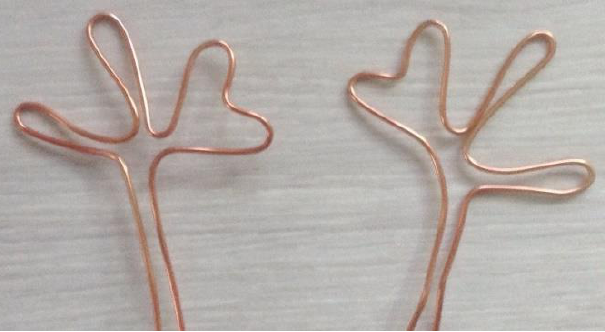
Before continuing with the body, prepare the antlers. Use wire to create the basic antler shape, ensuring it’s appropriate for the size of your moose’s head. Wrap the wire frame tightly with yarn, securing it with glue to create a neat finish.
Leave the wire tails long enough; these will extend into the body to form a sturdy neck frame. Insert the finished antlers into the openings you created in Row 22 of the head.
Continue with the Head-Body section:
- 5sc, 4inc, 5sc (18)
- 1sc, 1dec, 12sc, 1dec, 1sc (16)
- 1sc, 1dec, 3sc, 1inc, 2sc, 1inc, 3sc, 1dec, 1sc (16)
- 16sc (16)
- 1sc, 1dec, 3sc, 1inc, 2sc, 1inc, 3sc, 1dec, 1sc (16)
- (3sc, 1inc) x2, (1inc, 3sc) x2 (20)
- 3sc, 1inc, 4sc, 1inc, 2sc, 1inc, 4sc, 1inc, 3sc (24)
- 6sc, place arm marker, 1inc, 10sc, 1inc, place arm marker, 6sc (26)
- 2sc, 1inc, 4sc, 1inc, 10sc, 1inc, 4sc, 1inc, 2sc (30)
- 7sc, 1inc, 14sc, 1inc, 7sc (32)
- 32sc (32)
- 8sc, 1inc, 14sc, 1inc, 8sc (34)
- 13sc, 1inc, 6sc, 1inc, 13sc (36)
- 6sc, 1inc, 4sc, 1inc, 12sc, 1inc, 4sc, 1inc, 6sc (40)
- 17sc, 1inc, 4sc, 1inc, 17sc (42)
- 3sc, 1inc, 4sc, 1inc, 6sc, 1inc, 10sc, 1inc, 6sc, 1inc, 4sc, 1inc, 3sc (48)
Time to attach the arms! As you continue, make sure to stuff the body firmly.
- (4sc, 1inc) x2, 5sc, 1inc, 3sc, 1inc, 8sc, 1inc, 3sc, 1inc, 5sc, (1inc, 4sc) x2 (56)
- Rows 42-43: 56sc (56)
- 10sc, place leg marker, 36sc, place leg marker, 10sc. Do not close the row. Chain 6, then starting from the second chain from the hook, crochet 5sl st. Then sl st with the 1st stitch of the row to close. (56)
- 56sc (56)
- 16sc, 1dec, 5sc, 1dec, 6sc, 1dec, 5sc, 1dec, 16sc (52)
- (3sc, 1dec) x2, (2sc, 1dec) x4, (1dec, 2sc) x4, (1dec, 3sc) x2 (40)
- (2sc, 1dec) x10 (30)
Attach legs at this point.
- (3sc, 1dec) x6 (24)
- (2sc, 1dec) x6 (18)
- 18sc (18)
- (1sc, 1dec) x6 (12)
- 6dec (6)
- Decrease until the opening is completely closed. Fasten off and weave in ends.
Finishing Touches
Sculpting the Nostrils
The placement of the nostrils can truly change your moose’s expression, so feel free to experiment! Here’s how to create them:
- Identify where you want your nostrils to be.
- Insert your needle into “tightening marker 1” (from Row 15 of the head section).
- Bring the needle out at your desired nostril location.
- Move a couple of stitches aside, insert the needle back in, and bring it out a couple of stitches away from marker 1.
- Gently pull the thread tight to create an indentation, then secure it.
- Repeat this process for “tightening marker 2” and the second nostril.
Attaching Ears
Sew the two ears you made directly underneath the antlers on the head.
Tinting and Eyes
- Tinting: Use appropriate fabric pastels or makeup to lightly tint the hooves, nose, and the inner side of the ears. Be sure to darken the sculpted nostrils for more definition.
- Eyes:
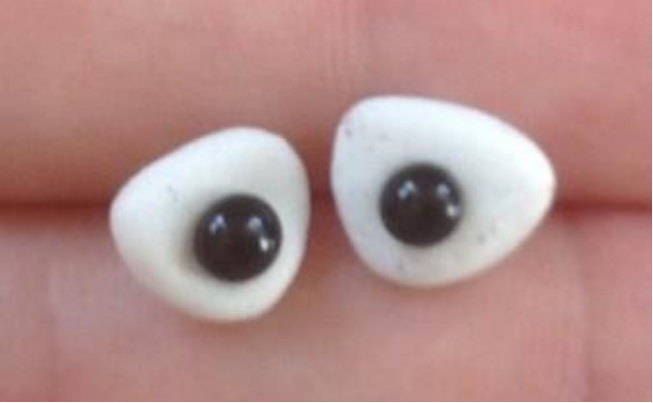
- Sculpt the whites of the eyes from white polymer clay.
- For pupils, the author used ready-made 3mm eyes. Before baking the clay, pierce the clay whites with the stem of the 3mm eyes.
- Bake the polymer clay with the eye stems inserted according to the clay manufacturer’s instructions.
- Once cooled, use clear glue (like “Moment Crystal”) to securely attach the finished eyes to your moose’s face.
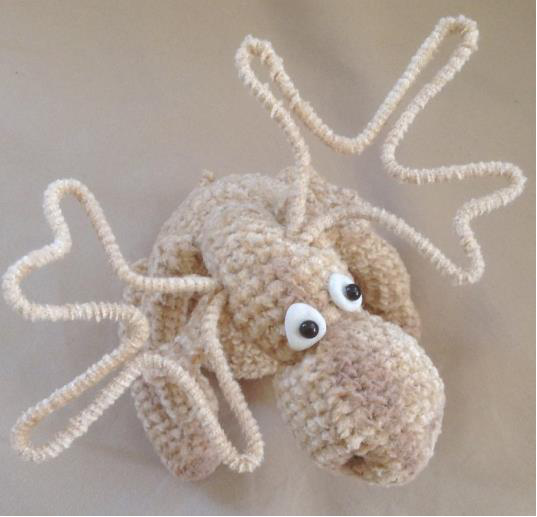
And now… enjoy your beautifully finished Moose Veniaminych!
I wish you easy stitches and lots and lots of free time for all your creative endeavors!
Important Copyright Information
This master class is the personal development of Trofimova Natalia (Chuda) and is intended for personal use only. It may not be published, replicated, resold, or distributed in any other way, including online. When sharing your finished works created using this master class, please kindly mention the author, Trofimova Natalia (Chuda). Your respect for my work is greatly appreciated.
If you have any questions, suggestions, or wishes, you can always reach me at Chuda.Nata@bk.ru.