Cuteness Overload: Crochet Your Own Adorable Bear in a Froggy Hoodie!
Adorable Amigurumi Bear in Frog Hood Crochet Pattern
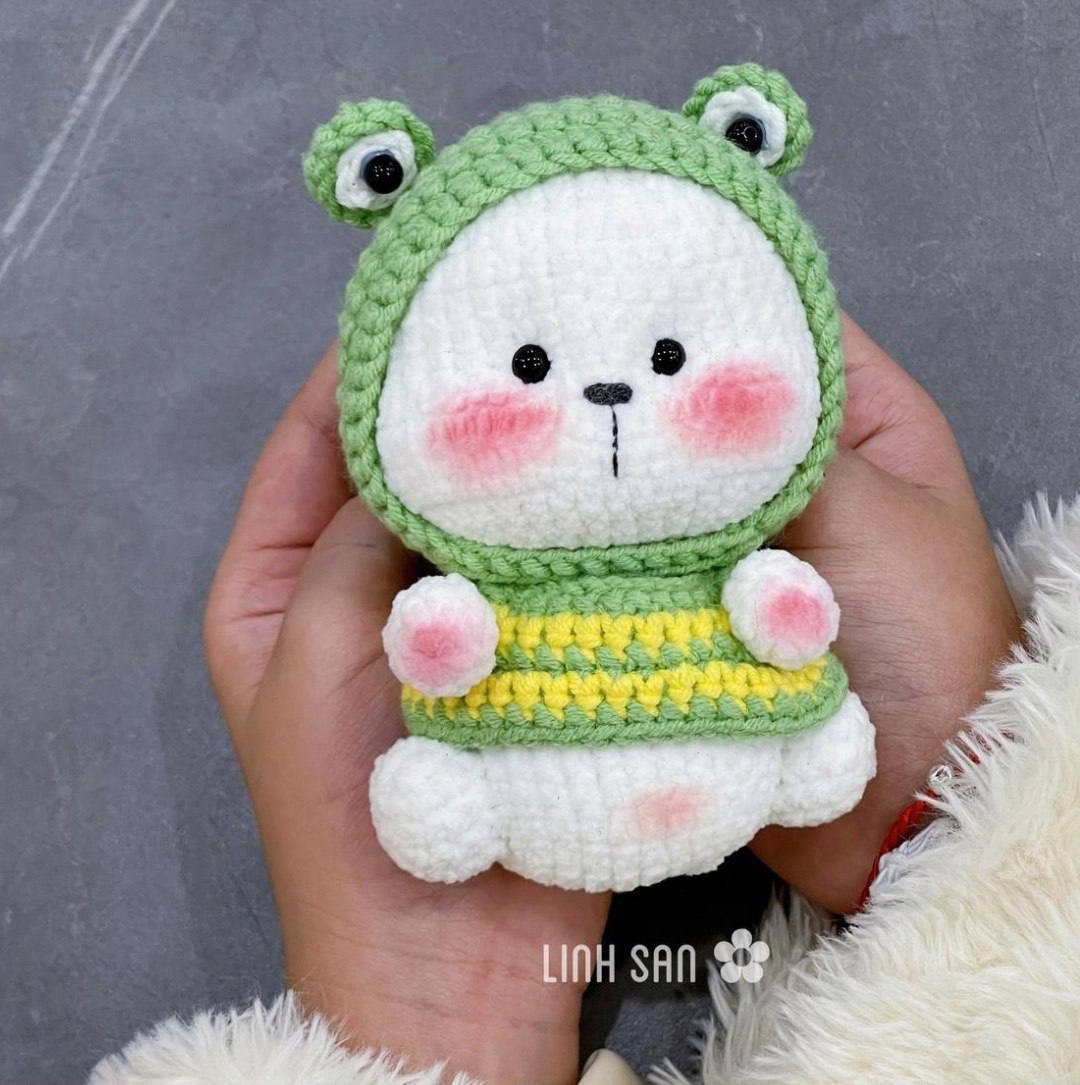
Create your very own cute plush bear wearing a cozy removable frog hoodie and striped sweater! This step-by-step amigurumi crochet pattern is perfect for crocheters looking to make a charming, super-soft plushie companion. Follow the detailed instructions below to complete your adorable frog-costumed doll.
Skill Level & Finished Size
- Skill Level: Intermediate / Easy
- Finished Size: Approx. 4 to 4.5 inches (10–11 cm) tall
Materials and Tools
- Plush Yarn: Fine chenille / plush velvet yarn in White (for head, body, arms, and legs)
- Cotton Yarn (Sport / 5-ply): Green, Yellow, White, and Black
- Crochet Hook: 2.2 mm (or size needed for your yarn weight)
- Safety Eyes / Half-Beads: 6 mm safety eyes (for bear face) and 6 mm flat-back beads or safety eyes (for frog hood eyes)
- Stuffing: Fiberfill polyester stuffing
- Notions: Tapestry needle, stitch markers, pins, scissors
- Embellishments: Pink blush or cosmetic blush with a brush, 1 small button (for the sweater), fabric/craft glue
Crochet Abbreviations (US Terms)
- MR: Magic Ring
- ch: Chain
- sc: Single crochet
- inc: Increase (2 single crochets in the same stitch)
- dec: Decrease (single crochet 2 stitches together)
- sl st: Slip stitch
- st(s): Stitch(es)
- rnd(s): Round(s)
- FLO: Front loop only
- BLO: Back loop only
Step-by-Step Crochet Pattern
Step 1: Head
Use White plush yarn. Work in continuous rounds unless noted otherwise.
- Rnd 1: 6 sc in MR (6)
- Rnd 2: 6 inc (12)
- Rnd 3: [1 sc, inc] × 6 (18)
- Rnd 4: [2 sc, inc] × 6 (24)
- Rnd 5: [3 sc, inc] × 6 (30)
- Rnd 6: [2 sc, inc, 2 sc] × 6 (36)
- Rnd 7: [5 sc, inc] × 6 (42)
- Rnds 8–11: sc in each st around (42) (4 rounds)
- Rnd 12: 12 sc, 6 inc, 6 sc, 6 inc, 12 sc (54) — creates full cheeks
- Rnds 13–14: sc in each st around (54) (2 rounds)
- Rnd 15: 12 sc, 6 dec, 6 sc, 6 dec, 12 sc (42)
- Rnd 16: [5 sc, dec] × 6 (36)
- Rnd 17: [2 sc, dec, 2 sc] × 6 (30)
- Rnd 18: [3 sc, dec] × 6 (24)
- Rnd 19: [1 sc, dec] × 8 (16)
Fasten off, leaving a long tail for sewing. Stuff the head firmly with fiberfill.
Eye Placement & Face Embroidery:
- Place 6 mm safety eyes between Rnds 11 and 12, spaced 6 stitches apart (centered right above the cheek increases made in Rnd 12).
- Perform eye indentations (needle sculpting) to sink the eyes slightly into the plush yarn for extra expression.
- Using black embroidery thread, embroider a small vertical line and nose between the eyes to create a cute T-shape snout.
Step 2: Body
Use White plush yarn.
- Rnd 1: Ch 7. Starting in the 2nd ch from hook: inc, 4 sc, 4 sc in the last stitch. Working along the opposite side of the chain: 4 sc, inc (16)
- Rnd 2: 2 inc, 4 sc, 4 inc, 4 sc, 2 inc (24)
- Rnd 3: [1 sc, inc] × 2, 4 sc, [1 sc, inc] × 4, 4 sc, [1 sc, inc] × 2 (32)
- Rnds 4–6: sc in each st around (32) (3 rounds)
- Rnd 7: dec, 14 sc, dec, 14 sc (30)
- Rnd 8: sc in each st around (30)
- Rnd 9: [3 sc, dec] × 6 (24)
- Rnds 10–11: sc in each st around (24) (2 rounds)
- Rnd 12: [1 sc, dec] × 8 (16)
- Rnd 13: sc in each st around (16)
Fasten off and stuff the body firmly with fiberfill.
Step 3: Arms (Make 2)
Use White plush yarn. Do not stuff.
- Rnd 1: 9 sc in MR (9)
- Rnd 2: sc in each st around (9)
- Rnd 3: 7 sc, dec (8)
- Rnd 4: 6 sc, dec (7)
- Rnds 5–7: sc in each st around (7) (3 rounds)
Fasten off, leaving a long tail. Flatten the top and sew arms to the sides of the body between Rnds 8 and 11.
Step 4: Legs (Make 2)
Use White plush yarn.
- Rnd 1: 6 sc in MR (6)
- Rnd 2: 6 inc (12)
- Rnds 3–5: sc in each st around (12) (3 rounds)
Fasten off, leaving a long tail for sewing. Stuff the legs with fiberfill and sew them to the bottom sides of the body between Rnds 3 and 6.
Step 5: Frog Hood
Use Green cotton/semi-cotton yarn.
- Rnd 1: 8 sc in MR (8)
- Rnd 2: 8 inc (16)
- Rnd 3: [1 sc, inc] × 8 (24)
- Rnd 4: [inc, 2 sc] × 8 (32)
- Rnd 5: [3 sc, inc] × 8 (40)
- Rnd 6: sc in each st around (40)
Now work in turned rows to create the face opening:
- Rows 7–15: 36 sc, ch 1, turn (36) (9 rows; leave the remaining 4 stitches unworked)
- Row 16 (Border & Chin Chain): 36 sc around the main opening, ch 8, sl st to the 1st st to form the chin strap. Continue around the bottom edge: 10 sc along the side, 4 sc along the unworked stitches of Rnd 6, 8 sc along the opposite side, 8 sc across the ch-8 chin strap, sl st to join.
Fasten off and weave in ends.
Step 6: Frog Eyes (Make 2 Outer & 2 Inner)
Outer Eye Socket (Make 2 – Green Yarn):
- Rnd 1: 8 sc in MR, sl st to 1st st (8)
- Rnd 2: ch 1, [1 sc, inc] × 4, sl st to 1st st (12)
Fasten off, leaving a tail for sewing.
Inner Whites (Make 2 – White Yarn):
- Rnd 1: 6 sc in MR, sl st to 1st st (6)
Fasten off and cut yarn.
Frog Eye Assembly:
- Glue or sew the White inner circles inside the Green outer eye sockets.
- Glue a 6 mm black half-bead (or safety eye pin removed) onto the white portion.
- Sew the assembled frog eyes onto the top of the hood between Rnds 8 and 9, spaced about 8 stitches apart.
Step 7: Striped Frog Sweater
Work in rows, changing colors as indicated.
- Row 1 (Green): Ch 34. Starting in the 7th ch from hook (this forms a button loop): 28 sc, ch 1, turn (28)
- Row 2 (Yellow): 5 sc, ch 8 (skip 4 sts for armhole), 10 sc, ch 8 (skip 4 sts for armhole), 5 sc, ch 1, turn (36)
- Row 3 (Green): 5 sc, 8 sc in ch-space, 10 sc, 8 sc in ch-space, 5 sc, ch 1, turn (36)
- Row 4 (Yellow): 36 sc, ch 1, turn (36)
- Row 5 (Green): 36 sc, sl st to finish.
Fasten off and weave in ends. Sew a small button onto the back edge opposite the button loop.
Step 8: Final Assembly & Details
- Attach Head to Body: Using the yarn tail from the head, stitch the head onto the neck opening of the body securely.
- Dress the Plushie: Wrap the striped sweater around the body and button it at the back. Put the frog hood over the bear’s head.
- Add Blush: Apply a light touch of pink cosmetic blush onto the bear’s plush cheeks and the inner palms/feet for an extra soft, cute look!
Your adorable amigurumi bear in a frog hood is officially finished!