Free Pattern: Crochet Love Bunny Amigurumi
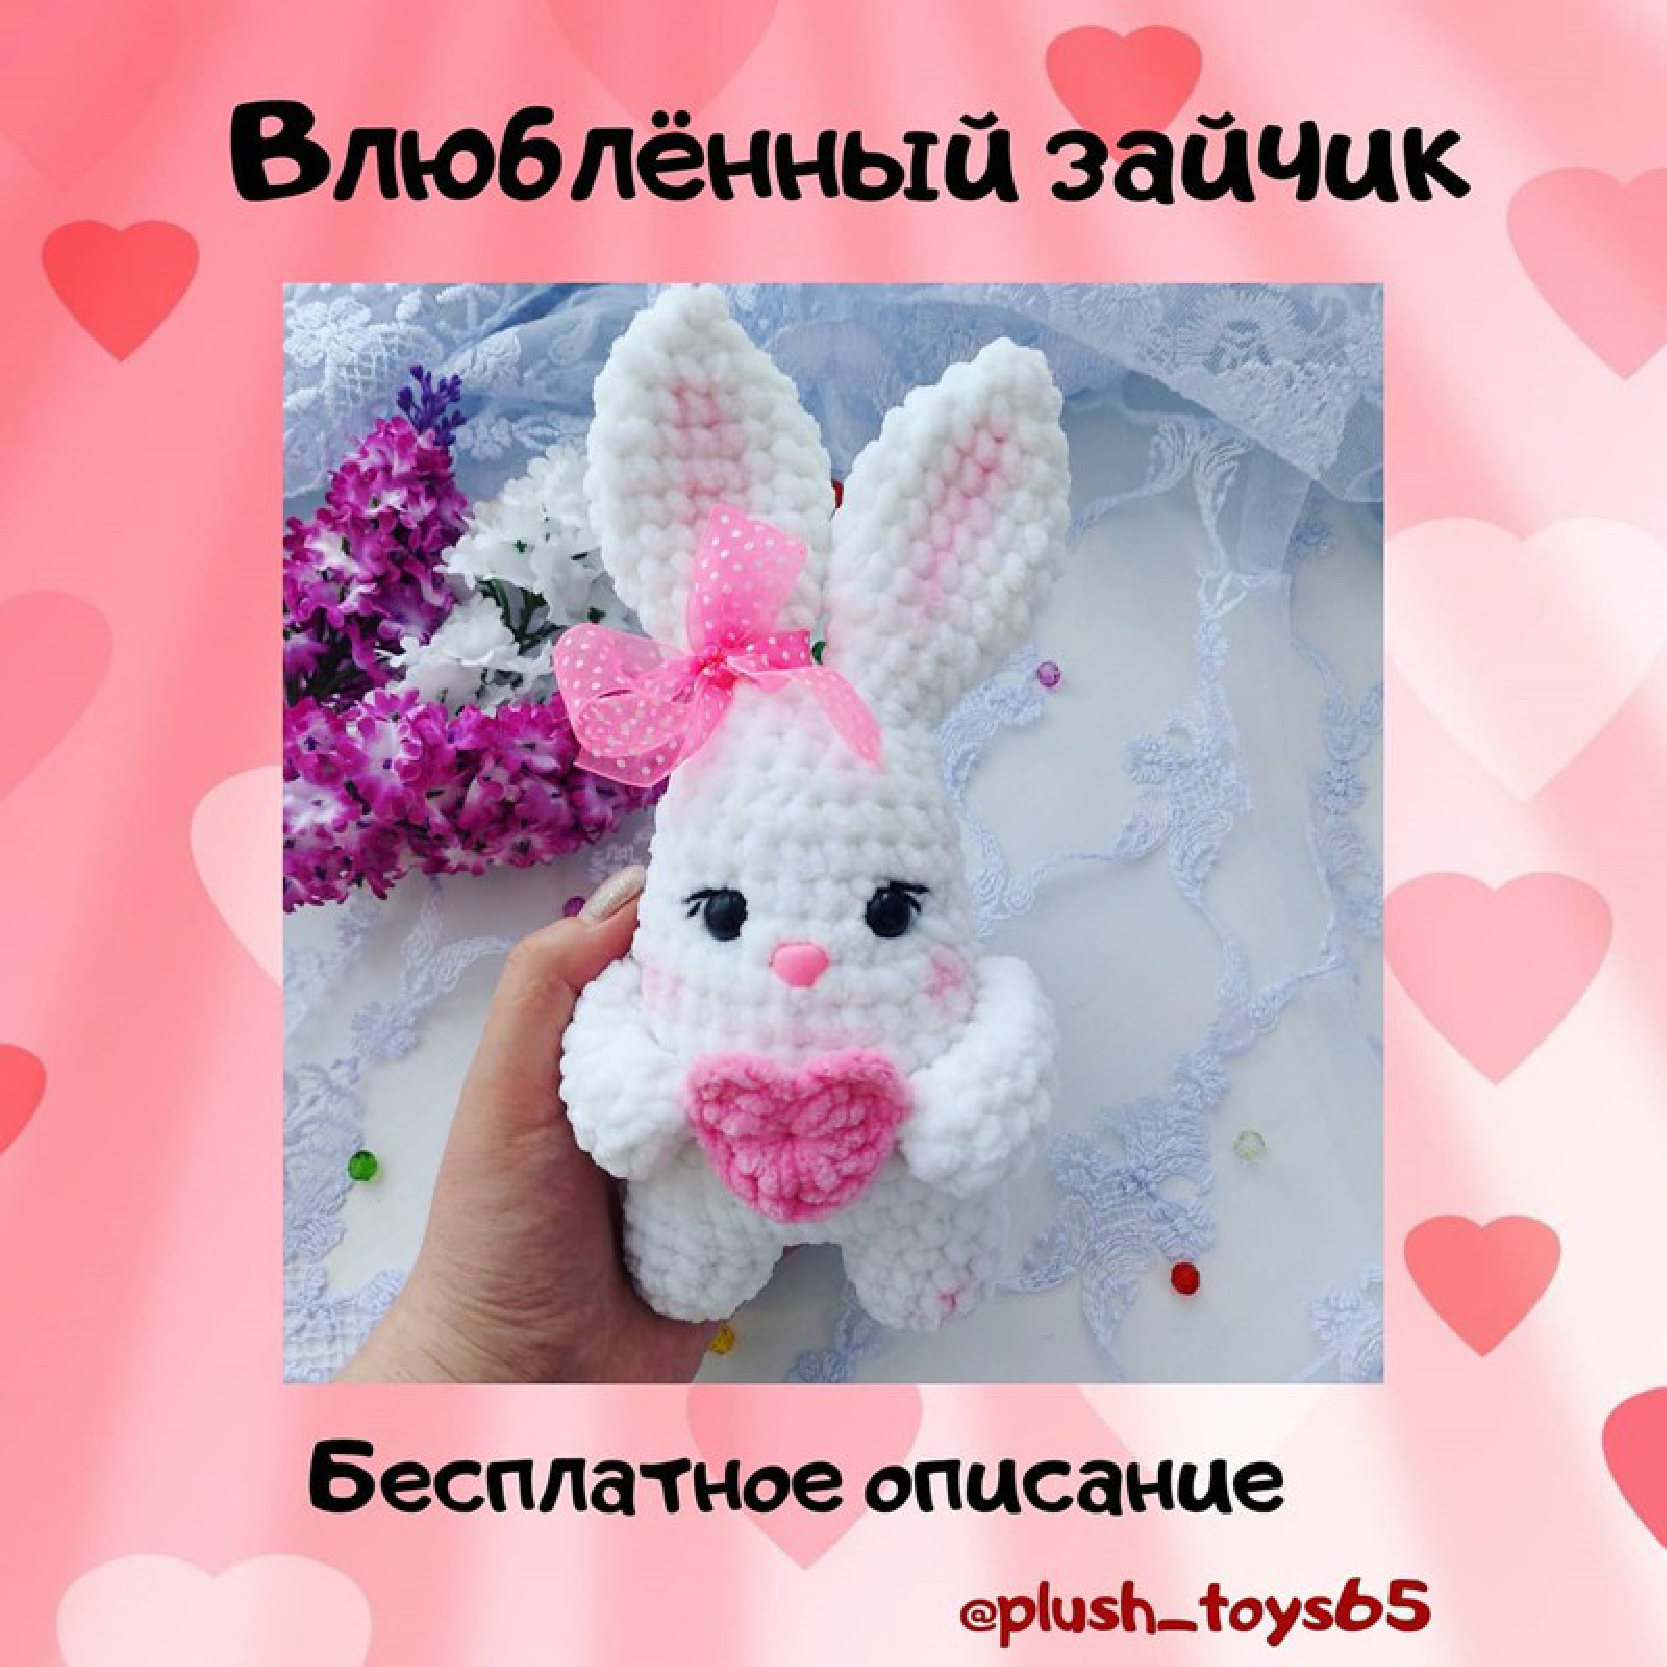
Get ready to create the most adorable, love-struck bunny with this free amigurumi crochet pattern! This little bunny, complete with a tiny heart, is the perfect handmade gift for Valentine’s Day, birthdays, or just to show someone you care. Its unique design is crocheted in one piece from the legs up to the head, making for minimal sewing and maximum fun. Let’s hop to it!
Materials You’ll Need
To bring this cute bunny to life, you will need the following materials:
- Yarn:
- Plush yarn in main color (approx. 0.5 skein)
- Plush yarn in a contrasting color for the heart
- Yarnart Jeans (or similar fine cotton yarn) in black for eye details
- Crochet Hook: 3.5 mm
- Eyes: 12mm safety eyes
- Nose: 12×10 mm safety nose
- Other Supplies:
- Toy stuffing (polyester fiberfill, etc.)
- Long needle with a wide eye for sculpting and sewing
- Scissors
- Stitch markers (optional but helpful)
- Dry pastel or blush for toning the cheeks and ears
- Satin ribbon for decoration (optional)
Abbreviations (US Terms)
- MR: Magic Ring
- Ch: Chain
- Sl st: Slip Stitch
- Sc: Single Crochet
- Dc: Double Crochet
- Tr: Treble Crochet
- Inc: Increase (2 sc in the same stitch)
- Dec: Decrease (sc 2 stitches together)
- (…) x N: Repeat the instructions in parentheses N times
Crochet Pattern Instructions
Note: The legs, body, and head are crocheted as a single piece. Stuff your bunny firmly as you go.
Legs, Body & Head (All-in-One)
First Leg:
Row 1: 6 sc in MR (6)
Row 2: 6 inc (12)
Rows 3-4: 12 sc around (2 rows) (12)
Fasten off and cut the yarn.
Second Leg & Body:
Rows 1-4: Repeat the pattern for the first leg, but do not cut the yarn.
Connecting the Legs:
From the second leg, Ch 2. Take the first leg and make a Sl st into any stitch to join. Now, we will work around both legs and the chain to create the body.
Row 5: 12 sc around the first leg, 2 sc in the connecting chains, 12 sc around the second leg, 2 sc in the other side of the connecting chains. (28) Note: The original pattern count is 29, which can be achieved by adding one stitch; 28 also works well. We will proceed with 28 for consistency.
Rows 6-15: 28 sc around (10 rows) (28)
Attach Safety Features: Insert the 12mm safety eyes between Rows 15 and 16, with about 4-5 stitches of space between them. Insert the safety nose centered between the eyes, between Rows 14 and 15.
Row 16: (2 sc, dec) x 7 (21)
Rows 17-18: 21 sc around (2 rows) (21)
Row 19: (5 sc, dec) x 3 (18)
Row 20: (1 sc, dec) x 6 (12)
Continue stuffing the head firmly.
Row 21: (2 sc, dec) x 3 (9)
Row 22: To create the ear openings, Ch 3, skip the next 3 sc, and sl st into the 4th stitch. Continue with sc in the remaining stitches. This should leave you with two distinct openings for the ears. Fasten off and weave in the end.
Ears (Make 2)
Attach yarn to one of the openings on the head. You will now crochet the ear directly onto the head. Do not stuff the ears.
Row 1: Work 10 sc evenly around the opening. (10)
Row 2: (4 sc, inc) x 2 (12)
Row 3: (5 sc, inc) x 2 (14)
Row 4: (6 sc, inc) x 2 (16)
Rows 5-7: 16 sc around (3 rows) (16)
Row 8: (6 sc, dec) x 2 (14)
Row 9: (5 sc, dec) x 2 (12)
Row 10: (4 sc, dec) x 2 (10)
Row 11: 5 dec (5)
Fasten off, cut the yarn, and use the tail to sew the top of the ear closed. Weave in the end. Repeat for the second ear in the other opening.
Arms (Make 2)
Do not stuff the arms.
Row 1: 4 sc in MR (4)
Row 2: 4 inc (8)
Rows 3-8: 8 sc around (6 rows) (8)
Fold the opening flat and crochet 4 sc through both layers to close. Leave a long tail for sewing.
Tail
Stuff the tail lightly.
Row 1: 4 sc in MR (4)
Row 2: 4 inc (8)
Rows 3-4: 8 sc around (2 rows) (8)
Fasten off, leaving a long tail for sewing.
Assembly and Finishing Touches
Your bunny is almost complete! These final steps will add personality and bring it to life.
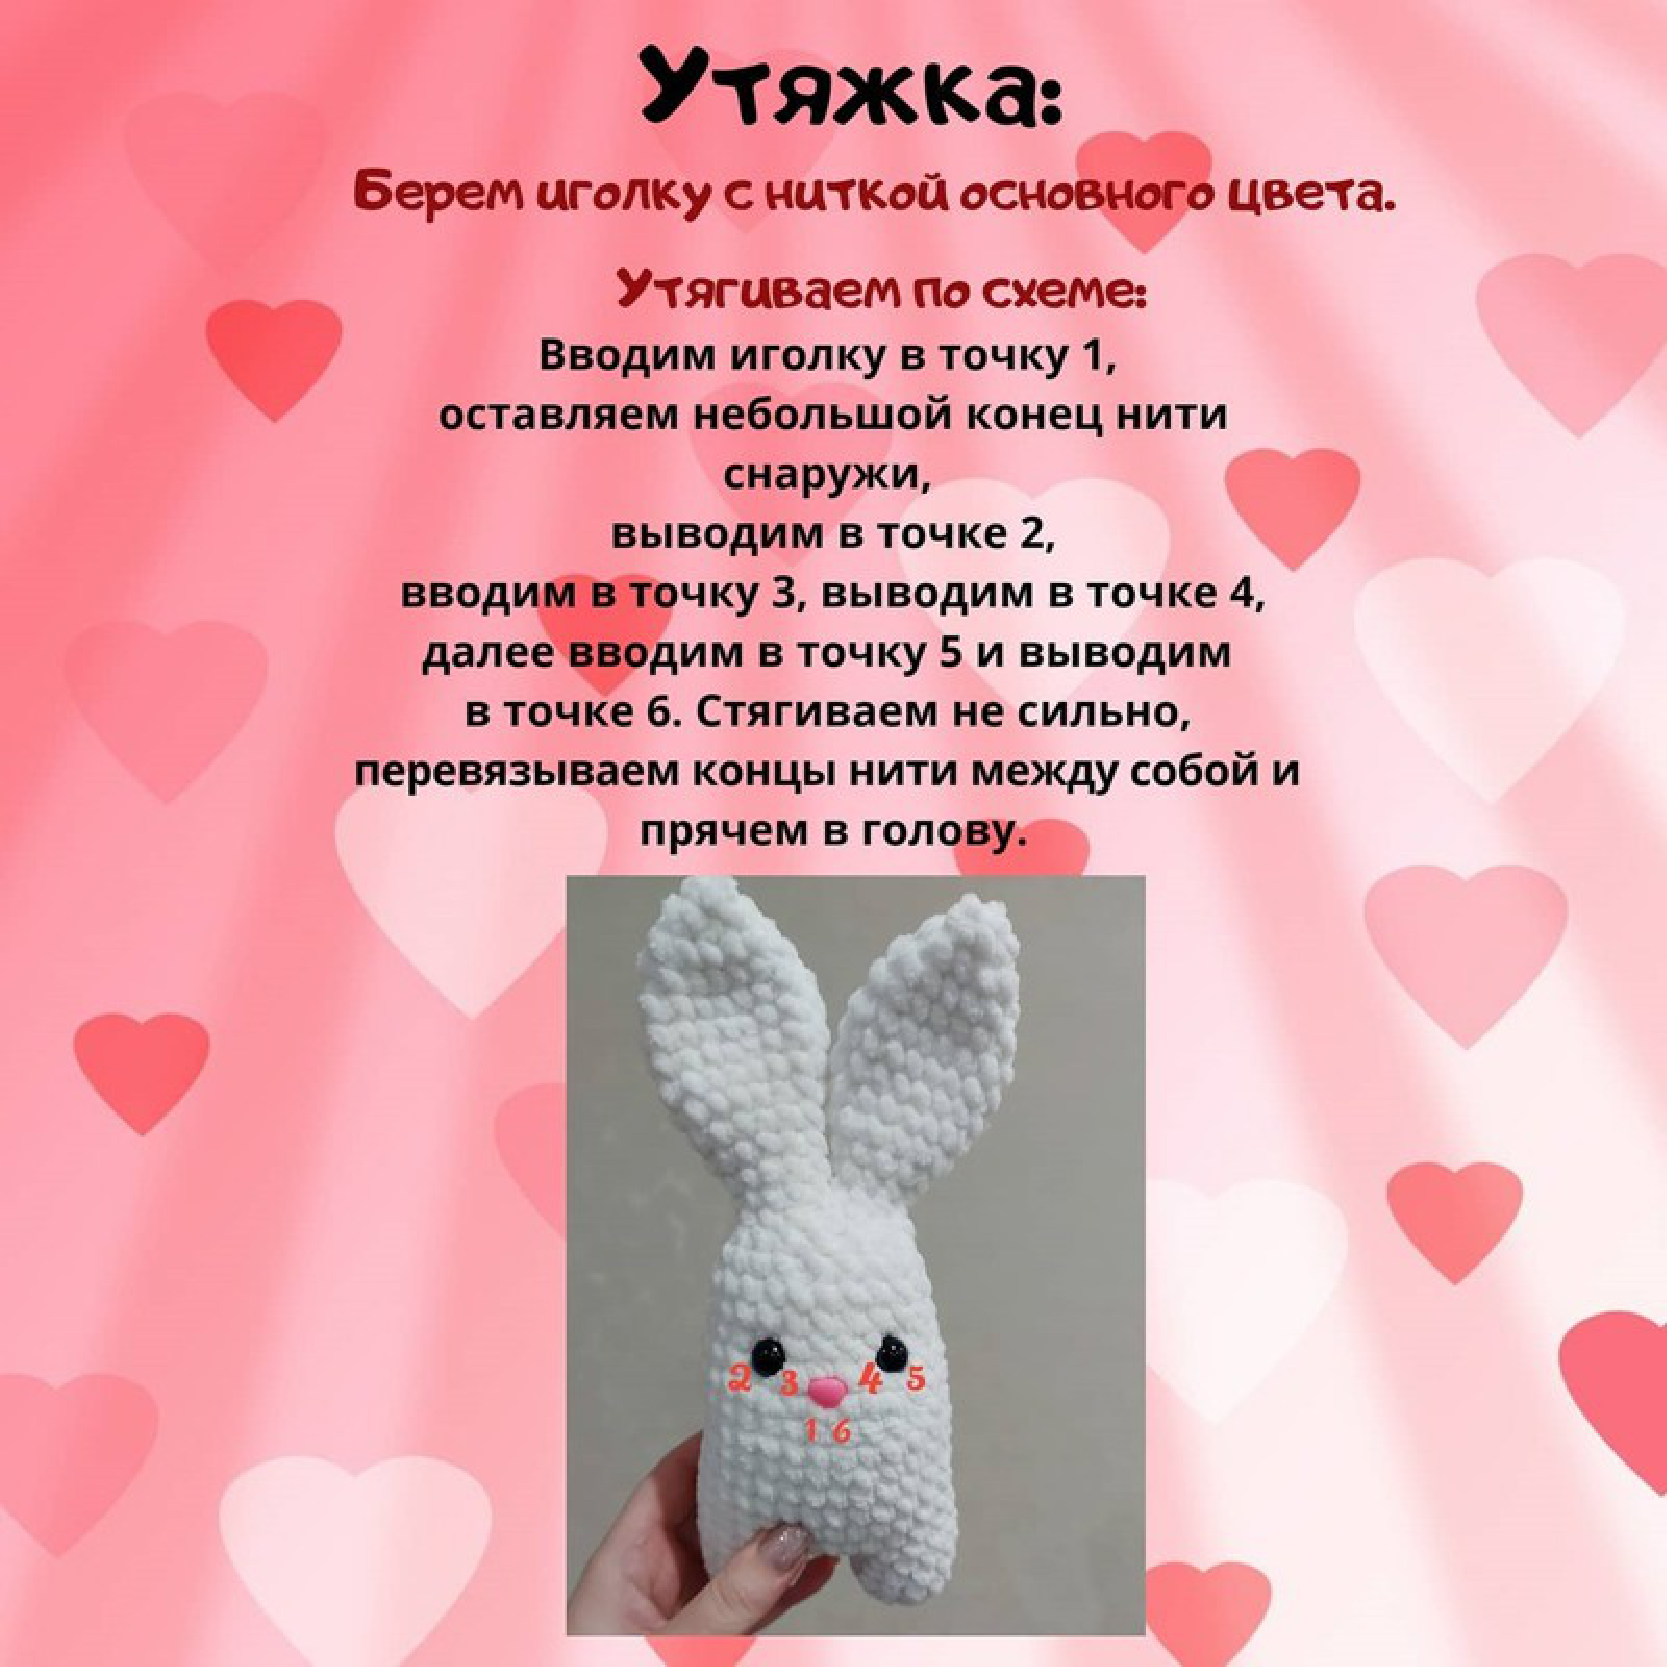
Facial Sculpting (Tightening)
Use a long needle and yarn of the main body color to sculpt the face. This will create cute eye sockets and give your bunny a sweet expression. Follow the diagram below:
- Insert the needle at point 1 (under the chin/neck), leaving a tail. Bring it out at point 2 (inner corner of the right eye).
- Go back in at point 3 (outer corner of the right eye) and bring the needle out at point 4 (outer corner of the left eye).
- Go back in at point 5 (inner corner of the left eye) and bring the needle out at point 6 (back at the starting point 1).
- Gently pull on both yarn tails to create the indentation. Tie them together securely in a knot and hide the ends inside the head.
Final Assembly
- Sew the arms to the sides of the body, around Row 13.
- Sew the tail to the back of the body, around Row 9.
- Add eye details by embroidering small “eyeliner” wings or eyebrows with the black Yarnart Jeans.
- Add color by using a small brush to apply dry pastel or cosmetic blush to the cheeks and the insides of the ears.

Heart Accessory
Using your contrasting plush yarn:
Start with a magic ring OR Ch 2.
Work all of the following stitches into the center of the ring (or the 2nd chain from the hook):
Ch 3, 2 Tr, 3 Dc, Ch 1, 1 Tr (to create the point), Ch 1, 3 Dc, 2 Tr, Ch 3, Sl st into the center.
Pull the ring tight to close. Fasten off and sew the heart to the bunny’s paws.
Congratulations, your Love-Struck Bunny is complete! This adorable amigurumi stands approximately 22 cm (about 8.5 inches) tall, including the ears. We hope you enjoyed this pattern and would love to see your finished creation!