Free Pattern: Crochet Sweet Valentine Kitten!
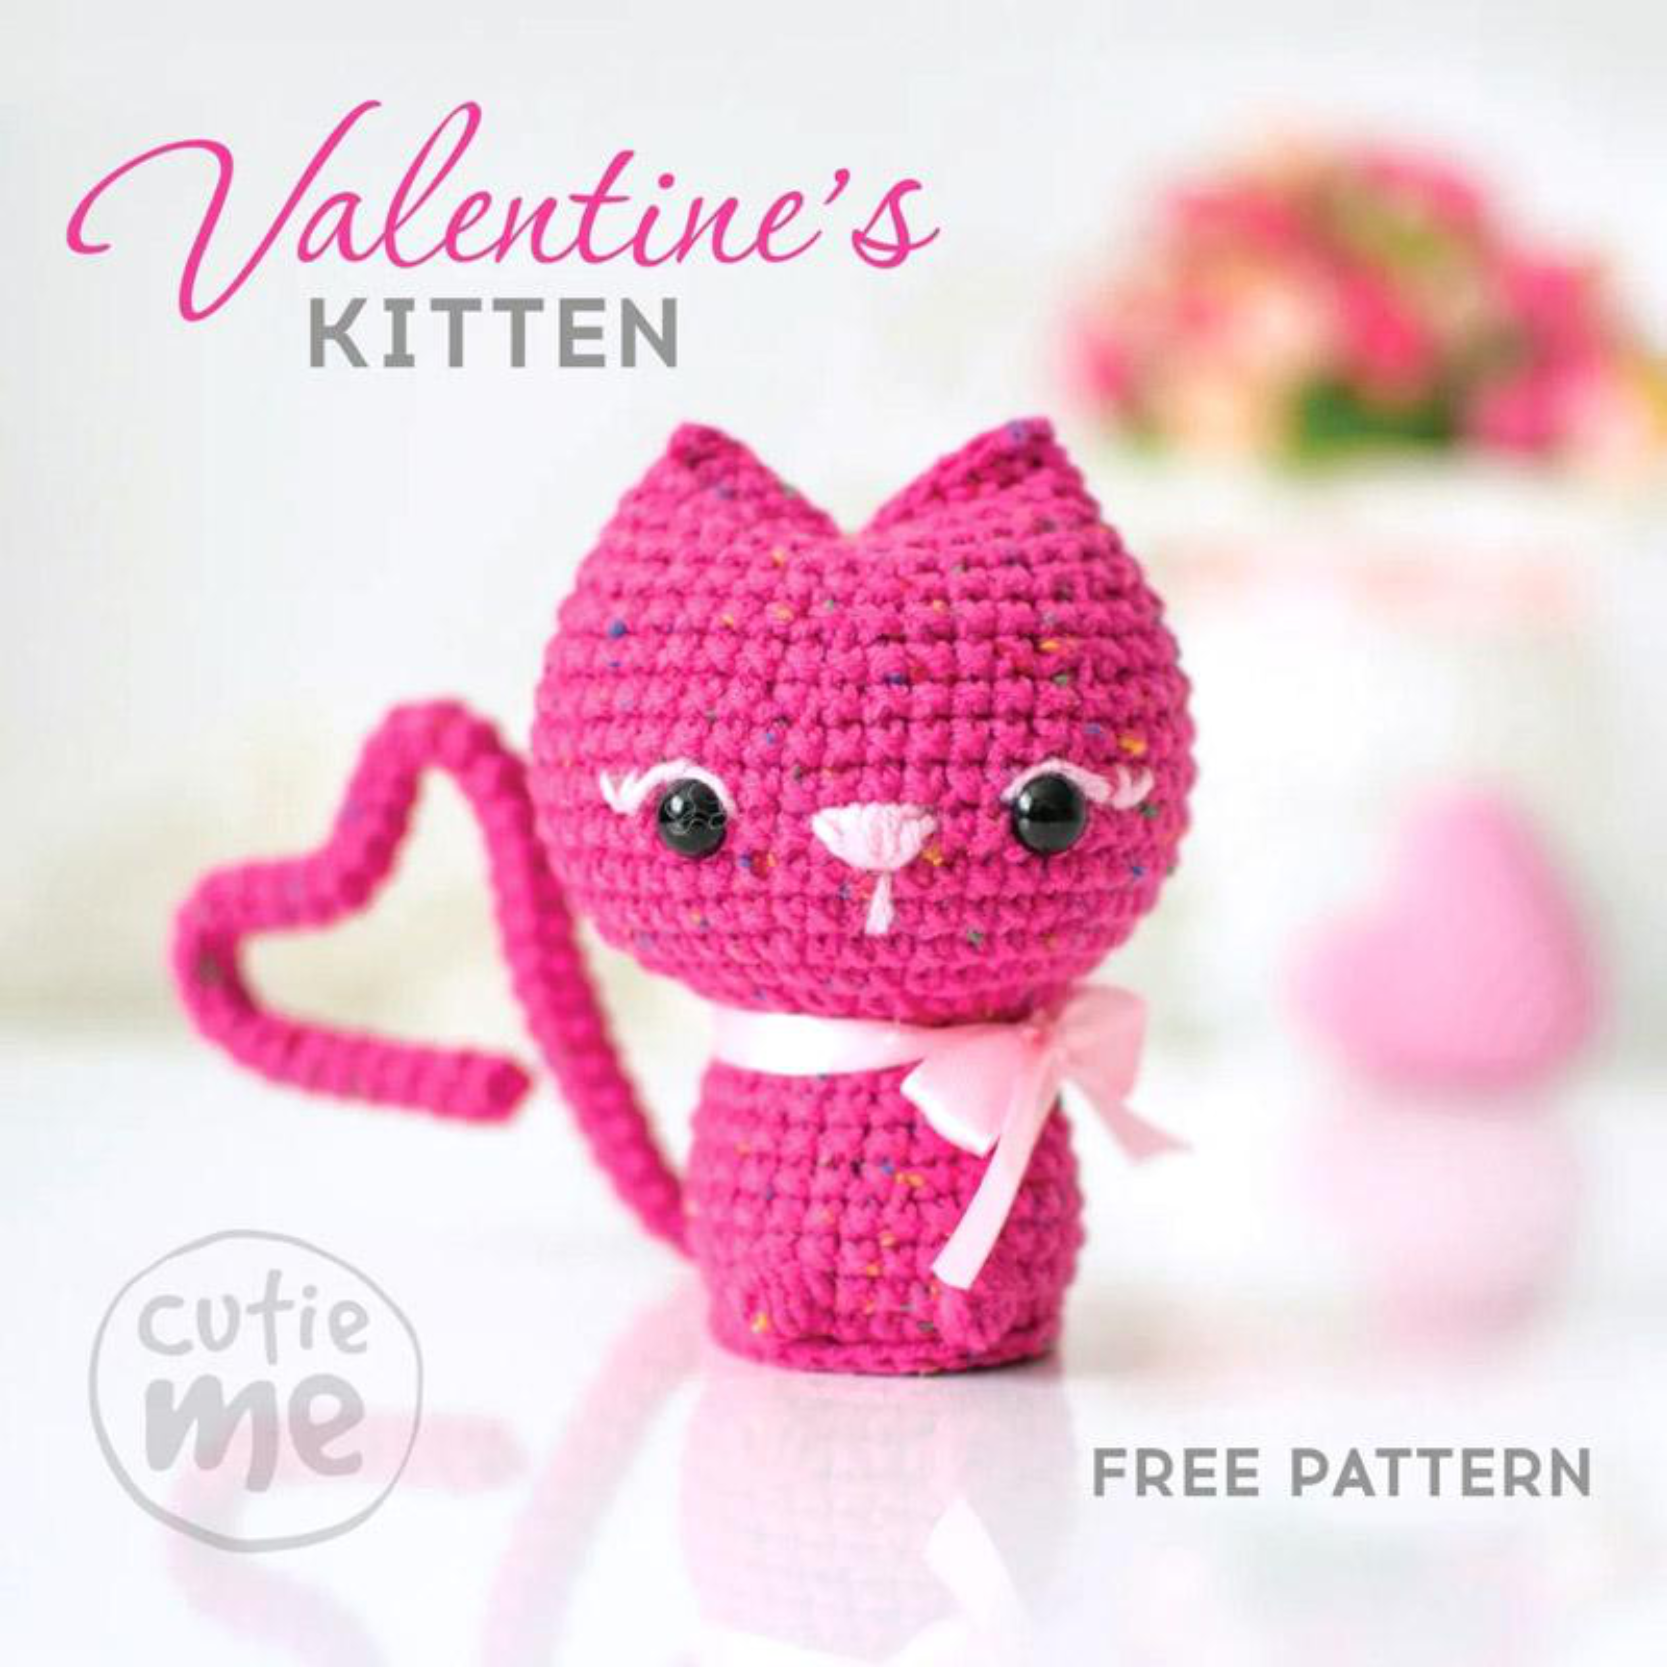
Get ready to crochet the cutest little Valentine’s Kitten with this free pattern from CutieMeStore! This adorable feline friend makes a perfect gift for someone special or a sweet addition to your own collection. Let’s get started!
Materials You Will Need
- Crochet Hook: 2 mm
- Cotton Yarn:
- Fuchsia: 15g / 45m (sample uses Alize Cotton Gold Tweed #149)
- Pink: small amount
- Stuffing: Polyfill
- Safety Eyes: A pair of 8mm safety eyes
- Tapestry Needle: For sewing and weaving in ends
- Wire: 0.8 mm, approximately 25cm (for the tail)
- Ribbon: Pink ribbon for decoration
Note: This sample is made with Alize Cotton Gold Tweed (cotton with acrylic). The finished toy will be approximately 9.5 cm (3.5 inches) tall.
Abbreviations
- MR: Magic Ring
- ch: Chain
- sc: Single Crochet
- slst: Slip Stitch
- dc: Double Crochet
- inc: Increase (2 sc in indicated stitch)
- dec: Decrease (2 sc together)
- bo: Bobble Stitch (5 dc cluster with one top)
- ( ___st ): Total amount of stitches in a round
- ( ) Nx: Repeat between ( ) N times
- st: Stitch
Let’s Crochet!
Body (Fuchsia Yarn)
We’ll start with the main body of our kitten. Make sure to stuff as you go!
| Rnd | Stitches | Count |
|---|---|---|
| 01 | 8sc in magic ring | (8) |
| 02 | (inc) 8x | (16) |
| 03 | (sc, inc) 8x | (24) |
| 04 | (2sc, inc) 8x | (32) |
| 05 | (Work in back loops only for this round) 32sc | (32) |
| 06 | 6sc, dec, 5sc, bo, 4sc, bo, 5sc, dec, 6sc | (30) |
| 07-08 | sc in each st around | (30) |
| 09 | 4sc, (dec, 8sc) 2x, dec, 4sc | (27) |
| 10 | sc in each st around | (27) |
| 11 | (7sc, dec) 3x | (24) |
| 12 | 3sc, (dec, 6sc) 2x, dec, 3sc | (21) |
| 13 | (5sc, dec) 3x | (18) |
| 14 | sc in each st around | (18) |
| 15 | (inc) 18x | (36) |
| 16 | (5sc, inc) 6x | (42) |
| 17 | (6sc, inc) 6x | (48) |
| 18-22 | sc in each st around | (48) |
| 23 | 7sc, (dec, 14sc) 2x, dec, 7sc | (45) |
| 24 | (13sc, dec) 3x | (42) |
| 25 | 6sc, (dec, 12sc) 2x, dec, 6sc | (39) |
| 26 | (11sc, dec) 3x | (36) |
| 27 | 5sc, (dec, 10sc) 2x, dec, 5sc | (33) |
| 28 | (9sc, dec) 3x | (30) |
| 29 | 4sc, (dec, 8sc) 2x, dec, 4sc | (27) |
| 30 | (7sc, dec) 3x | (24) |
| 31 | 11sc (you should reach the left side of the cat), flatten the detail and make 12sc through both sides to the end. |
Stuffing & Eyes:
- Start stuffing the body with polyfill around Rnd 8.
- If you are using safety eyes, the best time to place them is between Rnds 20 and 21, leaving 9 sc between them.
- Continue stuffing firmly as you crochet, especially before Rnd 28.
Fasten off, cut the yarn, and weave in the end.
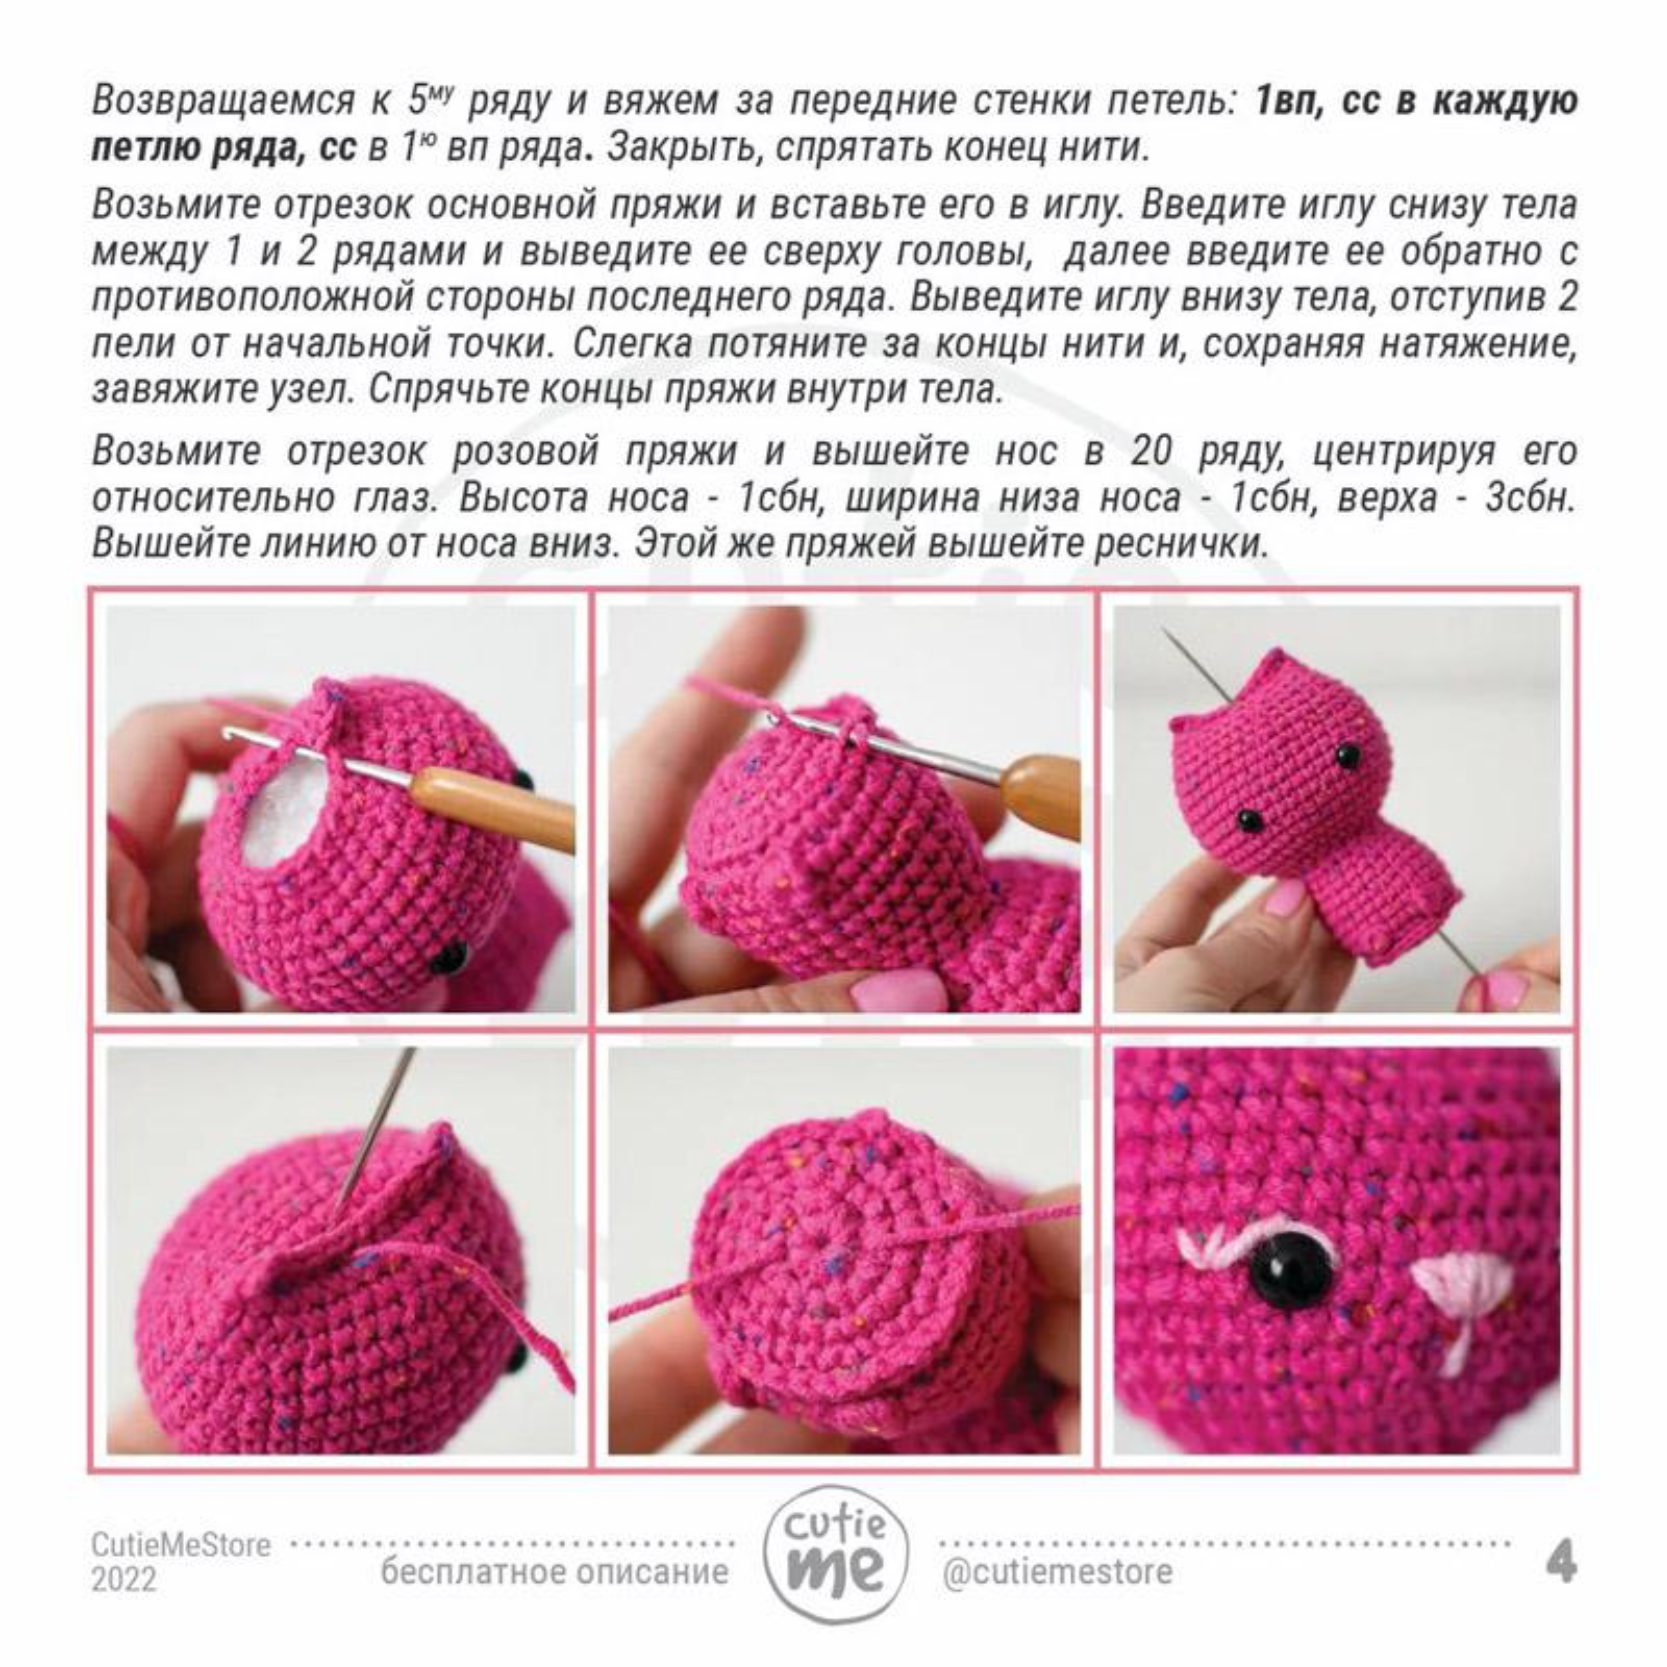
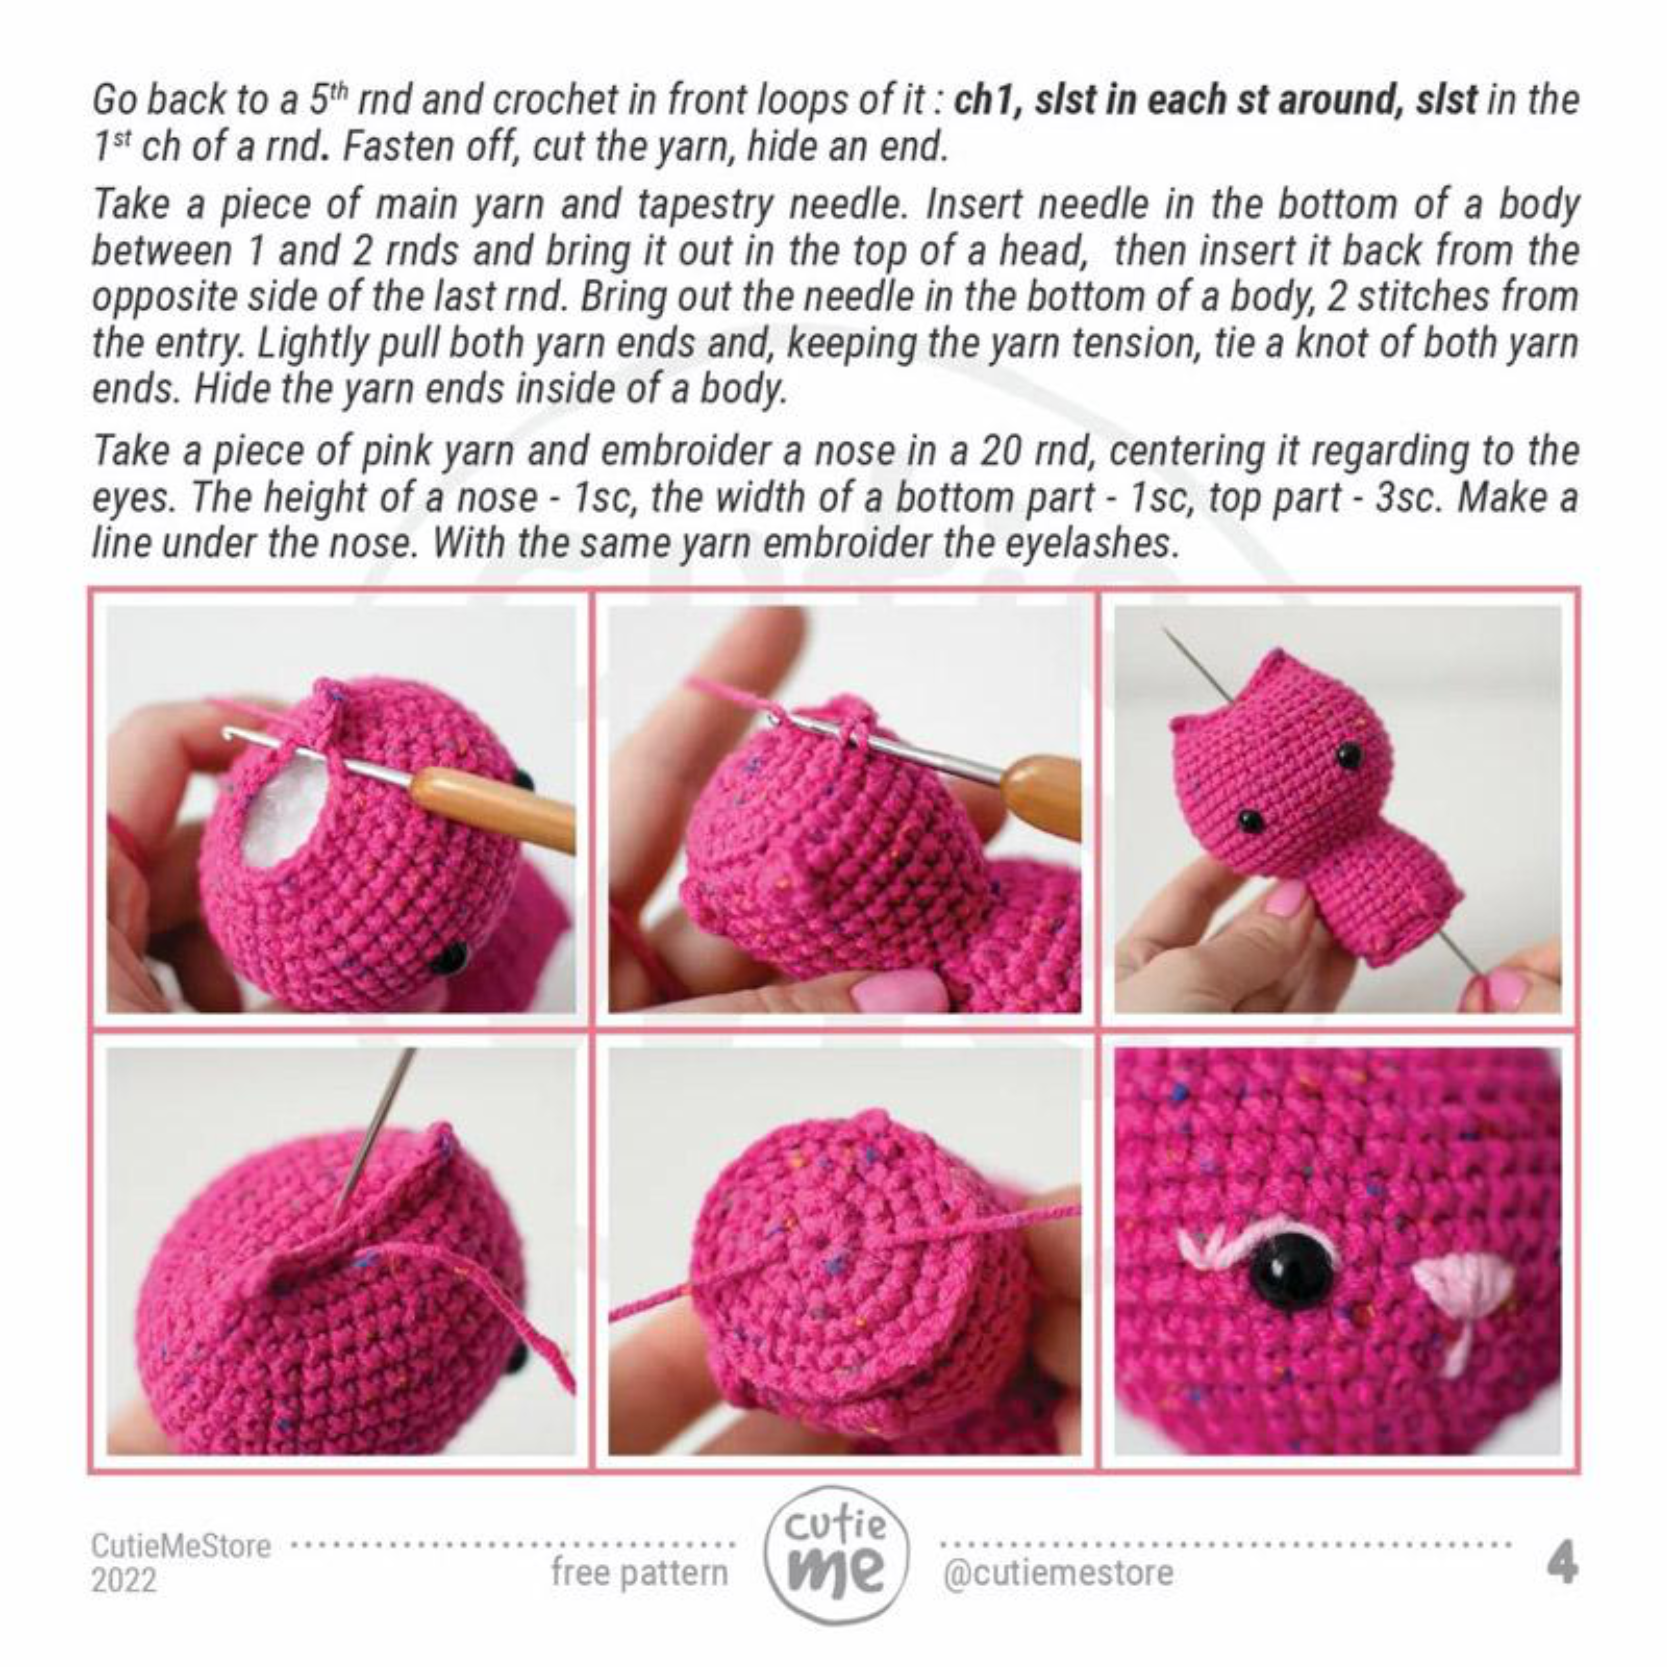
Finishing Touches on the Body
Collar Detail
Go back to Round 5, where you crocheted in the back loops only. Now, we’ll work into the front loops of that round to create a decorative collar.
- Attach your fuchsia yarn to any front loop of Round 5.
- Chain 1.
- Make a slip stitch (slst) in each front loop around the entire round.
- Slip stitch into the 1st chain you made at the start of this round.
- Fasten off, cut the yarn, and hide the end securely.
Shaping the Head
To give the kitten’s head a nice shape, we’ll use a technique called cinching.
- Take a long piece of your main fuchsia yarn (about 30-40cm) and thread it onto your tapestry needle.
- Insert the needle into the very bottom of the body, between Rnds 1 and 2.
- Bring the needle out at the top of the head (the last round of the body).
- Insert the needle back into the head from the opposite side of the last round (where you just came out).
- Bring the needle out at the bottom of the body, about 2 stitches away from where you first inserted it.
- Gently pull both yarn ends until the head slightly indents and takes shape. Hold the tension.
- While maintaining tension, tie a secure knot with both yarn ends.
- Hide the yarn ends inside the body.
Embroidering the Face
Now let’s bring our kitten to life with some cute facial details!
- Take a piece of pink yarn and your tapestry needle.
- Embroider a small nose in Round 20, centered between the eyes. The height of the nose should be 1 sc, the width of the bottom part 1 sc, and the top part 3 sc (this creates a little triangle).
- Make a small straight line directly under the nose for the mouth.
- With the same pink yarn, embroider delicate eyelashes next to the safety eyes.
Tail (Fuchsia Yarn)
Let’s create the adorable little tail for our kitten.
| Rnd | Stitches | Count |
|---|---|---|
| 01 | 6sc in magic ring | (6) |
| 02-45 | sc in each st around | (6) |
Fasten off, cut the yarn, leaving a long tail for sewing.
Shaping the Tail
To make the tail poseable and heart-shaped, we’ll use wire.
- Take your 25cm piece of 0.8mm wire and make a small loop at one end (this prevents the wire from poking through the crochet).
- Attach the other end of the wire to the back of the body, between Rnds 6 and 7, by carefully weaving it into the stitches to secure it.
- Insert the looped end of the wire inside the crocheted tail.
- Using the long yarn tail you left, sew the tail securely to the body.
- Once attached, carefully bend and twist the wire inside the tail into a charming heart shape.
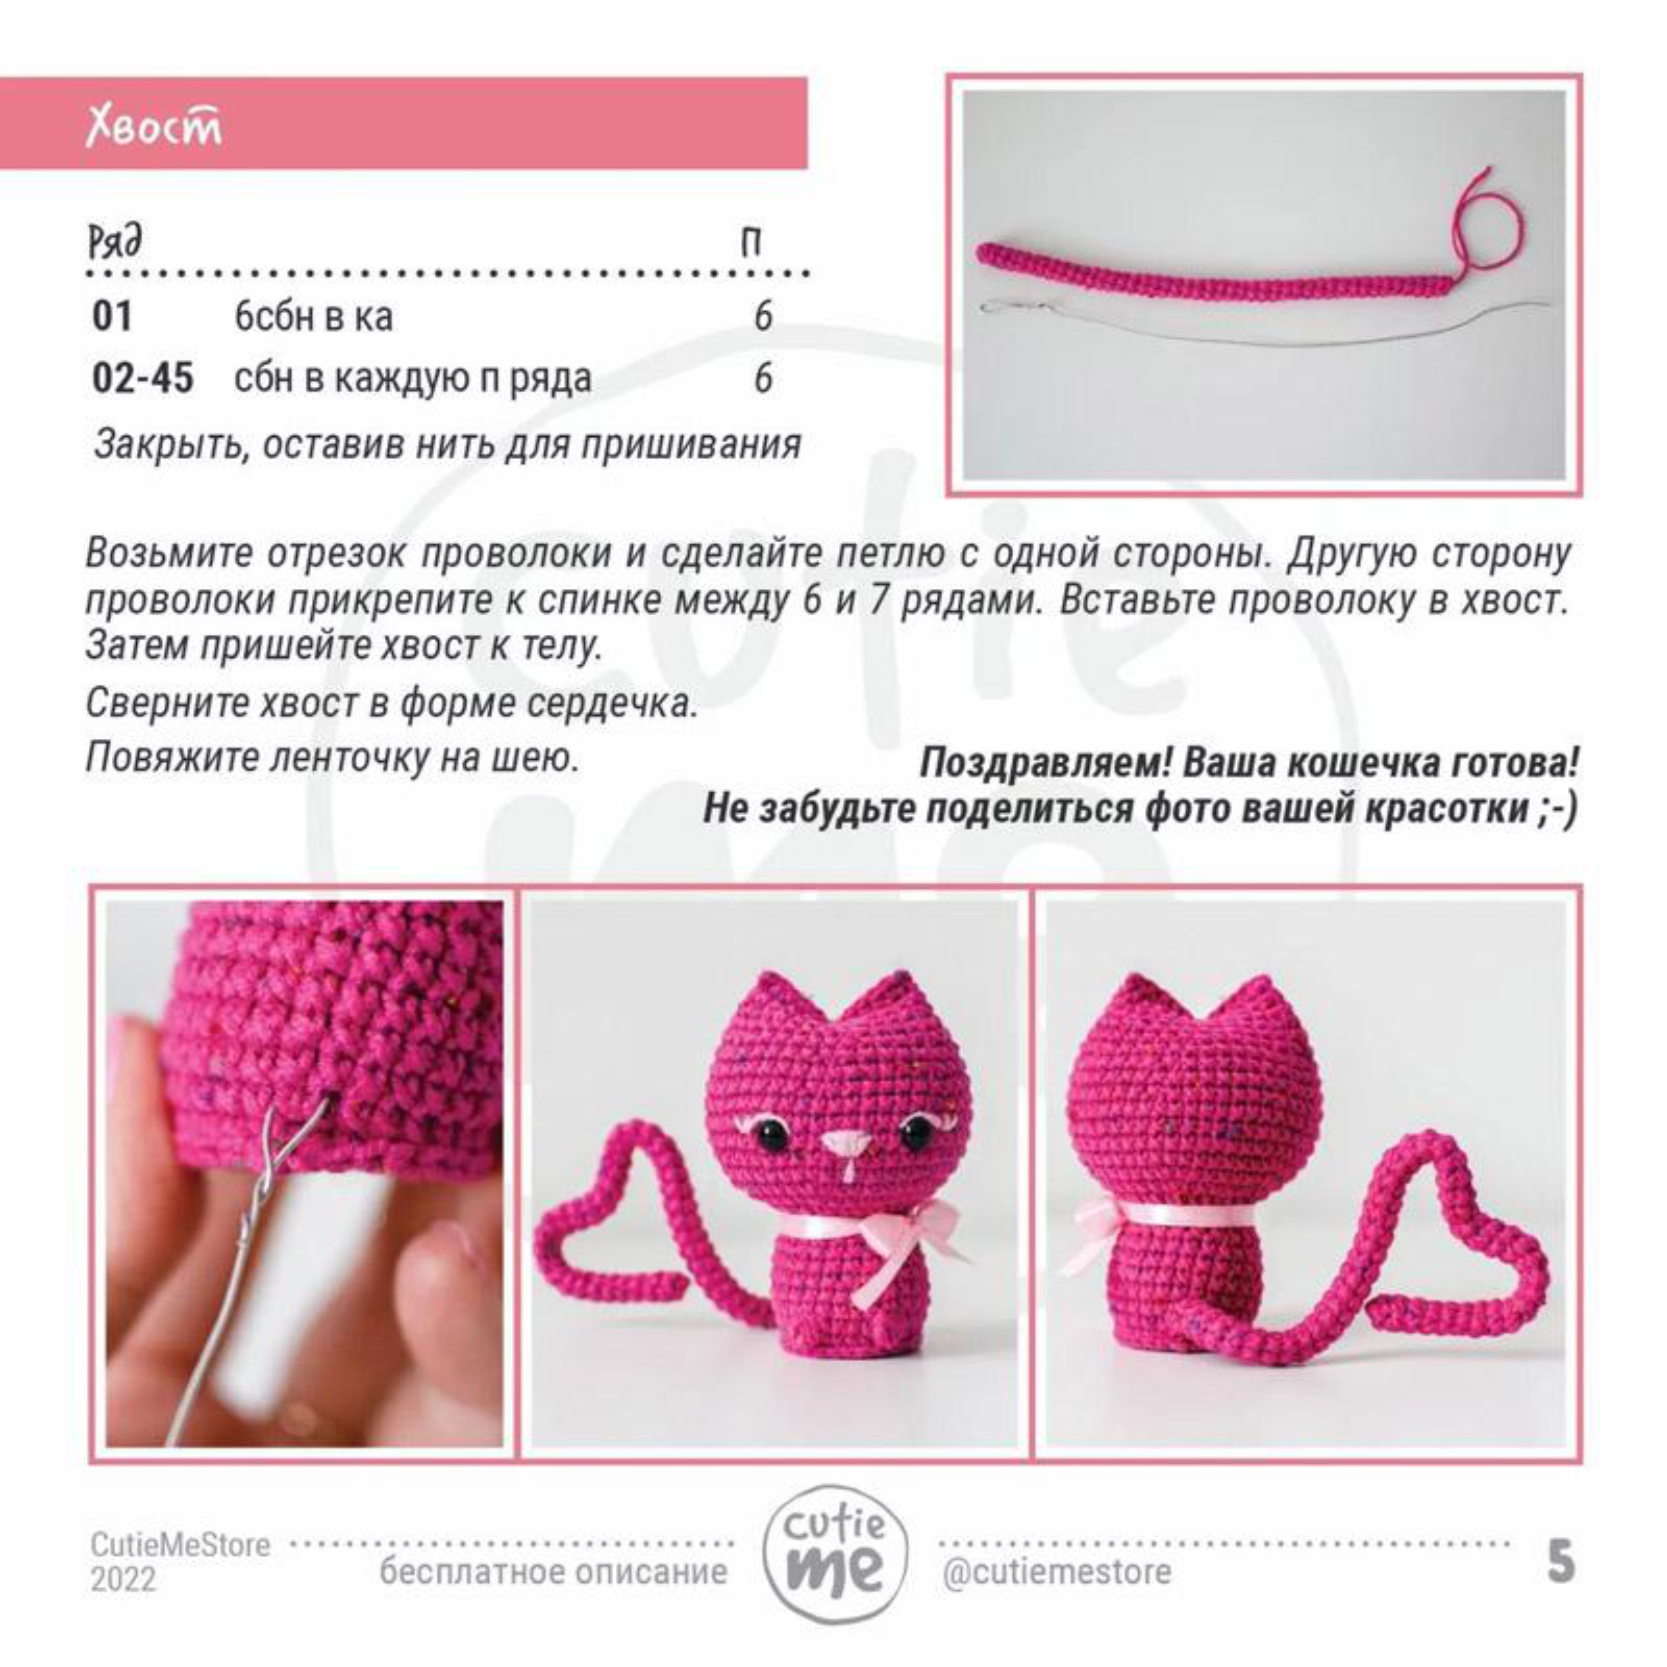
Finishing Your Valentine’s Kitten
Almost there! Just one more sweet detail:
- Tie a lovely pink ribbon around your kitten’s neck to complete its Valentine’s look.
Congratulations! Your Valentine’s Kitten is finished!
Don’t forget to share a photo of your beautiful creation! Tag @CutieMeStore on social media – we’d love to see it!