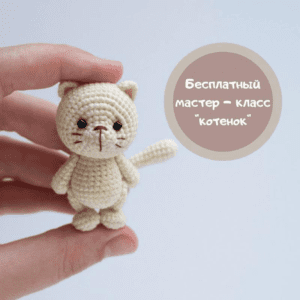
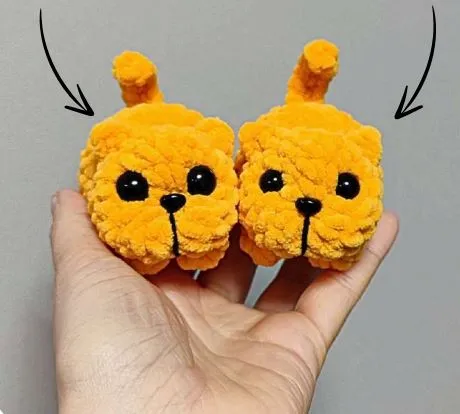
Free Plush Kitten Crochet Pattern
Crochet Kitten Amigurumi Pattern
Welcome to the Crochetto blog! If you’re looking for your next adorable project, you’re in the right place. This delightful crochet pattern will guide you through creating an irresistibly cute amigurumi kitten, perfect for gifting, decorating, or simply bringing a smile to your face. Let’s gather our supplies and get ready to stitch some magic!
About This Pattern
This free master class is an original work by @vsevyazanoe. Please note that this pattern is intended for personal use only. We kindly request that you do not copy, publish, or sell this master class. When sharing your finished creations on social media, please remember to credit the original author, @vsevyazanoe. This master class assumes you have basic crochet skills and does not include fundamental crocheting lessons.
Materials You’ll Need
* Plush yarn (approx. 120 m/100 g)
* Hook size 4 mm
* Scissors
* Safety eyes: 10-12 mm
* Safety nose: 7×9 mm
* Thread for face tightening (e.g., embroidery floss)
Abbreviations Guide
* MR – Magic Ring
* Sc – Single crochet
* Inc – Increase (2 sc in one stitch)
* Dec – Decrease (2 sc with one vertex)
* Hdc – Half double crochet
* Dc – Double crochet
* (…) x N – repeat N times
* Sl st – Slip stitch
* Ch – Chain stitch
* Puff stitch from 4 dc – 4 double crochet stitches in one stitch with one vertex
Important Notes Before You Begin
When using the specified materials, your finished toy will be approximately 8 cm tall. Please keep in mind that the final size may vary depending on your chosen yarn, hook size, tension, and individual crocheting style. As you crochet, pay close attention to stitch displacement and strive for symmetry in your toy. If necessary, you may crochet extra single crochet stitches or decrease as needed to maintain the desired shape.
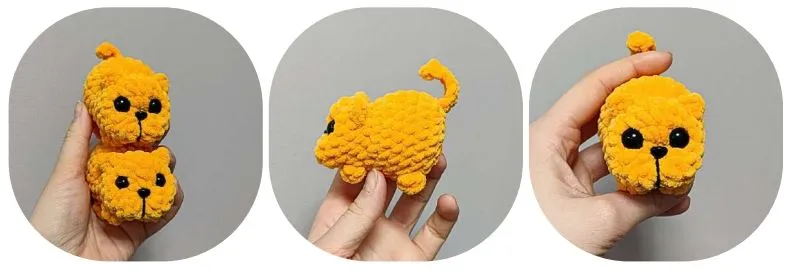
Crochet Pattern: Adorable Kitten
Crocheting begins from the head.
1. 8 sc in MR
2. 8 inc (16)
3. 6 sc, inc, 8 sc, inc (18)
4. 18 sc
5. 10 sc, ear (for the front loop of the stitch sc+dc+sc), 4 sc, ear, 2 sc (18)
In the next row, remember to crochet stitches into the remaining loops behind the ears:
6. 10 sc, 3 dec, 2 sc (15) – decreases should be at the top in the middle
7. 2 sc, paw (puff stitch from 4 dc), 2 sc, paw, 2 sc, (1 sc, inc) x 3. 1 sc (18) – increases should be at the center of the back.
Insert 10-12 mm safety eyes between rows 2 and 3 at a distance of 5 single crochet stitches apart.
8. 7 sc, (1 sc, inc) x 6 (24) – the end of the row shifts forward by 1 sc. Increases should be at the center of the back.
9-11. 24 sc (3 rows)
12. 2 sc, paw, 3 sc, paw, 17 sc (24)
13. (2 sc, dec) x 4, 1 sc, tail (8 ch, starting from the third stitch from the hook back along the chain hdc, 5 sc, sl st into the base of the tail), 1 sc, dec, 2 sc, dec (18)
14. (1 sc, dec) x 6 (12)
15. 6 dec

Finishing Touches
After completing the body, you can tighten (indent) the muzzle as desired to give your kitten a sweet, defined face. Then, shape and insert the 7×9 mm safety nose securely. Weave in any remaining ends to complete your adorable feline friend!
We hope you enjoyed crocheting this charming kitten! Your handmade creations inspire us daily. Don’t forget to share your finished kitten with the Crochetto community by tagging us on social media. We love seeing your beautiful work! Happy crafting!