Get Your Free Amigurumi Monkey Pattern!
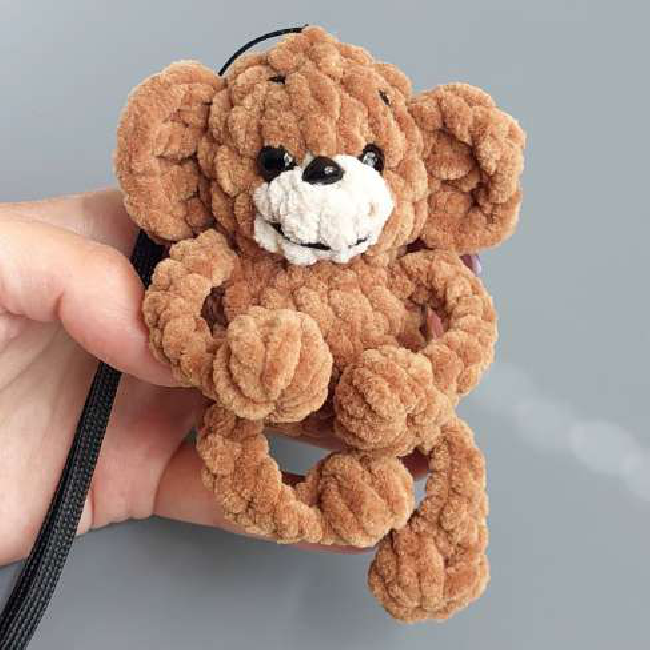
Adorable Amigurumi Monkey: A Free Crochet Pattern by Galina Burlakova
Welcome, fellow makers! Get ready to swing into a delightful new project with this charming Amigurumi Monkey crochet pattern, thoughtfully designed by the talented Galina Burlakova. This little friend is sure to bring a smile to anyone’s face, whether you’re making it for a loved one or as a sweet addition to your own collection. Our detailed crochet patterns are designed to be clear and easy to follow, making your crafting journey a joyful experience from start to finish. Let’s gather our materials and begin creating!
Materials Needed
- Plush yarn: 100g/120m, main brown color and a little lighter shade for the muzzle.
- Crochet hook of a suitable size for your tension (Galina used a 3.75 Clover hook).
- Stuffing.
- 8mm safety eyes.
- Stitch marker.
- Darning needle.
Abbreviations
- MR – magic ring
- SC – single crochet
- INC – increase
- DEC – decrease
- SL ST – slip stitch
- CH – chain
- HDC – half double crochet
- DC – double crochet
- 4DC TOG – work 4 double crochets into one stitch, sharing a common top (cluster)
Important Note: The toy is crocheted in one piece; remember to stuff as you go.
All 4 Legs
Each of the four legs is crocheted identically:
Chain 10. Starting from the second chain from the hook, crochet (4DC TOG, 8 SC, and SL ST into the base of the stitch).
Body – Head
This section is crocheted in a continuous spiral, forming the body and head.
- 8 MR (8)
- 3 INC, leg, 2 INC, leg, 3 INC, tail (chain 9, then starting from the 2nd chain from the hook, crochet 8 SC and SL ST into the base of the stitch). (16)
- 16 SC (16)
- 16 SC (16)
- 6 SC, leg, 6 SC, leg, 4 SC (16)
- 8 DEC (8)
- 8 INC (16)
- 9 SC, change yarn to muzzle color and crochet 2 INC (HDC), change yarn to main color, 5 SC (18)
- 9 SC, change yarn to muzzle color and crochet 2 DEC (HDC), change yarn to main color, 5 SC (16)
- 16 SC (16)
- 8 DEC (8) If using safety eyes, insert them now between rows 9 and 10 (at the corners of the muzzle).
- 4 DEC (4) Cut yarn, secure and weave in end.
Left Ear
Attach yarn between rows 8 and 9 and in the same stitch crochet HDC, 2 DC. In the stitch of the next row (rows 9 and 10), crochet 2 DC, HDC, and SL ST. Cut yarn, secure and weave in end.
Right Ear
Crochet similarly to the left ear, but attach yarn between rows 9 and 10: HDC, 2 DC. Then, in the stitch of the next row (rows 8 and 9), crochet 2 DC, HDC, SL ST. Cut yarn, secure and weave in end.
Face Sculpting and Finishing Touches
Adding these final details will bring your monkey to life!
Insert the needle from the bottom of the muzzle (1), bring it out at the corner of the left eye (2), then into the corner of the right eye (3), and bring it out from the bottom of the muzzle through a stitch next to the entry point (see photo). Pull gently to sculpt the muzzle.
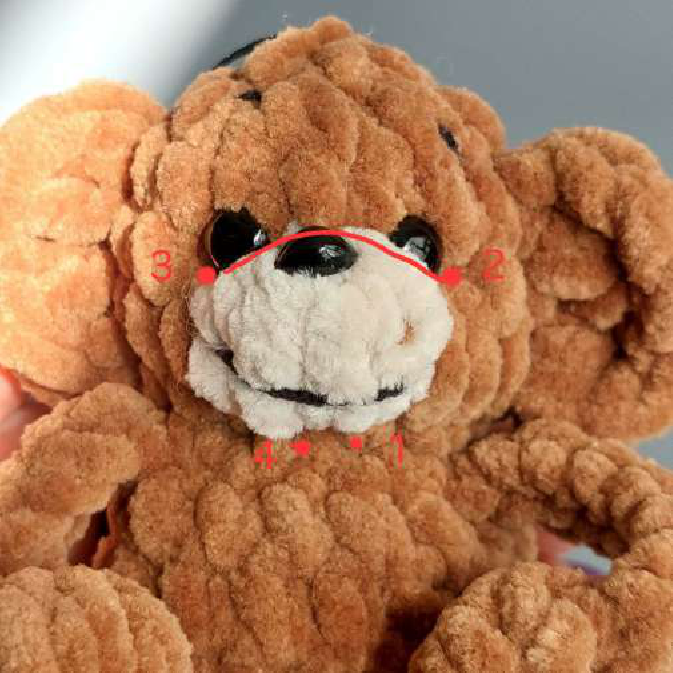
Glue the nose to the upper part of the muzzle, with the point facing up (see photo).

Embroider the mouth and eyebrows to give your monkey its unique expression.
Your adorable Amigurumi Monkey is now ready!
We hope you thoroughly enjoyed creating this charming little monkey! At Crochetto, we love seeing your finished projects. Share your handmade monkeys with us on social media and tag Crochetto so we can admire your beautiful work. Happy crocheting, and keep an eye out for more inspiring crochet patterns to spark your creativity!