
Hook The Cutest Duckling: Easy Amigurumi!
Crochet Your Own Adorable Duckling! Easy Amigurumi Pattern
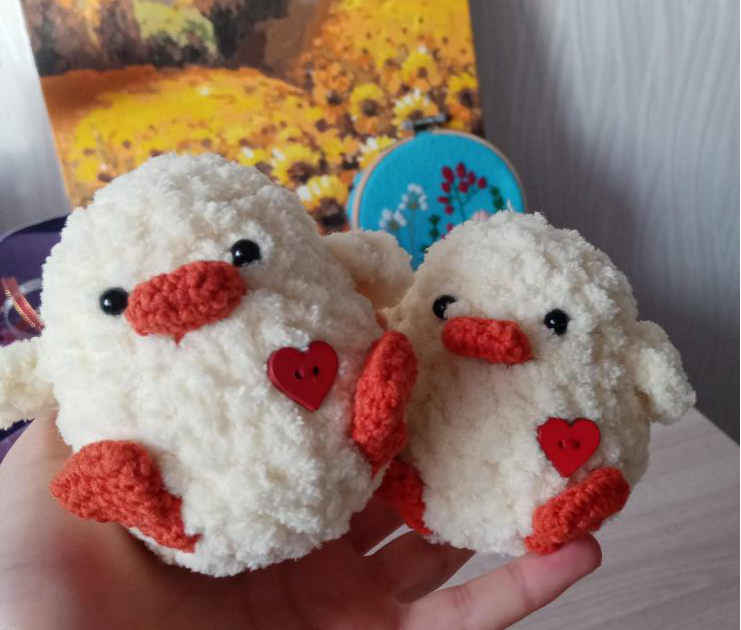
Get ready to crochet the cutest little duckling with this easy-to-follow amigurumi pattern! Perfect for gifting, decorating, or simply adding a touch of handmade charm to your day. This pattern, designed by Kovaleva Ksenia, is straightforward and fun for crocheters of all levels.
Let’s gather our supplies and get started!
Materials You’ll Need:
- Yellow yarn: (Author used Alize Soft) – This will be the main color for your duckling’s body and wings.
- Orange yarn: (Author used YarnArt Jeans) – For the beak and legs.
- Crochet hooks: Appropriate sizes for your yarn (Author used 6.5mm and 3mm hooks). Choose hooks that give you a tight enough fabric for amigurumi, preventing stuffing from showing through.
- 2 beads for eyes: Small black beads work well, or you can embroider eyes later.
- 1 heart-shaped button: Optional, for a cute embellishment.
- Stuffing: Polyester fiberfill or any suitable stuffing material.
- Tapestry needle: For sewing pieces together and weaving in ends.
- Scissors: For cutting yarn.
Abbreviations Used in This Pattern:
- MR / КА: Amigurumi Ring (also known as Magic Ring or Magic Circle) – A technique to start crocheting in the round without a hole in the center.
- sc / Сбн: Single Crochet – The basic crochet stitch used in amigurumi.
- inc / Пр: Increase – Make two single crochet stitches in the same stitch.
- dec / Уб: Decrease – Crochet two single crochet stitches together into one. (Invisible decrease is recommended for a cleaner look).
- ch: Chain – A series of loops, forming the foundation for many crochet projects.
- st(s): Stitch(es)
- (…)*X times: Repeat the instructions in the parentheses X number of times.
Author: Kovaleva Ksenia
Let’s Start Crocheting!
We’ll begin with the main body of our adorable duckling.
Body (using yellow yarn)
Work in continuous rounds unless otherwise stated. Use a stitch marker to keep track of your first stitch in each round.
- Round 1: Make 6 single crochets (sc) in a Magic Ring (MR). (6 sc)
- Round 2: Increase (inc) in each stitch around. (12 sc)
- Round 3: (1 sc, inc) repeat 6 times. (18 sc)
- Round 4: (2 sc, inc) repeat 6 times. (24 sc)
- Round 5 – 8: Sc in each stitch around for 4 rounds. (24 sc)
- Round 9: (2 sc, decrease (dec)) repeat 6 times. (18 sc)
- Round 10 – 12: Sc in each stitch around for 3 rounds. (18 sc)
Time to start stuffing your duckling! Make sure to stuff it firmly as you go to achieve a nice shape.
- Round 13: (1 sc, dec) repeat 6 times. (12 sc)
- Round 14: Decrease (dec) 6 times. (6 sc)
Cut yarn, leaving a long tail. Close the remaining opening with a tapestry needle by weaving the tail through the front loops of the last 6 stitches and pulling tight. Weave in the end.
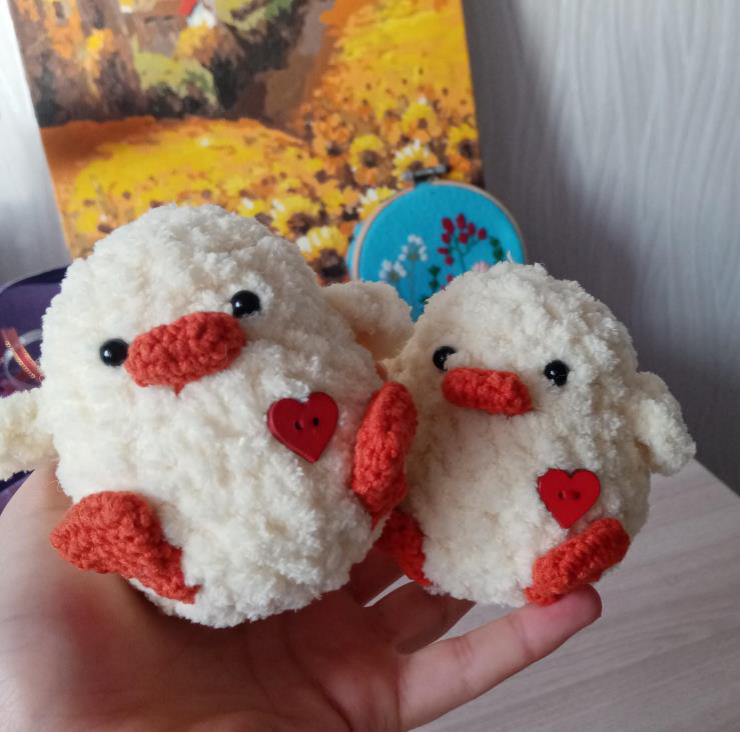
Eyes: Using your tapestry needle and thread, sew on the two beads for eyes between rows 5 and 6 of the body, approximately 3 single crochet stitches apart.
Beak (using orange yarn)
We’ll create a small oval for the beak. Work in rows, turning your work.
- Row 1: Chain (ch) 4 stitches. Starting from the 2nd chain stitch from your hook, work the following: 1 increase (inc), 2 sc, 2 increases (inc) in the next stitch, 1 sc, 1 inc. (10 sc)
- Row 2 – 3: Sc in each stitch around for 2 rounds. (10 sc)
Cut yarn, leaving a long tail for sewing. Sew the beak onto the duckling’s face, just below the eyes.
Legs (Make 2 – using orange yarn)
Like the beak, the legs start with a chain to form an oval shape.
- Round 1: Chain (ch) 6 stitches. Starting from the 2nd chain stitch from your hook, work the following: 1 increase (inc), 3 sc, 2 increases (inc) in the next stitch, 3 sc, 1 inc. (14 sc)
- Round 2-3: Sc in each stitch around for 2 rounds. (14 sc)
- Round 4: (2 sc, decrease (dec)) repeat 3 times, then 1 decrease (dec). (10 sc)
- Round 5: Sc in each stitch around. (10 sc)
- Round 6: (2 sc, decrease (dec)) repeat 3 times. (6 sc)
Cut yarn, leaving a long tail. Flatten the leg and crochet 3 single crochets together across the opening to close it (or sew it shut). Sew the finished legs to the bottom of the duckling’s body.

Wings (Make 2 – using yellow yarn)
The wings are simple and quick to make!
- Round 1: Make 6 single crochets (sc) in a Magic Ring (MR). (6 sc)
Cut yarn, leaving a long tail. Do not stuff. Flatten the wing and sew it to the body between rows 6 and 7, one on each side.
Finishing Touches
Once all the pieces are sewn on, take a step back and admire your adorable duckling! For an extra touch of cuteness, you can optionally sew on a heart-shaped button to the body.

Share Your Ducklings!
Congratulations on making your very own crochet duckling! I’d love to see your finished creations. Please share your ducklings on VK and tag @cherdak.knit.
Happy crocheting!
Pattern Designed by Kovaleva Ksenia