
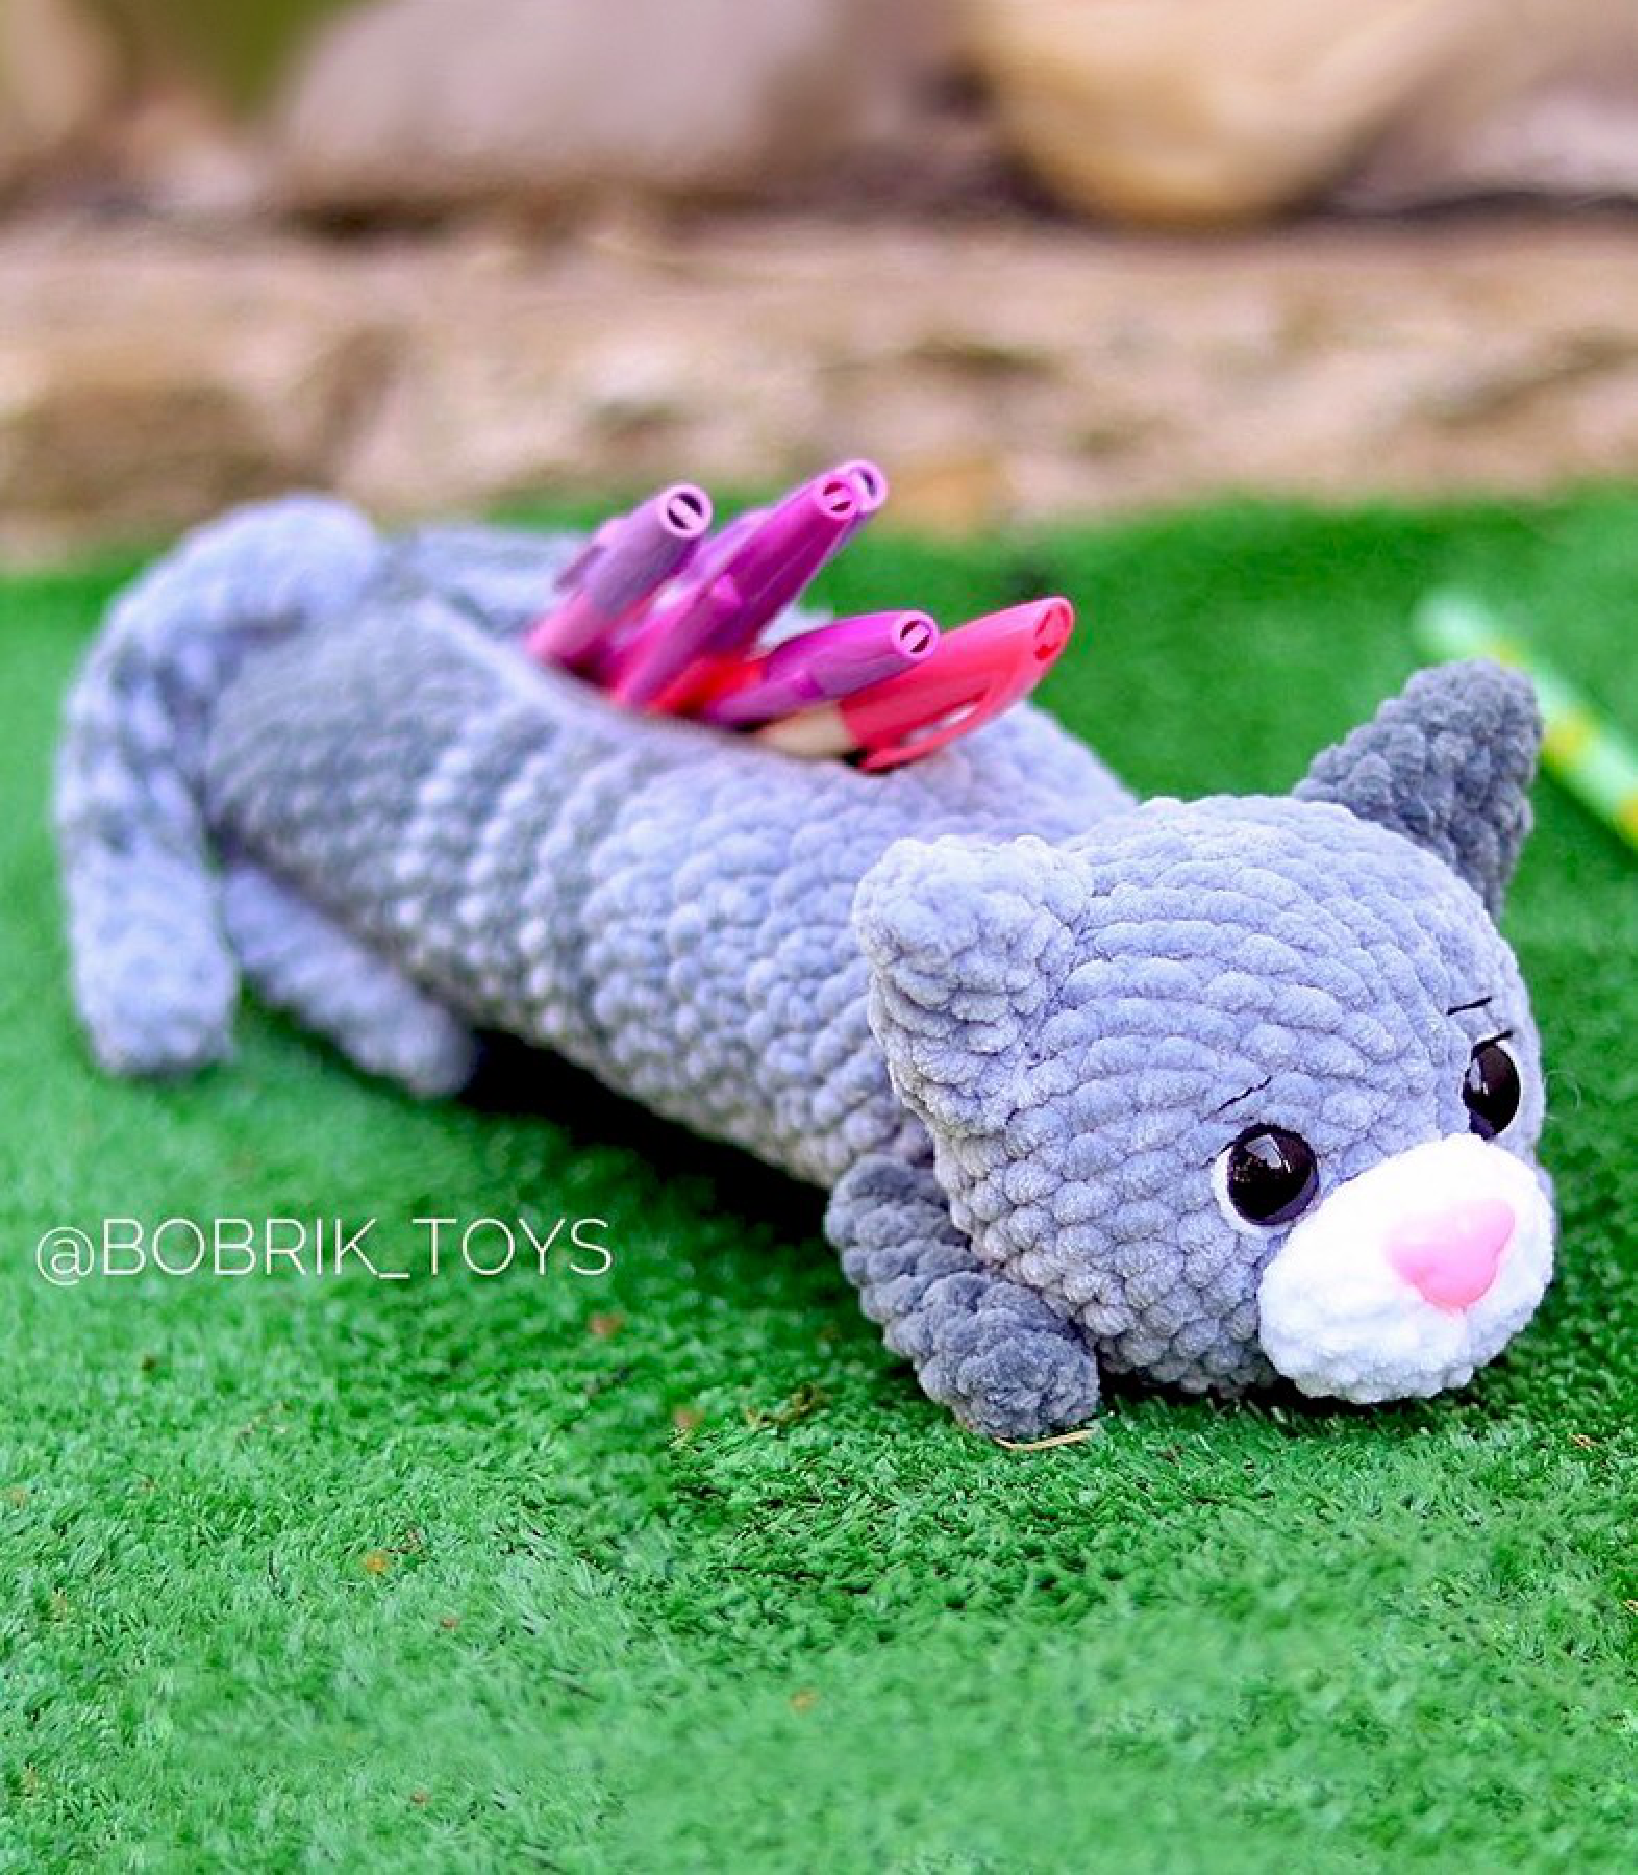
Hook Your Own Adorable Cat Pencil Case!
Materials You’ll Need
- Half a skein of gray YarnArt Dolce (color 782)
- Half a skein of dark gray YarnArt Dolce (color 760)
- A small amount of white YarnArt Dolce (color 741)
- Safety Eyes: 12 mm
- Thin black embroidery thread (for detailing)
- Pink Safety Nose: 15 mm
- Crochet Hook: 3.5 mm (e.g., Clover or similar)
- Stuffing (polyester fiberfill)
- Gray Zipper: 15 cm long
Abbreviations Used in This Pattern
- MR: Magic Ring (also known as Amigurumi Ring or Magic Circle)
- CH: Chain Stitch
- SC: Single Crochet
- INC: Increase (make two single crochets in the same stitch)
- DEC: Decrease (single crochet two stitches together)
- SL ST: Slip Stitch
- BLO: Back Loop Only
- FLO: Front Loop Only
- (X): Indicates the total number of stitches you should have at the end of the round/row
- […]xY: Repeat the instructions inside the brackets Y number of times
Let’s Get Crocheting!
Follow these step-by-step instructions to create your charming cat pencil case.
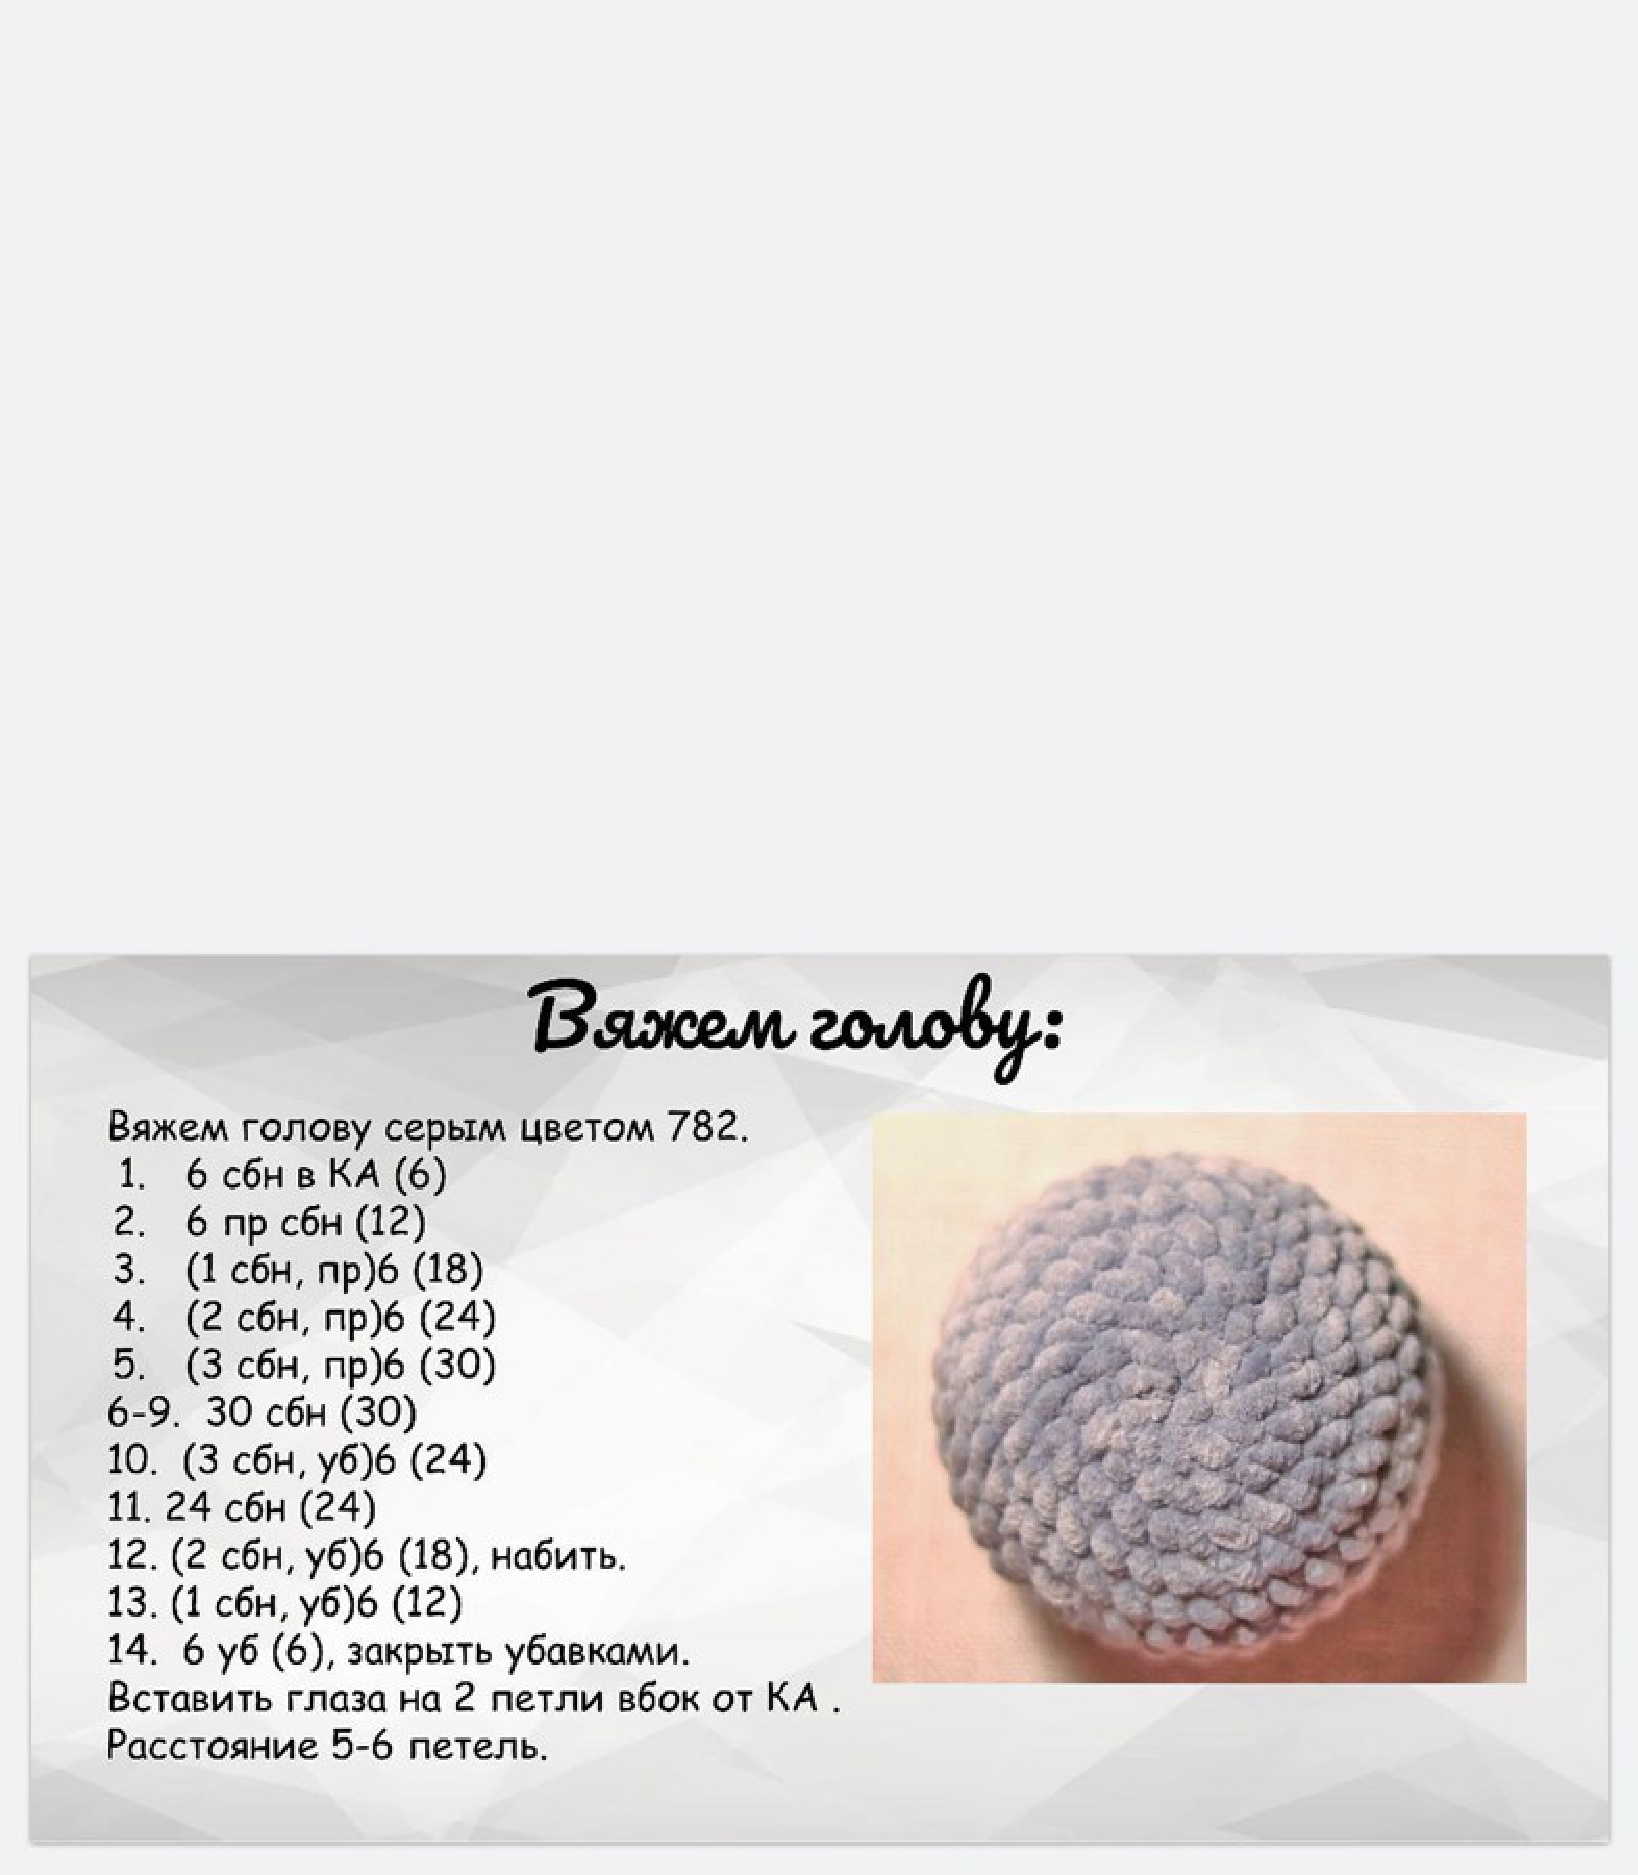
Head (Using Gray Yarn Color 782)
- Start with 6 SC in a Magic Ring (MR). (6)
- 6 INC SC (make an increase in each stitch). (12)
- [1 SC, INC] repeated 6 times. (18)
- [2 SC, INC] repeated 6 times. (24)
- [3 SC, INC] repeated 6 times. (30)
- Rounds 6-9: SC in each of the 30 stitches around. (30) (4 rounds total)
- [3 SC, DEC] repeated 6 times. (24)
- Round 11: SC in each of the 24 stitches around. (24)
- [2 SC, DEC] repeated 6 times. (18) Now is a good time to start stuffing the head firmly with fiberfill.
- [1 SC, DEC] repeated 6 times. (12)
- 6 DEC (decrease in each stitch), then fasten off and close the remaining hole. (6)
Eye Placement: Insert the 12mm safety eyes between rounds 9 and 10. Position them approximately 2 stitches away from the magic ring (center of the head) with 5-6 stitches apart between the eyes.
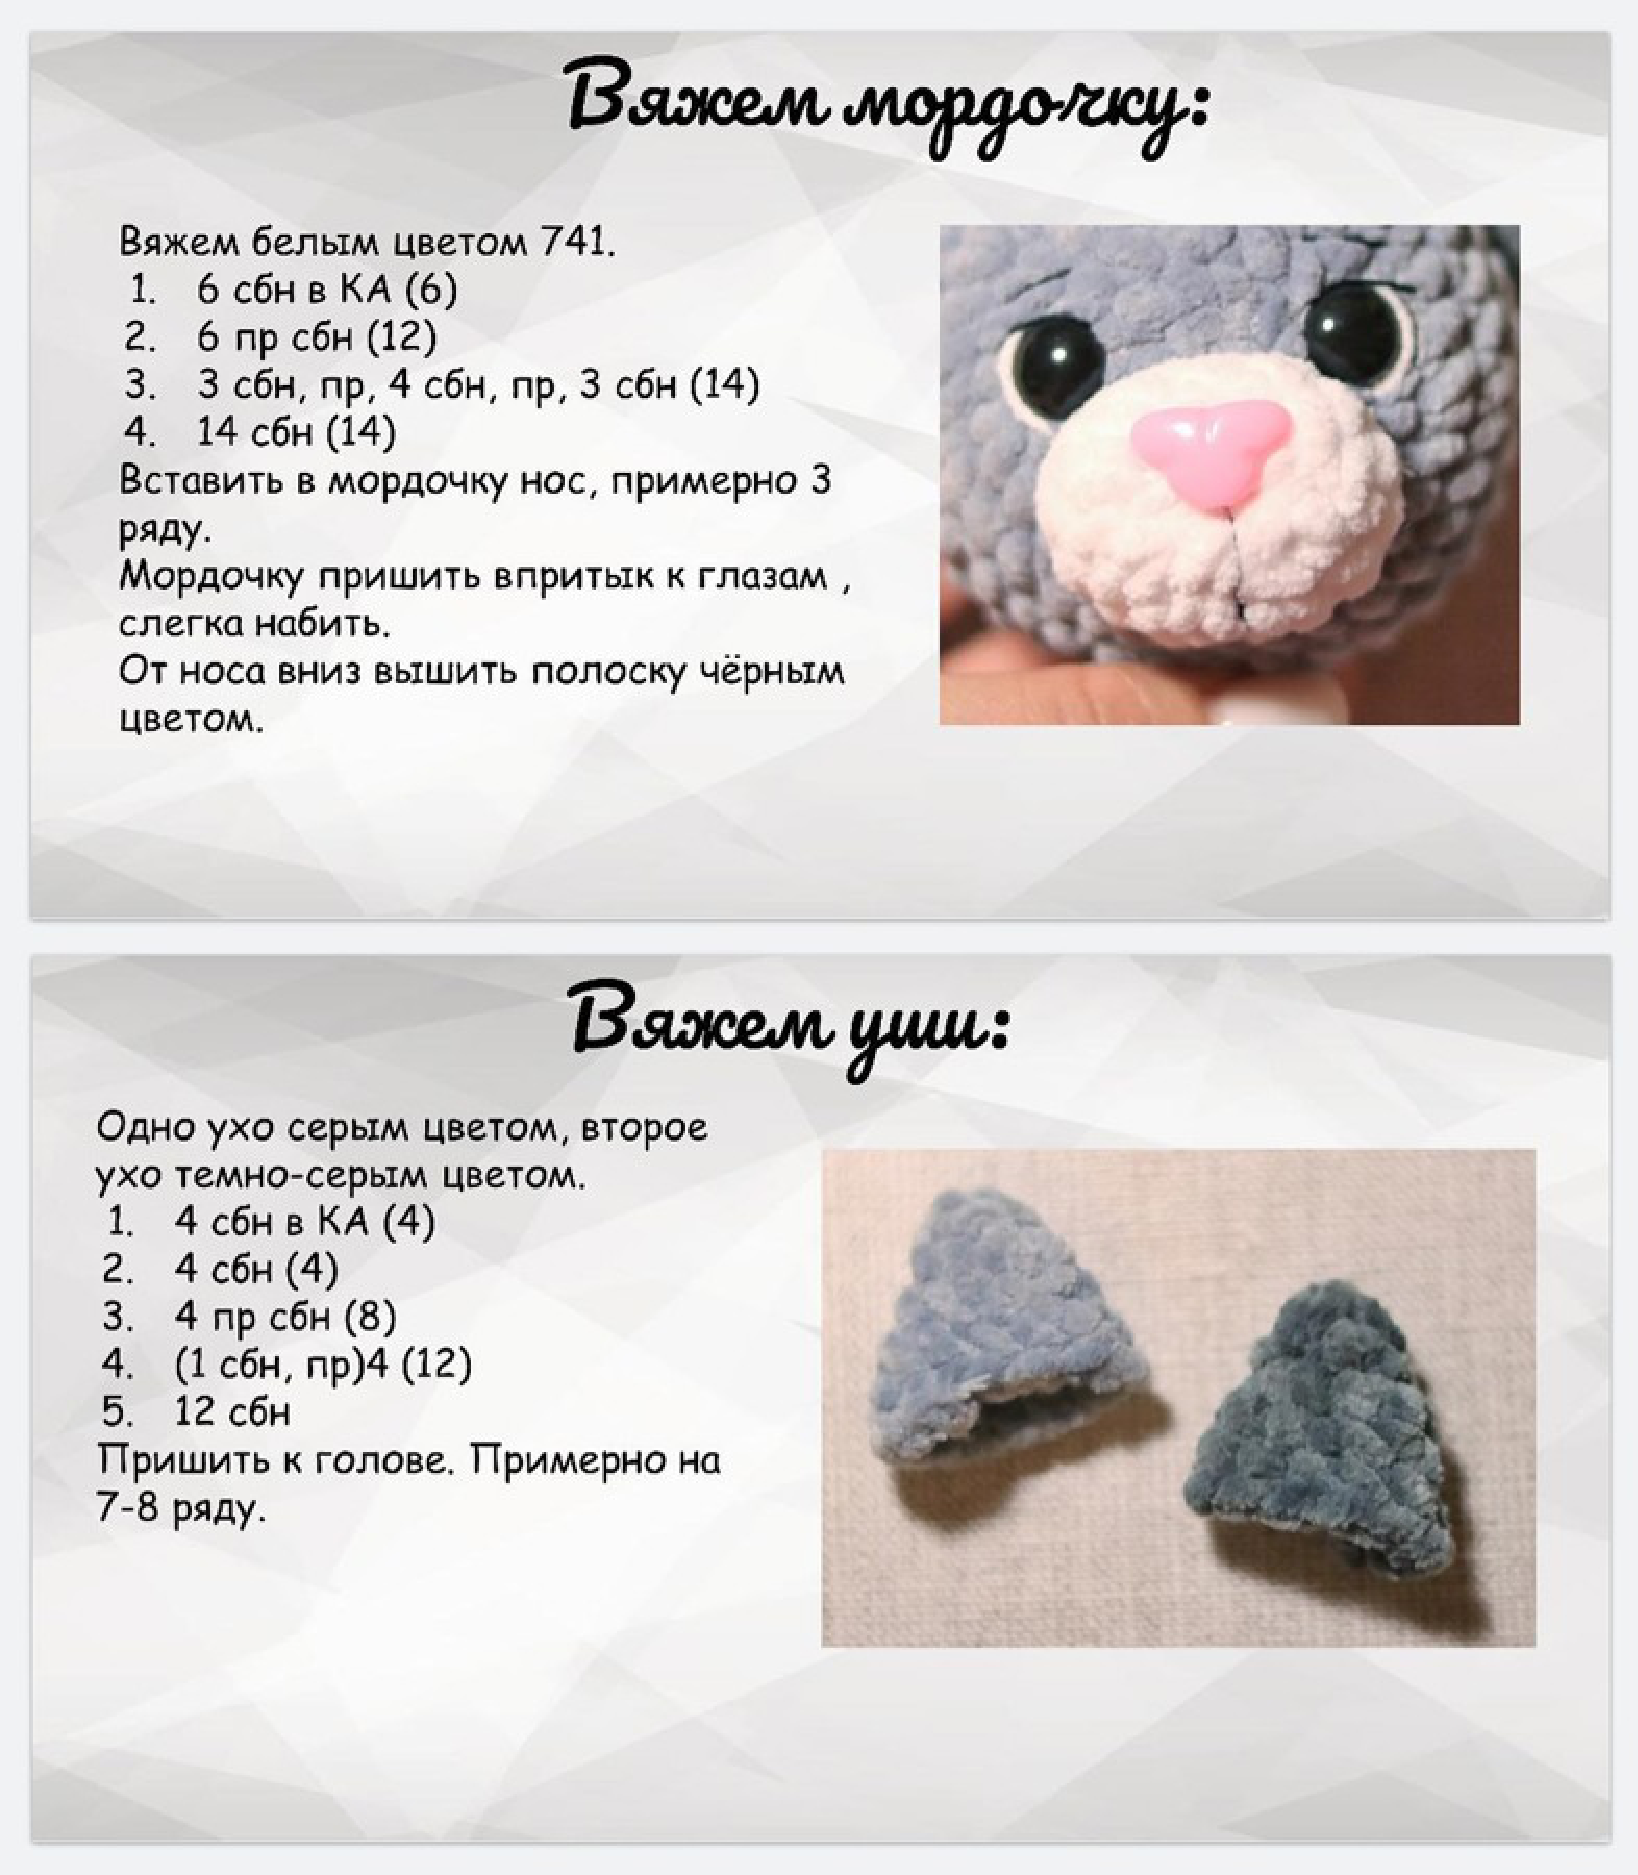
Muzzle (Using White Yarn Color 741)
- Start with 6 SC in a Magic Ring (MR). (6)
- 6 INC SC. (12)
- 3 SC, 1 INC, 4 SC, 1 INC, 3 SC. (14)
- Round 4: SC in each of the 14 stitches around. (14)
Assembly: Insert the 15mm pink safety nose into the muzzle, positioning it roughly on the 3rd round. Sew the muzzle onto the head, placing it close to the eyes. Lightly stuff the muzzle before fully sewing it closed. With thin black thread, embroider a black line downwards from the nose to create the mouth.
Ears (Make 2: One Gray, One Dark Gray)
- Start with 4 SC in a Magic Ring (MR). (4)
- Round 2: SC in each of the 4 stitches around. (4)
- 4 INC SC. (8)
- [1 SC, INC] repeated 4 times. (12)
- Round 5: SC in each of the 12 stitches around. (12)
Assembly: Sew the finished ears onto the head. Place them approximately between rounds 7 and 8.
Body (Start with Gray Yarn Color 782)
- Start with 6 SC in a Magic Ring (MR). (6)
- 6 INC SC. (12)
- [1 SC, INC] repeated 6 times. (18)
- [2 SC, INC] repeated 6 times. (24)
- [3 SC, INC] repeated 6 times. (30)
- Round 6: SC in the BLO (back loop only) for each of the 30 stitches. (30)
- Rounds 7-8: SC in each of the 30 stitches around. (30) (2 rounds total)
Creating the Zipper Opening (Crochet in Turning Rows)
From this point, you will crochet in turning rows. Remember to start each row with a CH 1, which does NOT count as a stitch.
- Rows 9-16: CH 1, turn your work, then 30 SC across the row. (30) (8 rows total)
Adding Stripes (Color Changes)
Now, you will alternate colors to create the striped effect. When changing color, carry the unused yarn along the inside of your work to easily pick it up again.
- Row 17: (Switch to Dark Gray Yarn 760) CH 1, turn, 30 SC. (30)
- Row 18: (Switch to Gray Yarn 782) CH 1, turn, 30 SC. (30)
- Row 19: (Switch to Dark Gray Yarn 760) CH 1, turn, 30 SC. (30)
- Row 20: (Switch to Gray Yarn 782) CH 1, turn, 30 SC. (30)
- Row 21: (Switch to Dark Gray Yarn 760) CH 1, turn, 30 SC. (30)
- Row 22: (Switch to Gray Yarn 782) CH 1, turn, 30 SC. (30)
Continuing with Dark Gray Yarn
From here, continue crocheting only with Dark Gray Yarn (color 760).
- Rows 23-28: CH 1, turn, 30 SC. (30) (6 rows total)
Closing the Body (Crochet in Continuous Rounds)
Now, you will join your work to crochet in continuous rounds again to close the bottom of the body.
- Rounds 29-30: SC in each of the 30 stitches around. (30) (2 rounds total)
- Round 31: SC in the BLO (back loop only) for each of the 30 stitches. (30)
- [3 SC, DEC] repeated 6 times. (24)
- [2 SC, DEC] repeated 6 times. (18)
- [1 SC, DEC] repeated 6 times. (12)
- 6 DEC (decrease in each stitch), then fasten off and close the remaining hole. (6)
Zipper Opening Edging: Along the raw edges of the opening created by rows 9-28, work a round of slip stitches evenly. This creates a neat edge for attaching the zipper. Make sure not to pull your slip stitches too tight.
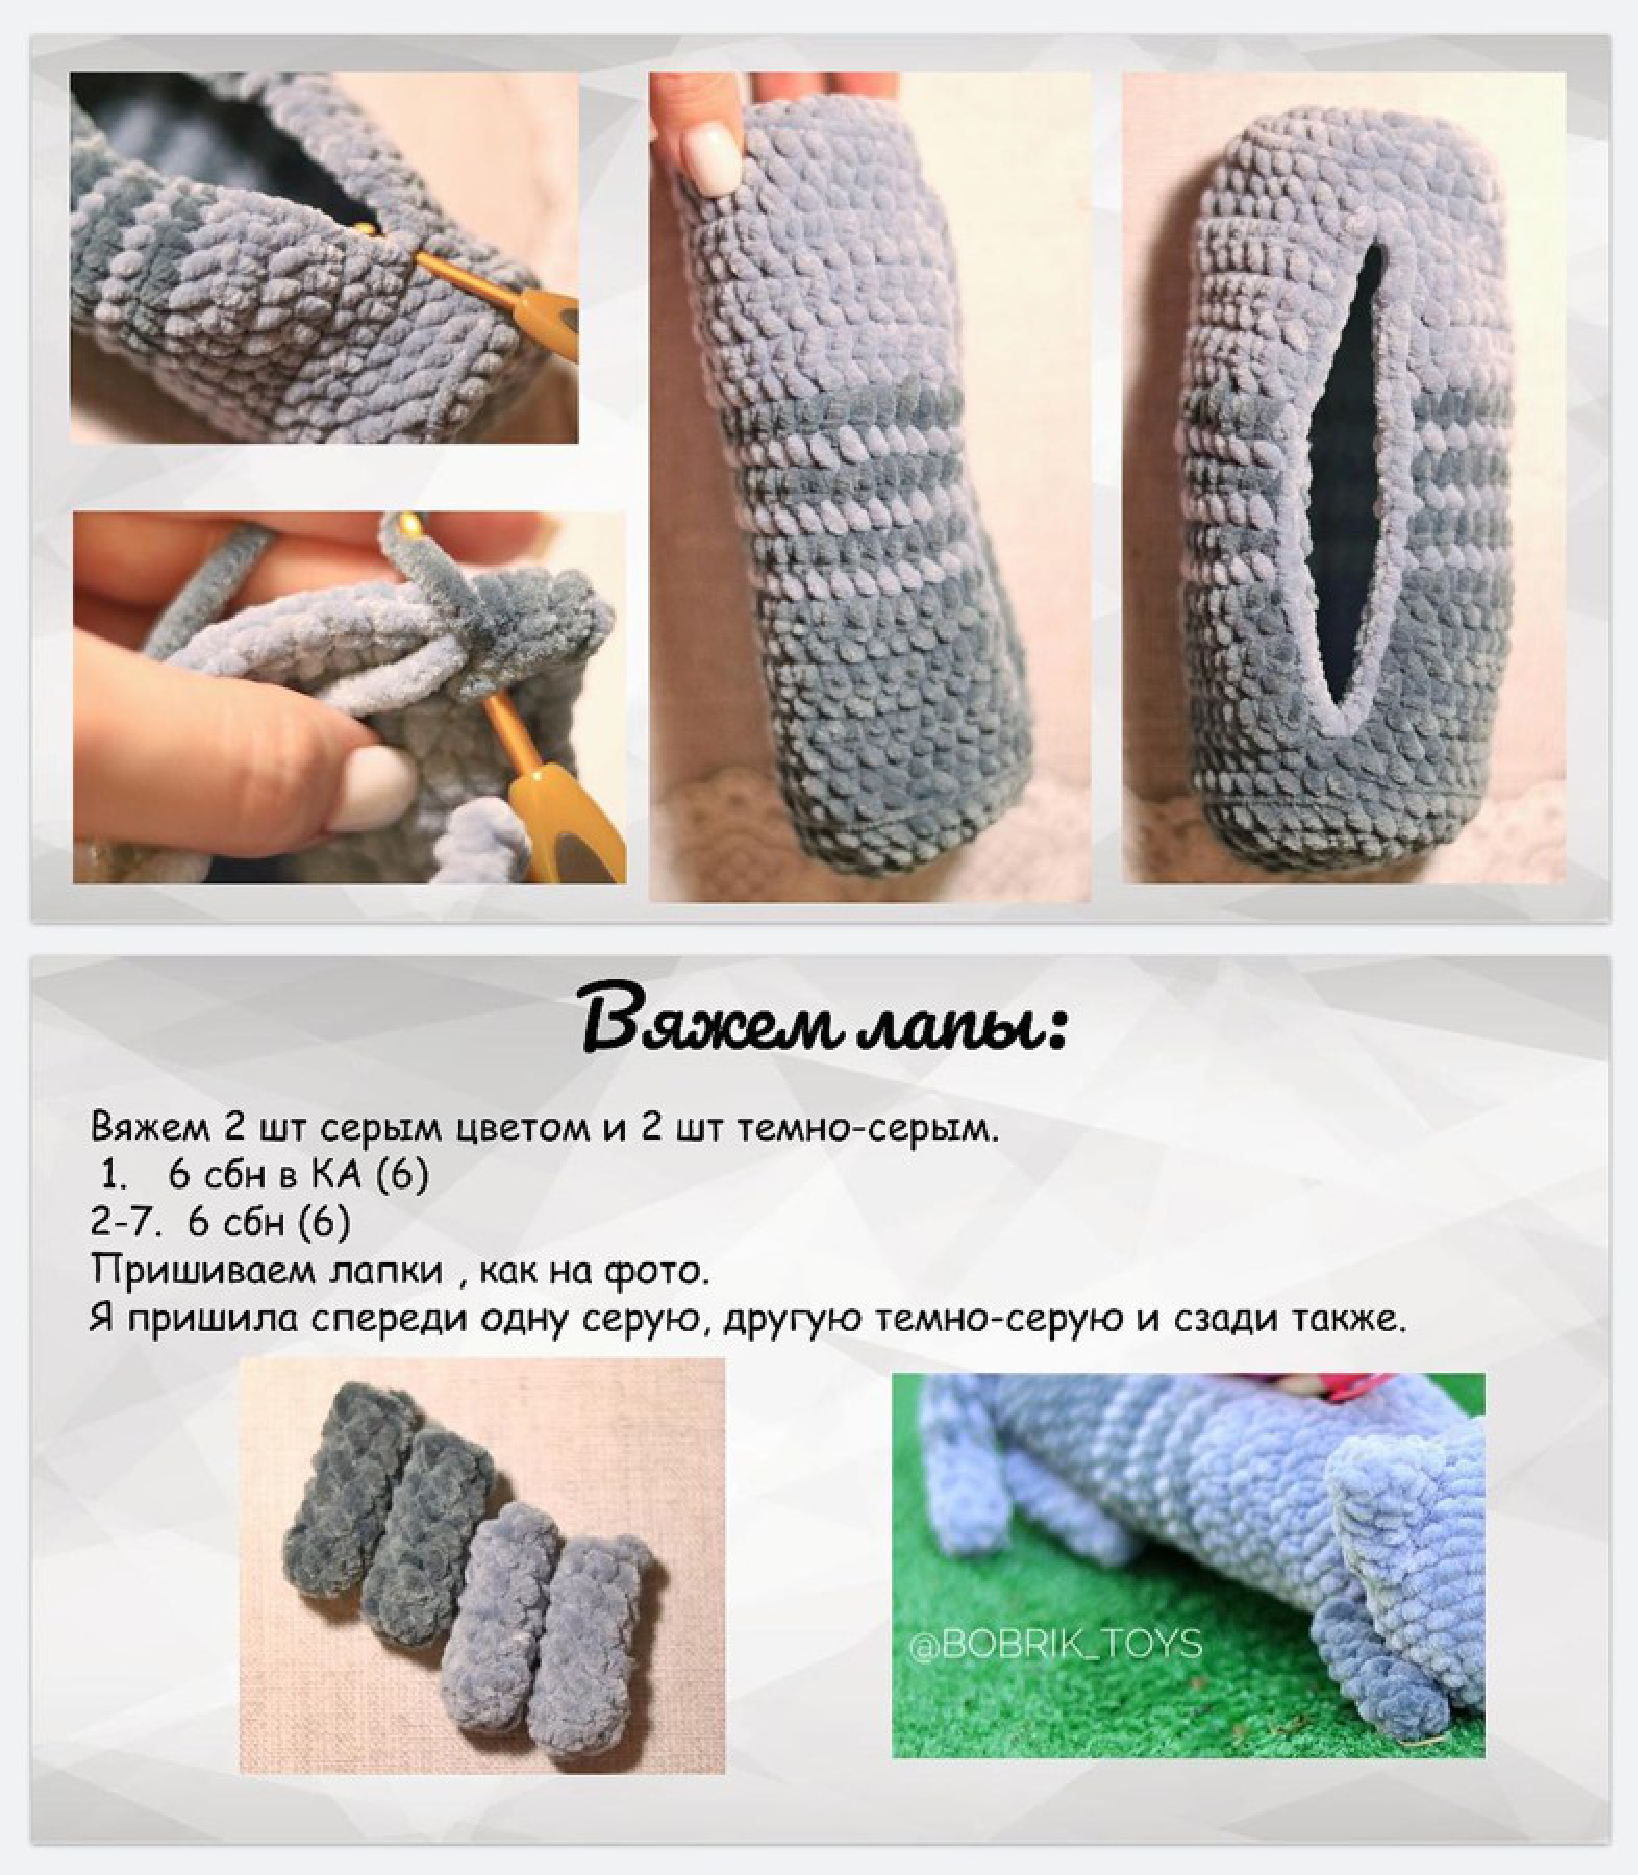
Paws (Make 4: 2 Gray, 2 Dark Gray)
- Start with 6 SC in a Magic Ring (MR). (6)
- Rounds 2-7: SC in each of the 6 stitches around. (6) (6 rounds total)
- Fasten off, leaving a tail for sewing.
Assembly: Sew the paws onto the body. For a cute striped effect, attach one gray and one dark gray paw to the front of the body, and the remaining gray and dark gray paws to the back, similar to the photo.
Tail (Start with Gray Yarn)
- Start with 6 SC in a Magic Ring (MR). (6)
- Rounds 2-5: SC in each of the 6 stitches around. (6) (4 rounds total)
Striped Tail Section
Now, you will alternate colors for each round (1 round Dark Gray, 1 round Gray).
- Rounds 6-10: SC in each of the 6 stitches around, alternating colors each round. (6) (E.g., Round 6 Dark Gray, Round 7 Gray, Round 8 Dark Gray, Round 9 Gray, Round 10 Dark Gray)
Continuing with Gray Yarn
From here, crochet only with Gray Yarn.
- Rounds 11-15: SC in each of the 6 stitches around. (6) (5 rounds total)
Finishing the Tail: If you wish, lightly stuff the tail (the original pattern creator opted not to stuff it). Flatten the tail opening and crochet 3 SC through both walls to close the opening. Fasten off, leaving a long tail for sewing.
Assembly: Sew the finished tail onto the 31st round of the body.
Finishing Touches
- Eye Details: Using white yarn, embroider small white highlights or “whites” on the side of the safety eyes to give them more life. Then, with thin black embroidery thread, add a thin black line just above the eyes for expressiveness.
- Eyebrows: Using thin black embroidery thread, embroider eyebrows one stitch above each eye. Make them approximately 1 stitch long, with about 5-6 stitches of space between them.
- Zipper Installation: Carefully sew the 15cm gray zipper into the opening of the body, securing it neatly to the slip stitch edging you created earlier.
Congratulations! Your adorable Cat Pencil Case is now complete and ready to hold your stationery or small treasures!

We hope you enjoyed crocheting this lovely project. Don’t forget to share your finished creation on social media and tag the designer @BOBRIK_TOYS!