
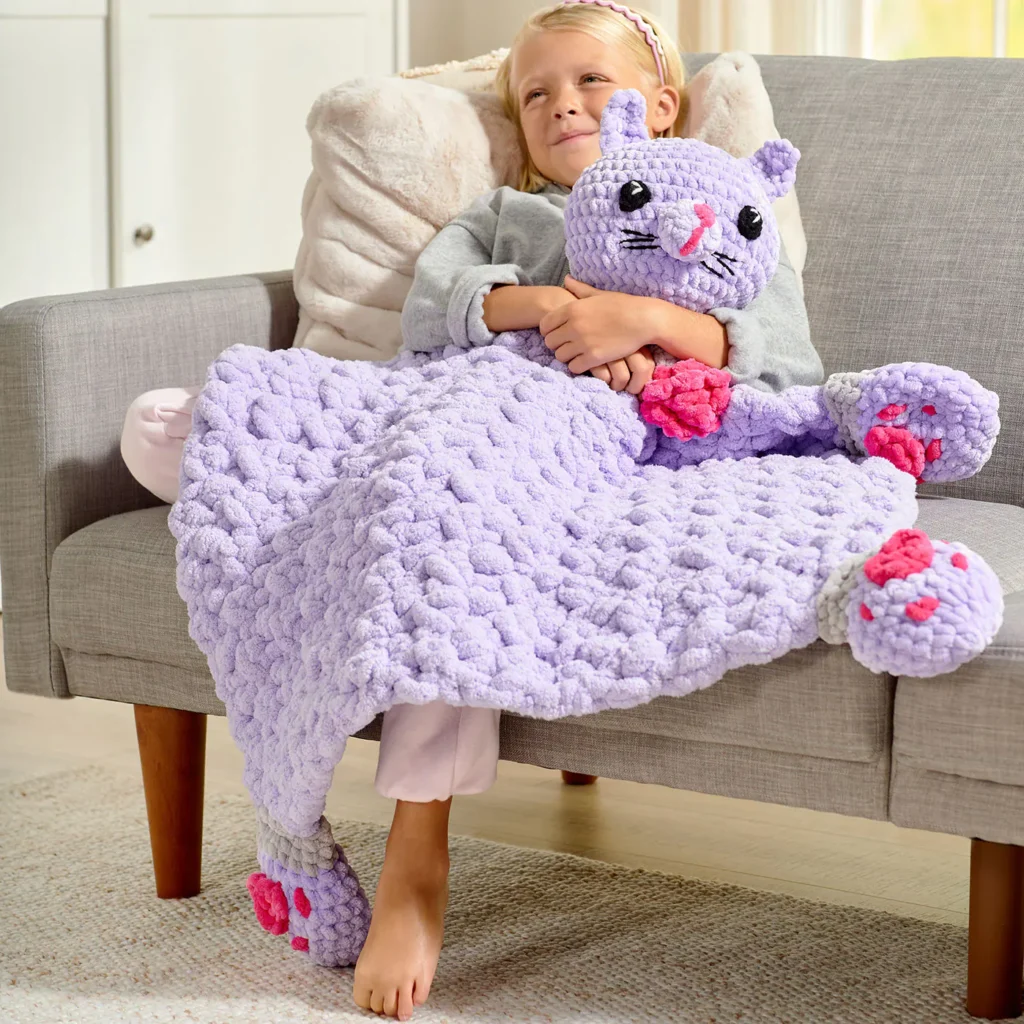
How To Crochet a Cozy Cat Blanket

Are you ready to crochet something both adorable and practical? This Cat Blanket pattern is a true showstopper, combining cozy comfort with delightful details like perky ears, playful paws, and a sweet little flower accent. Whether you’re a devoted cat lover or simply looking for a creative blanket project, this pattern offers the perfect balance of simplicity and charm.
Affiliate Disclosure:
As an Amazon Associate, I earn from qualifying purchases. This post contains affiliate links, which means I may receive a small commission if you click on a link and make a purchase—at no extra cost to you. Thank you for your support!
Materials You Need To Start This Project


Abbreviations
- beg = begin(ning)
- ch = chain
- dc = double crochet
- dec’d = decreased
- hdc = half double crochet
- inv-dec = invisible single crochet decrease
- rem = remain(ing)
- rep = repeat
- rnd(s) = round(s)
- sc = single crochet
- sc2tog = single crochet 2 stitches together
- sk = skip
- sl st = slip stitch
- sp(s) = space(s)
- st(s) = stitch(es)
- yo = yarn over
Cat Blanket Pattern
Finished Measurements
- Blanket Size: Approximately 26″ [66 cm] wide x 28″ [71 cm] long
Gauge
- Blanket (with Yarn A and larger hook):
- 4 stitches x 3 rows = 4″ [10.2 cm] in the blanket’s slip stitch/half-double crochet pattern
- Head (with Yarn B and smaller hook):
- 7 stitches x 8 rounds = 4″ [10.2 cm] in single crochet pattern
Tip: Always check your gauge before starting to ensure your finished project matches the intended size.
- Magic Ring (Adjustable Ring)
- Wrap yarn around your left middle finger twice, leaving a 6″ [15 cm] tail.
- Insert your hook under both strands and pull up a loop.
- Chain (ch) 1 and begin working your stitches directly into the center of the ring.
- Later, tighten the ring by pulling on the yarn tail.
- Inv-Dec (Invisible Single Crochet Decrease)
- Insert hook into the front loop only of the next 2 stitches.
- Yarn over (yo) and draw through both loops on the hook (you now have 2 loops on your hook).
- Yarn over again and draw through both loops to complete the decrease. (This decreases 1 stitch total.)
Important Notes
- This cat blanket is crocheted in three main sections: the blanket, the head, and the paws.
- When the instructions say to work in continuous (spiral) rounds, place a stitch marker in the first stitch of each round. Move the marker up as you begin each new round.
- To change color, work the current stitch until the last yarn over, then pull through the new color to finish the stitch.
- Stuff the head and paws with fiberfill or similar stuffing before closing as instructed.
Stitch Guide
Step 1: Crochet the Blanket
- Foundation Chain
- Using Yarn A and the larger hook, chain (ch) 26.
- Row 1
- Slip stitch (sl st) into the 2nd chain from the hook,
- Half double crochet (hdc) in the next chain,
- *Sl st in the next chain, hdc in the following chain; repeat from * across.
- You should end up with 25 stitches total. Turn your work.
- Row 2
- Ch 2 (this does not count as a stitch),
- Hdc in the first stitch, sl st in the next,
- *Hdc in the next stitch, sl st in the next stitch; repeat from * across.
- Turn your work.
- Row 3
- Ch 1, sl st in the first stitch, hdc in the next,
- *Sl st in the next stitch, hdc in the next stitch; repeat from * across.
- Turn your work.
- Repeat Rows 2 and 3
- Continue this pattern (alternating the row instructions) until the blanket measures 28″ [71 cm] in length.
- Fasten Off
- Once it reaches the desired length, cut your yarn, leaving a small tail, and fasten off. Weave in any ends securely.
Step 2: Crochet the Head
Using Yarn B and the smaller hook:
- Foundation
- Chain (ch) 2.
- Round 1
- Work 8 single crochet (sc) in the 2nd chain from hook.
- Do not join; you will work in continuous rounds. Place a marker in the first stitch to track rounds.
- Round 2
- Work 2 sc in each stitch around (16 sc total).
- Round 3
- *Sc in the next stitch, 2 sc in the following stitch; repeat from * around (24 sc total).
- Round 4
- *Sc in the next 2 stitches, 2 sc in the next stitch; repeat from * around (32 sc total).
- Round 5
- *Sc in the next 3 stitches, 2 sc in the next stitch; repeat from * around (40 sc total).
- Round 6
- *Sc in the next 4 stitches, 2 sc in the next stitch; repeat from * around (48 sc total).
- Rounds 7–17
- Sc in each stitch around (48 sc total each round).
- Round 18
- *Sc in the next 4 stitches, inv-dec once; repeat from * around (40 sc total).
- Round 19
- *Sc in the next 3 stitches, inv-dec once; repeat from * around (32 sc total).
- Round 20
- *Sc in the next 2 stitches, inv-dec once; repeat from * around (24 sc total).
- Round 21
- *Sc in the next stitch, inv-dec once; repeat from * around (18 sc total).
- Rounds 22–24
- Sc in each stitch around (18 sc total each round).
- Fasten Off
- Leave a long tail for sewing.
- Stuffing the Head
- Lightly stuff the head, leaving the last few rounds (22–24) unstuffed.
- Close the Opening
- Thread your yarn needle with the long tail and sew Round 24 closed in a flat line.
- Do not cut the yarn yet; you will use this tail to sew the head onto the blanket later.
Step 3: Ears, Nose, and Paws
Ears (Make 2)
Using Yarn B and the smaller hook:
- Foundation
- Ch 2.
- Round 1
- Work 3 sc in the 2nd chain from hook. Turn. (3 sc)
- Round 2
- Ch 1, sc in each stitch across. Turn. (3 sc)
- Round 3
- Ch 1, 2 sc in the first stitch, sc in the next stitch, 2 sc in the last stitch. Turn. (5 sc)
- Round 4
- Ch 1, sc in each stitch across. (5 sc)
- Fasten Off
- Leave a long tail for sewing to the head later.
Nose
Using Yarn B and the smaller hook:
- Foundation
- Ch 2.
- Round 1
- Work 6 sc in the 2nd chain from hook.
- Join with a sl st to the first sc (6 sc total).
- Round 2
- Ch 1, work 2 sc in each stitch around.
- Join with a sl st to the first sc (12 sc total).
- Round 3
- Ch 1, *sc in the next stitch, sc2tog (single crochet 2 together) in the next two stitches; repeat from * around.
- Join with a sl st to the first sc (8 sc total).
- Fasten Off
- Leave a long tail for sewing.
Paws (Make 4)
Hand Section
Using Yarn B and the smaller hook:
- Magic Ring
- Create a magic ring.
- Round 1
- 6 sc in the ring. Do not join; work in continuous rounds (6 sc total).
- Round 2
- 2 sc in each stitch around (12 sc total).
- Round 3
- 2 sc in each stitch around (24 sc total).
- Rounds 4–8
- Sc in each stitch around (24 sc in each round).
- Round 9
- *Sc in the next stitch, inv-dec once; repeat from * around (16 sc total).
- Fasten Off
- Join Yarn C (for a color change at the paw’s edge).
- Rounds 10–12
- Sc in each stitch around with Yarn C (16 sc in each round).
- Fasten Off
- Leave a long tail for sewing.
- Lightly stuff the paw if desired.
Center Pad
Using Yarn D and the smaller hook:
- Magic Ring
- Create a magic ring.
- Row 1
- Ch 3, work 2 double crochet (dc) in the ring,
- Ch 2, then 3 dc in the ring.
- Do not join.
- Fasten Off
- Leave a long tail for sewing.
Step 4: Paw Assembly
- Sew the Center Pad
- Position the center pad on top of the paw (the “hand” part) and sew it down using the tail from Yarn D.
- Add ‘Toe Pads’
- Using Yarn D, stitch four small “toe pads” evenly spaced around the center pad. These can be simple embroidery stitches or small oval shapes worked on the surface.
- Lightly Stuff
- If you haven’t already, add a bit of stuffing to give the paw dimension. Do not overstuff.
Step 5: Additional Features
Eyes (Make 2)
Using Yarn E (or desired eye color) and the smaller hook:
- Magic Ring
- Create a magic ring.
- Round 1
- 6 sc in the ring (6 sc total). Do not join; work continuously.
- Round 2
- 2 sc in each stitch around (12 sc total).
- Join with a sl st to the first stitch.
- Fasten Off
- Leave a long tail for sewing.
- Optional Eye Detail
- Thread Yarn C onto a needle. Add a short running stitch in a “V” shape on each eye for extra detail.
Collar
Using Yarn C and the smaller hook:
- Foundation Chain
- Ch 4.
- Row 1
- Sc in the 2nd ch from the hook and in each ch across (3 sc total). Turn.
- Row 2
- Ch 1, work in the front loop only of each stitch across (3 sc). Turn.
- Row 3
- Ch 1, work in the back loop only of each stitch across (3 sc). Turn.
- Rows 4–11
- Repeat Rows 2 and 3 to create a ribbed texture.
- Fasten Off
- Leave a long tail for sewing.
Flower Decoration
Using Yarn D and the smaller hook:
- Foundation Chain
- Ch 20.
- Row 1
- Sl st in the 2nd chain from hook,
- (Ch 4, sl st in next chain) repeat 6 times,
- (Ch 3, sl st in next chain) repeat 7 times,
- (Ch 2, sl st in next chain) repeat 5 times.
- Fasten Off
- Leave a long tail for sewing.
- Shape the Flower
- Roll the strip so that the shortest loops (ch-2) form the top layer of petals and the longer loops (ch-4) are at the back.
- Thread your needle and stitch through the roll to secure the flower shape.
Finishing Up
- Attach Features to the Head
- Sew the eyes, nose, and ears onto the head, referring to the photo (if provided) or position them as you like.
- For the nose, thread Yarn E onto a needle and stitch any desired nostril details or mouth lines.
- Attach the Head to the Blanket
- Place the head about 5″ [12.5 cm] below the top edge of the blanket.
- Use the tail from the head to securely stitch it to the blanket.
- For extra stability, sew the back of the blanket edge to the back of the head.
- Add the Collar
- Wrap the collar around the head-neck junction and stitch it in place. This hides any visible joining seam and looks cute!
- Sew on the Flower
- Attach the crocheted flower onto one side of the collar as a decorative accent.
- Attach the Paws
- Sew one paw on each corner of the blanket for a fun, playful look.
- Add Whiskers
- Thread Yarn E onto your needle and stitch whiskers on either side of the nose.
- Weave in Ends
- Make sure all loose yarn ends are woven in on the back side of the work to give a neat finish.
Congratulations!
You’ve just finished an adorable cat blanket complete with head, paws, and cute little details. Snuggle up with it or gift it to a cat lover. Enjoy your new creation!