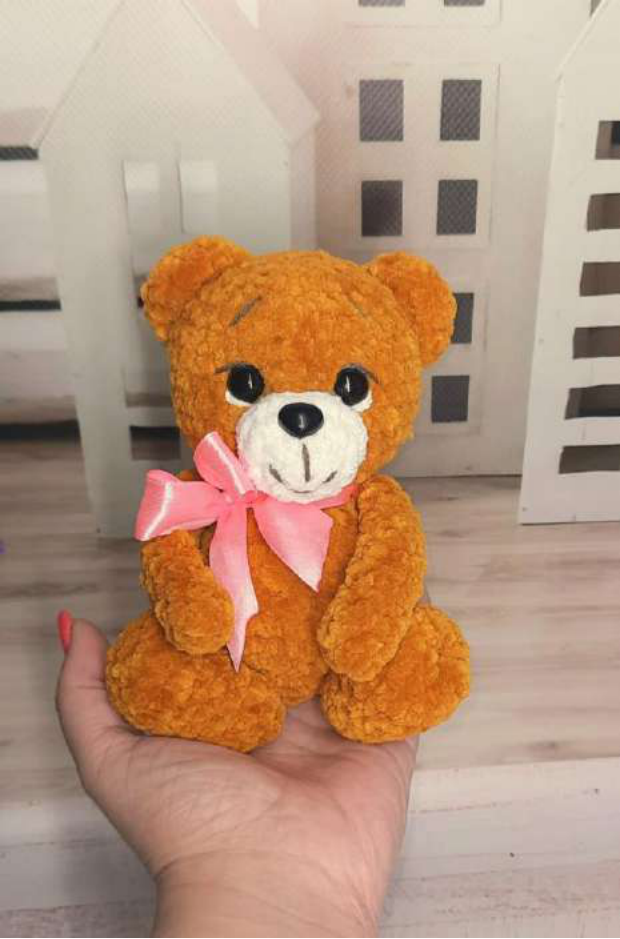
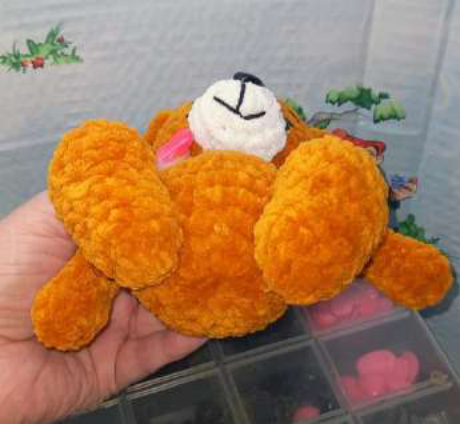
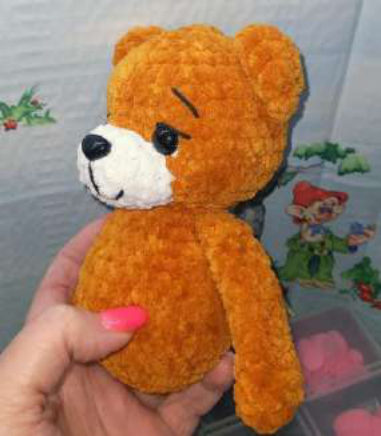
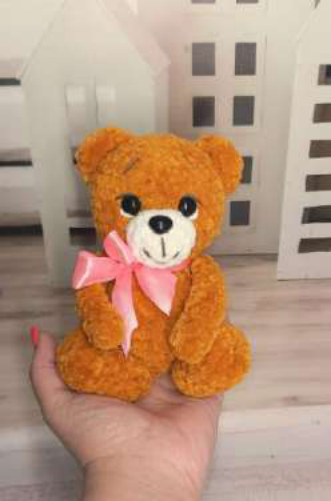
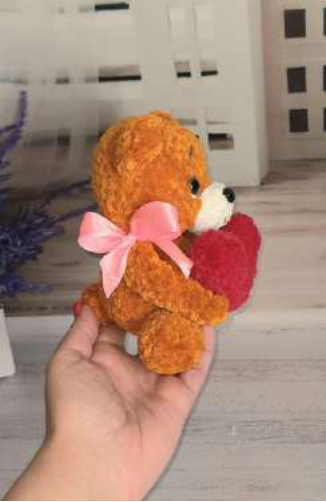
Huggable Valentine Bear: Free Crochet Pattern
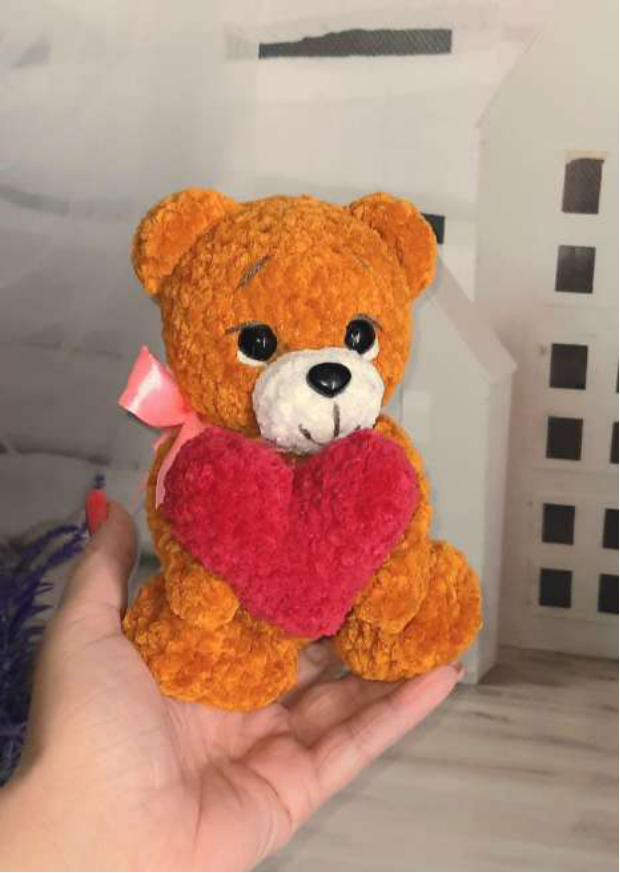
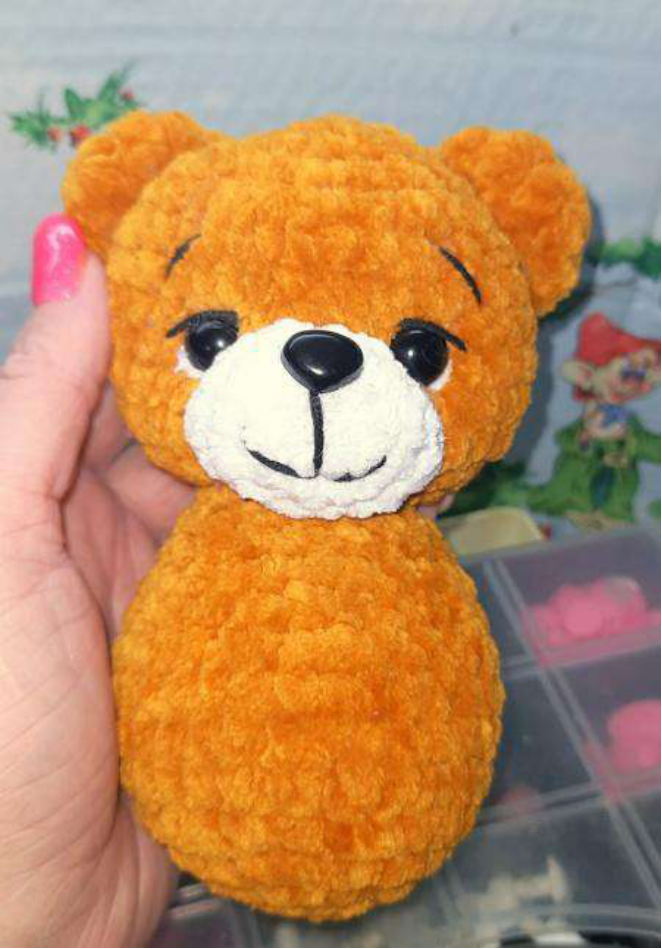
Create an adorable, huggable plush teddy bear, perfect for Valentine’s Day or as a heartwarming gift for someone special! This easy-to-follow pattern by Natalia Khodunova will guide you through making this 15cm (about 6 inches) tall bear, complete with a sweet little heart. Let’s get our hooks ready and make something lovely!
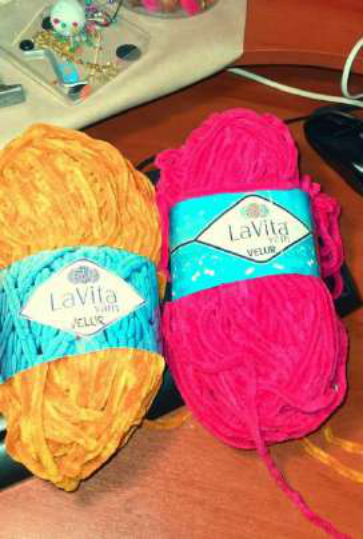
Materials You’ll Need
- Main Yarn: LaVita Yarn Velur (Color #7108) or similar chenille/velvet yarn.
- Muzzle Yarn: Yarn Art Dolce Baby (White) or a slightly thinner white plush yarn.
- Heart Yarn: LaVita Yarn Velur (Color #4136 Raspberry).
- Crochet Hook: 4mm (or 3.5mm) for the main parts.
- Crochet Hook: 2.5mm for the muzzle.
- Safety Eyes: 10-12mm (the pattern uses glue-on eyes).
- Safety Nose: 15mm (or slightly smaller).
- Embroidery Thread: A small amount of black or brown for eyebrows and face details.
- Stuffing: Polyester fiberfill.
- Other Tools: Scissors, yarn needle, glue (if using glue-on eyes), and a ribbon for the bow.
Abbreviations (US Crochet Terms)
- MR: Magic Ring
- sc: Single Crochet
- inc: Increase (2 sc in the same stitch)
- dec: Decrease (sc 2 stitches together)
- sl st: Slip Stitch
- (…)x6: Repeat the instructions in the parenthesis 6 times.
- (…): The number at the end of the round indicates the total stitch count.
Pattern Instructions
A quick tip: This project is worked in continuous rounds. Use a stitch marker to keep track of the beginning of each round!
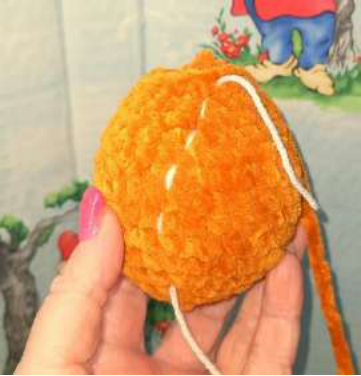
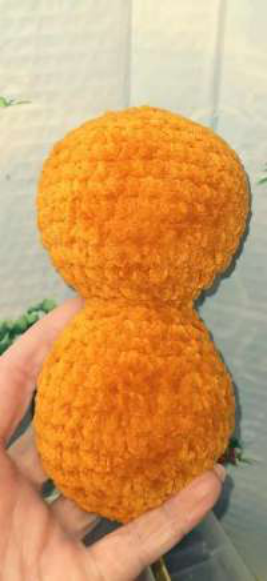
Body and Head (Crocheted as one piece)
Start with the main body color yarn.
- R1: 6 sc in MR (6)
- R2: 6 inc (12)
- R3: (1 sc, inc) x 6 (18)
- R4: (2 sc, inc) x 6 (24)
- R5: (3 sc, inc) x 6 (30)
- R6 – R9 (4 rows): 30 sc (30)
- R10: (3 sc, dec) x 6 (24)
- R11: 24 sc (24)
- R12: (2 sc, dec) x 6 (18)
- R13: 18 sc (18)
- R14: (1 sc, dec) x 6 (12)
- R15: 12 sc (12)
Now, we will start forming the head directly from the body.
- R16: 12 inc (24)
- R17: (3 sc, inc) x 6 (30)
- R18: (4 sc, inc) x 6 (36)
- R19 – R23 (5 rows): 36 sc (36)
- R24: (4 sc, dec) x 6 (30)
- R25: (3 sc, dec) x 6 (24)
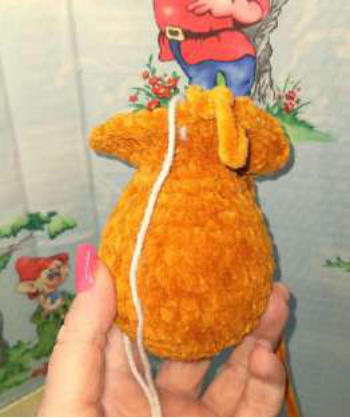
Begin stuffing the body and head firmly. Continue stuffing as you close the top.
- R26: (2 sc, dec) x 6 (18)
- R27: (1 sc, dec) x 6 (12)
- R28: 6 dec (6)
Cut the yarn, leaving a tail. Use a yarn needle to weave the tail through the front loops of the final 6 stitches and pull tight to close the opening. Weave in the end.
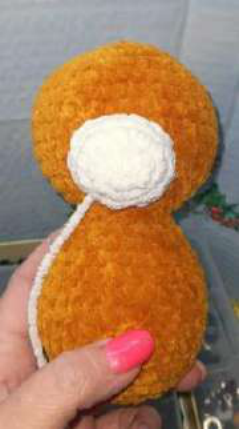
Muzzle
Use the white yarn and the 2.5mm hook.
- R1: 6 sc in MR (6)
- R2: 6 inc (12)
- R3: (1 sc, inc) x 6 (18)
- R4: 18 sc (18)
Finish with a sl st. Cut the yarn, leaving a long tail for sewing.
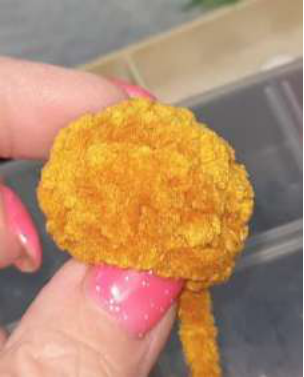
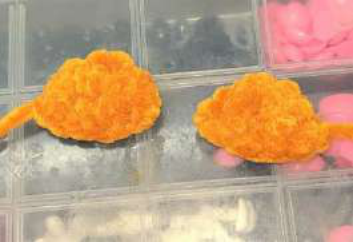
Ears (Make 2)
Use the main body color yarn.
- R1: 6 sc in MR (6)
- R2: 6 inc (12)
- R3: 12 sc (12)
Fold the circle in half and crochet through both layers with 6 sc to create a flat semi-circle. Leave a long tail for sewing.
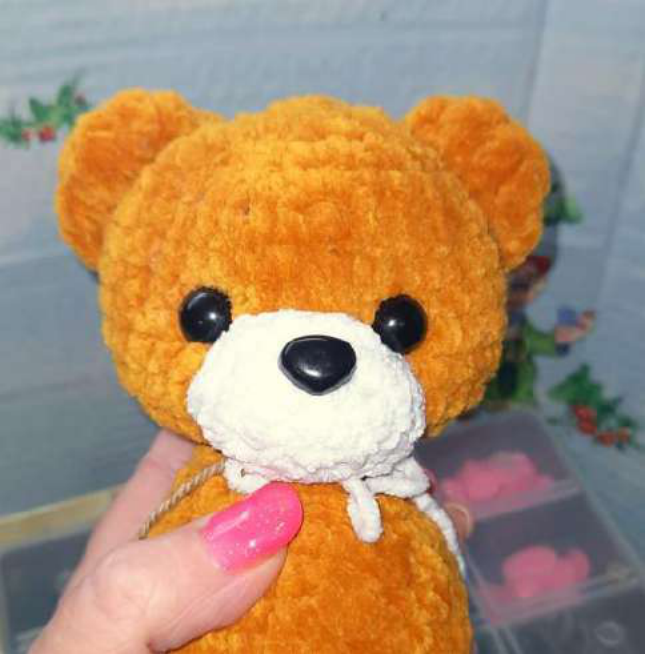
Assembly & Face Details
This is where your bear comes to life!
-
- Sew on the Muzzle: Pin the muzzle onto the face, centered between rounds 18 and 24 of the head. Lightly stuff it before you sew the last few stitches.
-
- Sew on the Ears: Attach the ears to the top of the head, approximately over rounds 22-24.
-
- Create Eye Indentations (Optional): For a more defined look, use a long needle and yarn to create indentations for the eyes before attaching them.

-
- Attach Eyes and Nose: Position and attach the safety nose at the top center of the muzzle. Place the eyes on either side, just above the muzzle. If using glue-on eyes, secure them firmly with fabric glue.
-
- Embroider Details: Use black or brown embroidery thread to add eyebrows, a line down from the nose to the mouth, and any other details you like, such as eyelashes or white eye glints.
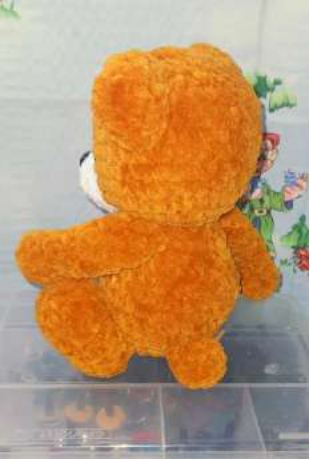
Arms (Make 2)
Use the main body color. Do not stuff the arms.
- R1: 6 sc in MR (6)
- R2: (1 sc, inc) x 3 (9)
- R3: 9 sc (9)
- R4: (1 sc, dec) x 3 (6)
- R5 – R13 (9 rows): 6 sc (6)
Fold the opening flat and crochet through both layers with 3 sc to close. Leave a long tail and sew the arms to the sides of the body, just below the neck.
Legs (Make 2)
Use the main body color. Stuff firmly as you go.
- R1: 6 sc in MR (6)
- R2: 6 inc (12)
- R3 – R5 (3 rows): 12 sc (12)
- R6: (3 sc, inc) x 3 (15)
- R7 – R8 (2 rows): 15 sc (15)
- R9: (3 sc, dec) x 3 (12)
- R10: 6 dec (6)
Cut the yarn, leaving a very long tail. Close the opening as you did for the head. Thread the long tail back through the leg to the top (where you started). This will be used for a button-jointed look. Sew the legs to the bottom of the body, pulling the thread tightly to secure them.
Tail
Use the main body color. Stuff lightly.
- R1: 6 sc in MR (6)
- R2: (1 sc, inc) x 3 (9)
- R3: 9 sc (9)
- R4: (1 sc, dec) x 3 (6)
Finish with a sl st. Leave a long tail and sew the tail to the back of the bear. Position it so it helps the bear sit upright.
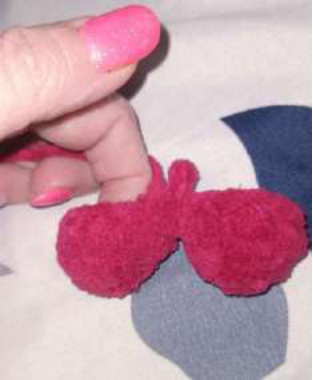
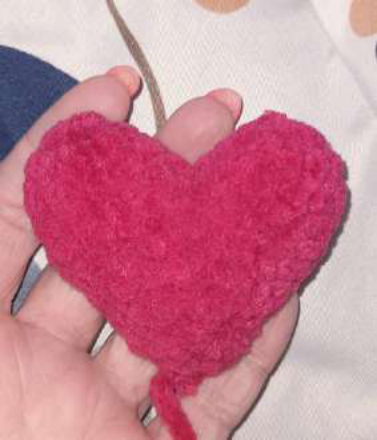
Heart
Use the raspberry yarn. First, you will make two identical “humps” for the top of the heart.
Make 2 pieces:
- R1: 6 sc in MR (6)
- R2: 6 inc (12)
- R3 – R4 (2 rows): 12 sc (12)
For the first piece, cut the yarn and fasten off. For the second piece, do not cut the yarn. You will now join them together.
Joining the pieces:
-
- R1: From the second piece, sc 12 stitches around the first piece, then sc 12 stitches around the second piece. You are now working in a large round. (24)
- R2: 24 sc (24)
- R3: (2 sc, dec) x 6 (18)
- R4: 18 sc (18)
- R5: (1 sc, dec) x 6 (12)
Stuff the heart firmly.
- R6: 12 sc (12)
- R7: 6 dec (6)
Cut the yarn, close the opening, and weave in the end.
Final Touches
Sew the heart securely to the bear’s paws. Finally, tie a festive ribbon into a bow around the bear’s neck.

Congratulations! Your Plush Teddy Bear Valentine is complete!

This free pattern was created by Natalia Khodunova. You can find more of her work in her