
Melt The Ice Hat Crochet Pattern – Full Pattern
Skill level: Beginner–Intermediate • Time: 2–3 hours • Yarn weight: Bulky (5)
Melt The Ice Hat Crochet Pattern
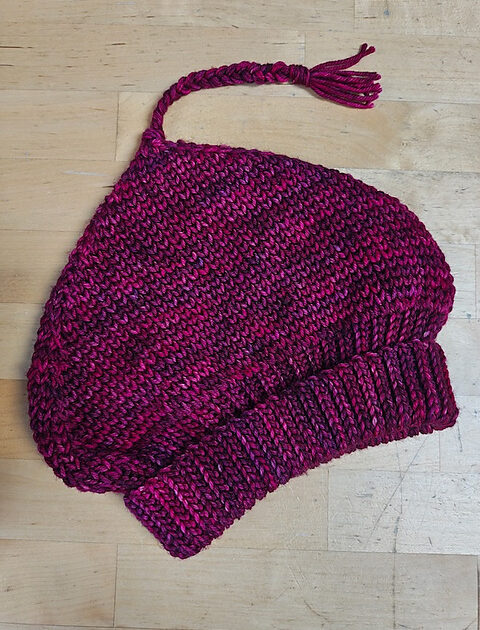
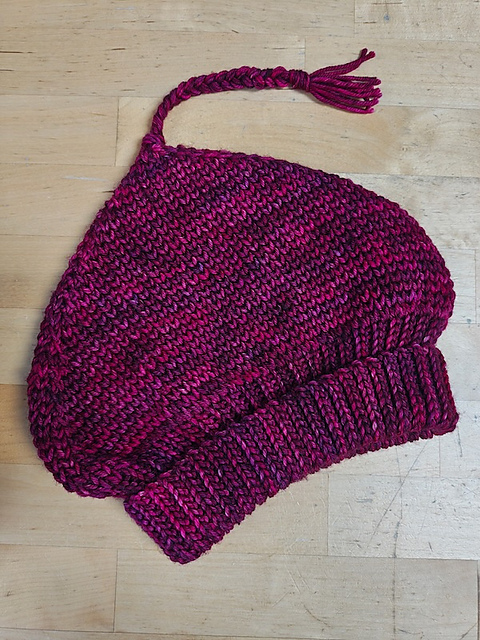
here is the Melt The Ice Hat Crochet Pattern – Full Pattern ; If you’ve ever seen a cozy, marled magenta hat with that rich knit-like texture and thought ‘there’s no way that’s crochet’ — think again. This slouchy hat is made entirely with a crochet hook using a simple slip stitch technique that perfectly mimics the look of knitting. The result? A thick, squishy hat with a folded brim, a roomy slouchy body, and a charming twisted top knot.
Best of all, once you get the rhythm going, this stitch is incredibly meditative. Let’s get into it.
What You’ll Need
Melt The Ice Hat Crochet Pattern – Full Pattern
- Yarn: Bulky weight (size 5), approximately 130–150 yards. Look for a marled or tweed yarn in berry/magenta tones for that gorgeous two-tone effect. Alternatively, hold together one strand each of hot pink and dark plum worsted weight yarn.
- Hook: 9 mm (US M/N-13), or adjust to match your gauge
- Notions: Stitch marker, yarn needle for weaving in ends
- Scissors
Gauge
9 stitches × 10 rows = 4 inches in slip stitch BLO (back loop only)
Gauge matters here — slip stitch pulls tight easily, so swatch first and go up a hook size if your hat feels stiff.
Sizes
This pattern comes in three sizes:
- Small (S): 20–21″ head circumference — starting chain 58 sts
- Medium (M): 21–22″ head circumference — starting chain 64 sts
- Large (L): 22–23″ head circumference — starting chain 70 sts
Abbreviations
- ch — chain
- sl st — slip stitch
- sc — single crochet
- BLO — back loop only
- FLO — front loop only
- dec — decrease (sl st 2 together)
- st(s) — stitch(es)
- rnd — round
The Secret: Slip Stitch BLO
Melt The Ice Hat Crochet Pattern
The entire body of this hat is worked in slip stitch in the back loop only (sl st BLO). This is what creates that satisfying knit-like “V” texture you see on the finished hat. Each slip stitch creates a tiny V that mimics a knit stitch almost perfectly.
How to sl st BLO: Insert your hook into the back loop of the stitch only, yarn over, and pull through both loops on your hook in one motion. Keep your tension looser than usual — this stitch tightens up quickly and a too-tight hat won’t stretch over your head.
Pro tip: If you’re used to single crochet, the slip stitch will feel almost too simple. That’s the point! The magic is in the back-loop placement, not stitch complexity.
The Pattern
Step 1: Make the Brim (Ribbing)
The brim is worked flat (back and forth in rows) and then seamed into a tube. This gives it that neat, structured folded cuff.
- Ch 10.
- Row 1: Sc in 2nd ch from hook and each ch across. (9 sts)
- Rows 2–64 (M) / 2–58 (S) / 2–70 (L): Ch 1, turn. Sc BLO across.
- Sl st the first and last rows together to form a tube. This is your brim band.
Step 2: Join the Brim & Begin Working in the Round
Along the long edge of the brim tube, evenly sc 64 sts (M) / 58 sts (S) / 70 sts (L) around. Join with a sl st to form a circle. Place your stitch marker to mark the beginning of each round.
Tip: Pick up approximately one stitch per row end as you go around the brim edge. This keeps things even.
Step 3: Work the Hat Body
This is where the magic happens. Work in rounds without turning:
Rounds 1–18 (M) / 1–16 (S) / 1–20 (L): Sl st BLO in each stitch around. Move your stitch marker up each round.
Step 4: Crown Decreases
Now we’ll shape the top of the hat with evenly spaced decreases. A “dec” here means sl st 2 stitches together (insert hook through both back loops of the next 2 sts, yarn over, pull through all loops).
- Rnd 1 (dec): *Sl st BLO 6, dec* repeat around. (56 sts / M)
- Rnd 2: Sl st BLO around.
- Rnd 3 (dec): *Sl st BLO 5, dec* repeat around. (48 sts)
- Rnd 4: Sl st BLO around.
- Rnd 5 (dec): *Sl st BLO 4, dec* repeat around. (40 sts)
- Rnd 6 (dec): *Sl st BLO 3, dec* repeat around. (32 sts)
- Rnd 7 (dec): *Sl st BLO 2, dec* repeat around. (24 sts)
- Rnd 8 (dec): *Sl st BLO 1, dec* repeat around. (16 sts)
- Rnd 9 (dec): *Dec* repeat around. (8 sts)
Step 5: Close the Top
Cut your yarn leaving a 12″ tail. Thread the tail onto your yarn needle and run it through the remaining 8 stitches. Pull tight to close the top, and knot securely on the inside. Don’t cut yet — you’ll use some of this length for the top knot.
Step 6: Add the Twisted Top Knot
This is the signature detail that makes the hat! Gather 6–8 strands of yarn, each about 8 inches long. Fold them in half and pull the folded loop through the top opening from outside to inside using your crochet hook. Pull the loose ends through the loop and tighten.
From there, twist or braid the strands together and tie them off at the top to create that knotted topknot effect. Trim the ends evenly.
Alternatively, chain 10–12 with your working yarn after closing the top, then sl st back down to create a small loop, and decorate with yarn tassels.
Step 7: Finish & Fold the Brim
Weave in all remaining ends securely. Then fold the brim up by about 1.5–2 inches. The ribbed texture naturally holds its shape when folded, creating that clean cuffed edge.
Your hat is done! Block lightly if needed by dampening and laying flat to dry.
Tips for the Best Results
- Keep your slip stitches loose. This is the most important tip. Tight sl st = stiff hat that won’t fit. When in doubt, go up a hook size.
- Yarn matters a lot. The marled or two-tone color effect hides minor tension inconsistencies beautifully, making this a great pattern for beginners trying the technique for the first time.
- Move your stitch marker every round. It’s easy to lose your place in sl st rounds because they all look similar.
- Swatch before you start. Even an experienced crocheter may need to adjust hook size for sl st tension.
- The brim can be adjusted. If you want a deeper cuff, simply add more rows to the brim strip in Step 1.
Happy crocheting! If you make this hat, share a photo — there’s nothing quite like seeing that knit-look texture come to life from a single crochet hook.Tags: #crochet #slouchyhat #knitlookcrochet #crochethat #bulkyyarn #crochettutorial