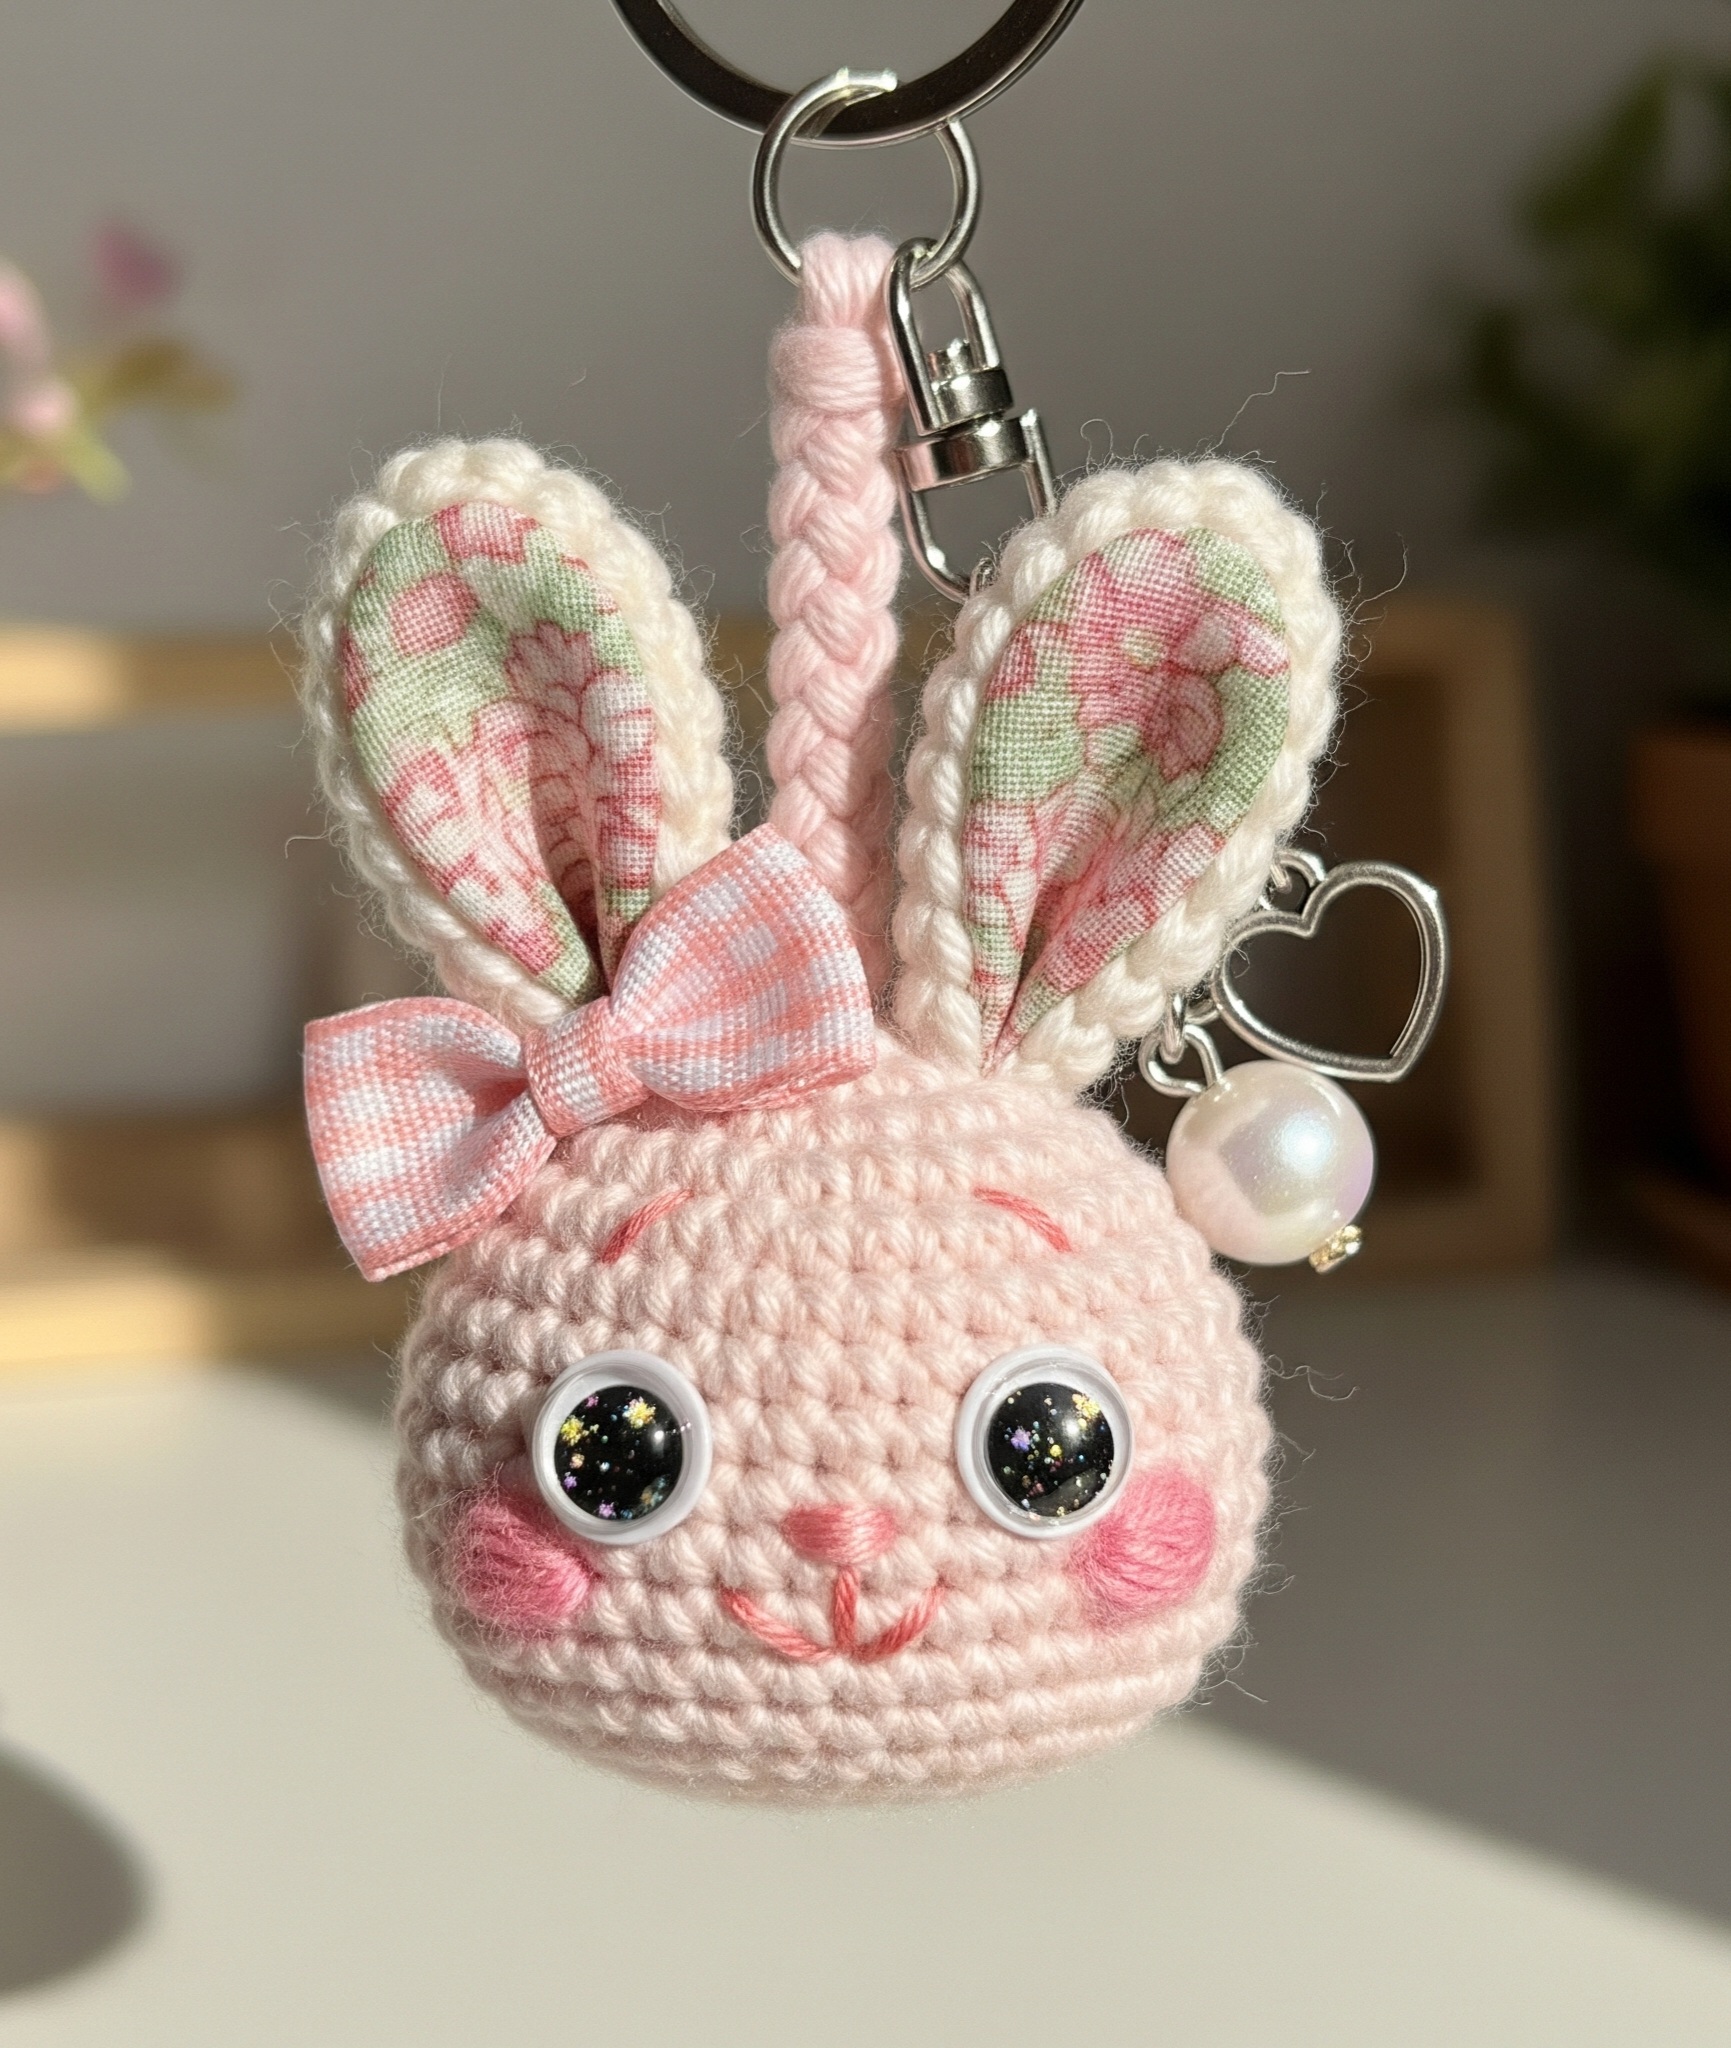
Pink Bunny Head Keychain — Crochet + Fabric Ears
Finished size (as shown): head 6.5–7 cm (2.6–2.8″) diameter; ear height 6.5–7 cm (2.6–2.8″) from head; total drop to ring ~12 cm (4.75″).
Skill level: confident beginner (amigurumi + simple sewing).
Construction: crocheted sphere head; crocheted cheeks; tiny oval nose; embroidered mouth & brows; flat fabric-lined ears edged with crochet; 3-strand braided hanger; bow, heart charm, and pearl on a split ring.
Materials
- Yarn A (head): DK/light-worsted cotton or cotton-blend, pastel pink. Sample uses ~18 g.
- Yarn B (ear edging): DK/light-worsted soft white/cream (non-fuzzy cotton or acrylic). ~6 g total.
- Yarn C (braid + details): same pink as head or slightly deeper pink for contrast. ~3 g.
- Hook: 2.75 mm (C) for a firm amigurumi fabric. If you crochet loosely, use 2.5 mm.
- Eyes: 12 mm glossy black domed safety eyes with sparkle/galaxy print (or plain 12 mm).
- Stuffing: polyester fiberfill.
- Stitch markers, yarn needle, sewing needle, matching polyester thread.
- Fabric (inner ear): lightweight cotton (pastel floral); two pieces 5 × 9 cm (2 × 3.5″).
- Fusible interfacing: light/medium; two pieces 4.5 × 8 cm (1.75 × 3.15″).
- Ribbon: 10 mm (3/8″) pink gingham; 14–16 cm (5.5–6.25″) for a bow.
- Keychain hardware: 25–30 mm split ring + 15–20 mm lobster clasp.
- Charms (optional): small open heart charm + 10–12 mm faux pearl bead, 6 mm jump ring, headpin.
- Fray-check or clear fabric glue; fabric marker or pencil; small sharp scissors.
- Blush option: you can crochet cheeks (pattern below) or add dry pastel blush.
Gauge (amigurumi tight fabric)
~8–9 sc per 2.5 cm (1″) in the round with 2.75 mm hook using Yarn A. Exact gauge isn’t critical; aim for no stuffing show-through. Size notes below assume this density.

Abbreviations (US terms)
MR – magic ring • sc – single crochet • inc – increase (2 sc in same st) • dec – invisible decrease • sl st – slip stitch • ch – chain • FLO/BLO – front/back loop only • st(s) – stitch(es) • rep – repeat • FO – fasten off.
Work amigurumi in a spiral unless otherwise noted.
Notes & Placements (important for the look)
- Eye line: between Rounds 10–11 of head, 10 sts apart (center–to–center 20–22 mm).
- Brows: shallow arcs one round above each eye, curving outward.
- Cheeks: round appliqués centered one stitch below the midpoint of each eye, outer edges level with the eye’s outer edge.
- Nose: tiny oval centered 2 sts below the eye line; mouth a soft “W”/smile directly under nose.
- Ears: bases sit side-by-side with a 2–3 st gap; braided hanger emerges between them.
Pattern
1) Head (Yarn A, 2.75 mm, worked in spiral)
Stuff firmly as you go.
- R1: MR 6 sc (6)
- R2: inc around (12)
- R3: (sc, inc) ×6 (18)
- R4: (2 sc, inc) ×6 (24)
- R5: (3 sc, inc) ×6 (30)
- R6: (4 sc, inc) ×6 (36)
- R7: (5 sc, inc) ×6 (42)
- R8–R13 (6 rnds): sc around (42)
👉 Place eyes now between R10–R11, 10 sts apart. Do not lock washers yet—check face first, then snap on tight.
- R14: (5 sc, dec) ×6 (36)
- R15: (4 sc, dec) ×6 (30)
- R16: (3 sc, dec) ×6 (24)
- R17: (2 sc, dec) ×6 (18)
- R18: (sc, dec) ×6 (12)
- R19: dec ×6 (6) — FO, close opening neatly.
Weave tail, shape the sphere with your hands to a smooth ball.
2) Cheeks — make 2 (Yarn A or slightly deeper pink if you want stronger blush)
Small crocheted circles give the exact puff look from the photo.
- R1: MR 6 sc (6)
- R2: inc around (12)
- Sl st to next st, FO with a 20–25 cm tail for sewing.
- Lightly flatten—do not stuff.
(Alternate: skip crocheted cheeks and dust pink pastel blush in soft circles.)
3) Tiny Oval Nose (Yarn A, worked around a short chain)
- Ch 3. Working around the chain:
- Side 1: sc in 2nd ch from hook, sc in next; 3 sc in last ch.
- Side 2 (other edge of chain): sc in next ch, 2 sc in last ch. (8 sts total)
- Sl st to first st, FO leaving 25 cm tail.
This makes the little raised oval “button” you see.
4) Fabric-Lined Ears with Crocheted Edge — make 2
The ears in the photo are flat, with floral fabric inside and a rope-like crochet edging. We’ll build a neat fabric insert and crab-stitch (reverse sc) border so they hold their shape and sit upright.
4A) Prepare fabric inserts
- Draw this ear template on card: height 7 cm, width 3.2 cm at the widest, pointed oval (bunny ear) with a flat 1.2 cm base.
- Cut 2× interfacing using the template at full size. Fuse to wrong side of fabric.
- Cut fabric 2–3 mm bigger all around (seam-allowance).
- Turn under the raw edge toward the interfacing by 2–3 mm and stick it down with tiny dots of fabric glue/Fray-Check. Let dry flat.
Result: a crisp, non-fraying fabric ear piece ~6.6 × 3.0 cm, perfect to sew onto crochet.
4B) Crochet ear backing (Yarn B, 2.75 mm, worked in the round around a foundation chain)
This makes a slim, leaf-shaped panel that exactly frames the fabric.
- Foundation: ch 16.
- Rnd 1 (both sides of chain): sc in 2nd ch from hook and next 13, 3 sc in last ch; continue along the underside of the chain, sc 13, 2 sc in last (the same first ch). (32)
- Rnd 2: (inc, sc 13), (inc ×3), (sc 13), (inc ×2). (38)
- Rnd 3: (sc, inc, sc 13), [(sc, inc) ×3], (sc 13), [(sc, inc) ×2]. (46)
- Rnd 4: sc around through BLO (46) — creates a slight ridge to cradle the fabric.
- Rnd 5: sc around (46).
- Rnd 6 (gentle taper): ×2, sc 10, dec, sc 10, dec. (42)
- Rnd 7: sc around (42).
FO. Leave a long tail (~50 cm) for sewing to head later (and for a clean base join).
This panel finishes ~7.2 cm tall × 3.3 cm wide—just right for the prepared fabric.
4C) Attach fabric + rope edge
- Center the prepared fabric insert inside the BLO ridge on the crochet panel (right side up). Hand-stitch all around with small invisible whip stitches in polyester thread to the inner loops of Rnd 4’s ridge (don’t pierce through to the back more than necessary).
- With Yarn B, join anywhere on the edge and work Crab Stitch (reverse sc) all the way around through both loops of the outermost row to create the twisted, corded edging you see. Sl st to finish; FO and weave this short end on the back.
- Flatten the base 1.2 cm of the ear by finger-pressing so it sits straight when sewn on.
(Optional: for extra stand-up ears, slip a thin strip of plastic canvas or a trimmed coffee-stirrer inside behind the fabric before finishing step 2.)
5) 3-Strand Braided Hanger (Yarn C)
This gives the exact chunky braid you see between the ears.
- Make 3 identical cords: with Yarn C, ch 45, turn, sl st back across (44 sl st). FO each.
- Knot the three cords together at one end. Braid snugly for 8.5–9 cm. Knot the other end.
- Thread both knotted ends through your split ring (so the ring sits at the top of the braid). Tie the two ends together to make a closed loop. Wrap neatly with Yarn C (or sew) just under the ring to create the little “collar” wrap you can see. Trim tails.
You now have a finished braided loop with a ring at the top and a neat wrapped section that will sit between the ears.
6) Bow (gingham ribbon)
- Cut 14–16 cm of 10 mm ribbon. Tie a small bow with ~2.5–3 cm loops.
- Trim tails at an angle and seal with heat or Fray-Check.
- We’ll sew it to the left side of the ear base (as pictured) during assembly.
7) Face Embroidery (after eyes are locked)
Use 2 strands of embroidery floss or a single split strand of Yarn C.
- Brows: one round above each eye, stitch a soft arc 3–4 mm long that tilts outward.
- Mouth: from the center directly under the nose, embroider a tiny “W”/smile: one short vertical stitch down, then two shallow diagonal stitches forming the smile. Keep it delicate.
- Optional nose highlight: one tiny horizontal stitch across the nose center.
Assembly & Exact Placement
- Lock eyes: When you like the face, attach washers firmly inside.
- Sew cheeks: pin them so each circle’s inner edge sits 1 st below the center of its eye; outer edge matches the eye’s outer edge line. Use the long tails to sew with small whip stitches. Lightly tug to give a cheeky puff; weave in tails.
- Attach nose: center it 2 sts below the eye line, straight across. Sew around with the tail, slightly tightening to raise it a little.
- Attach ears:
- Mark the top center of the head.
- Place ears so their inner edges are 2–3 sts apart with bases level and slightly angled outward (match the photo’s jaunty angle).
- Stitch the flattened 1.2 cm base of each ear to the head using the long Yarn B tail. Take multiple passes through the base and the head for sturdiness.
- Insert braided hanger:
- Part the stitches between the two ears at the very top and sew the wrapped section of the braid firmly to the head. Catch the wrap and the head in several passes so it won’t pull out.
- Add a tiny wrap of Yarn C around the join (like the photo’s little tie) and secure with a hidden knot.
- Bow: stitch the ribbon bow to the front of the left ear base (as worn), snug against the head. Add a couple of securing stitches through the knot.
- Charms: add the heart charm and pearl bead to a small jump ring and clip them to the keyring (they hang to the right side of the ears in the photo).
- Final shaping: roll the head between your palms to smooth, pinch the ear bases slightly so they tilt forward, and tidy any fibers.
Optional: Painted Blush (if you skipped crocheted cheeks)
Lightly brush dry pastel or fabric-safe blush in soft circles below each eye; seal with a mist of fixative held far away.
Exact Row Map (quick reference)
- Eyes: between R10–R11, 10 sts apart.
- Nose center: R12 (2 rows below eye line).
- Mouth: straddles R12–R13.
- Brows: R9 (one round above eye line).
- Ear sew line: top crown; bases span ~6–7 sts each with a 2–3 st gap between.
Troubleshooting for a “photo-match” finish
- Head too big/small vs 12 mm eyes:
- If the eyes look tiny, add one more even round at 42 before decreasing.
- If they look too big, stop increases at 36 (skip R7) and adjust placements one round lower.
- Ears flop: add a sliver of plastic canvas or a trimmed zip-tie behind the fabric before edging, or stitch a few anchoring tacks from ear midline to head.
- Cheeks look too bold: switch to blush instead of crochet circles, or work cheeks as R1 only (6 sc) for smaller discs.
Care
Spot clean. Avoid soaking the fabric ears. If gifting, add a note to keep away from children under 3 due to small parts (safety eyes, charms).
Quick Checklist (don’t miss anything!)
- [ ] 12 mm sparkle safety eyes placed R10–11, 10 sts apart
- [ ] Crocheted cheeks sewn 1 st below eye centers
- [ ] Tiny oval nose centered 2 sts below eye line
- [ ] Brows one round above eyes, curving outward
- [ ] Fabric floral ear insert with fusible interfacing
- [ ] Crab-stitch rope edging around ears
- [ ] Ears sewn with 2–3 st gap, slight outward tilt
- [ ] 3-strand braided hanger, wrapped at base, anchored between ears
- [ ] Pink gingham bow at left ear base
- [ ] Heart charm + pearl on split ring to the right