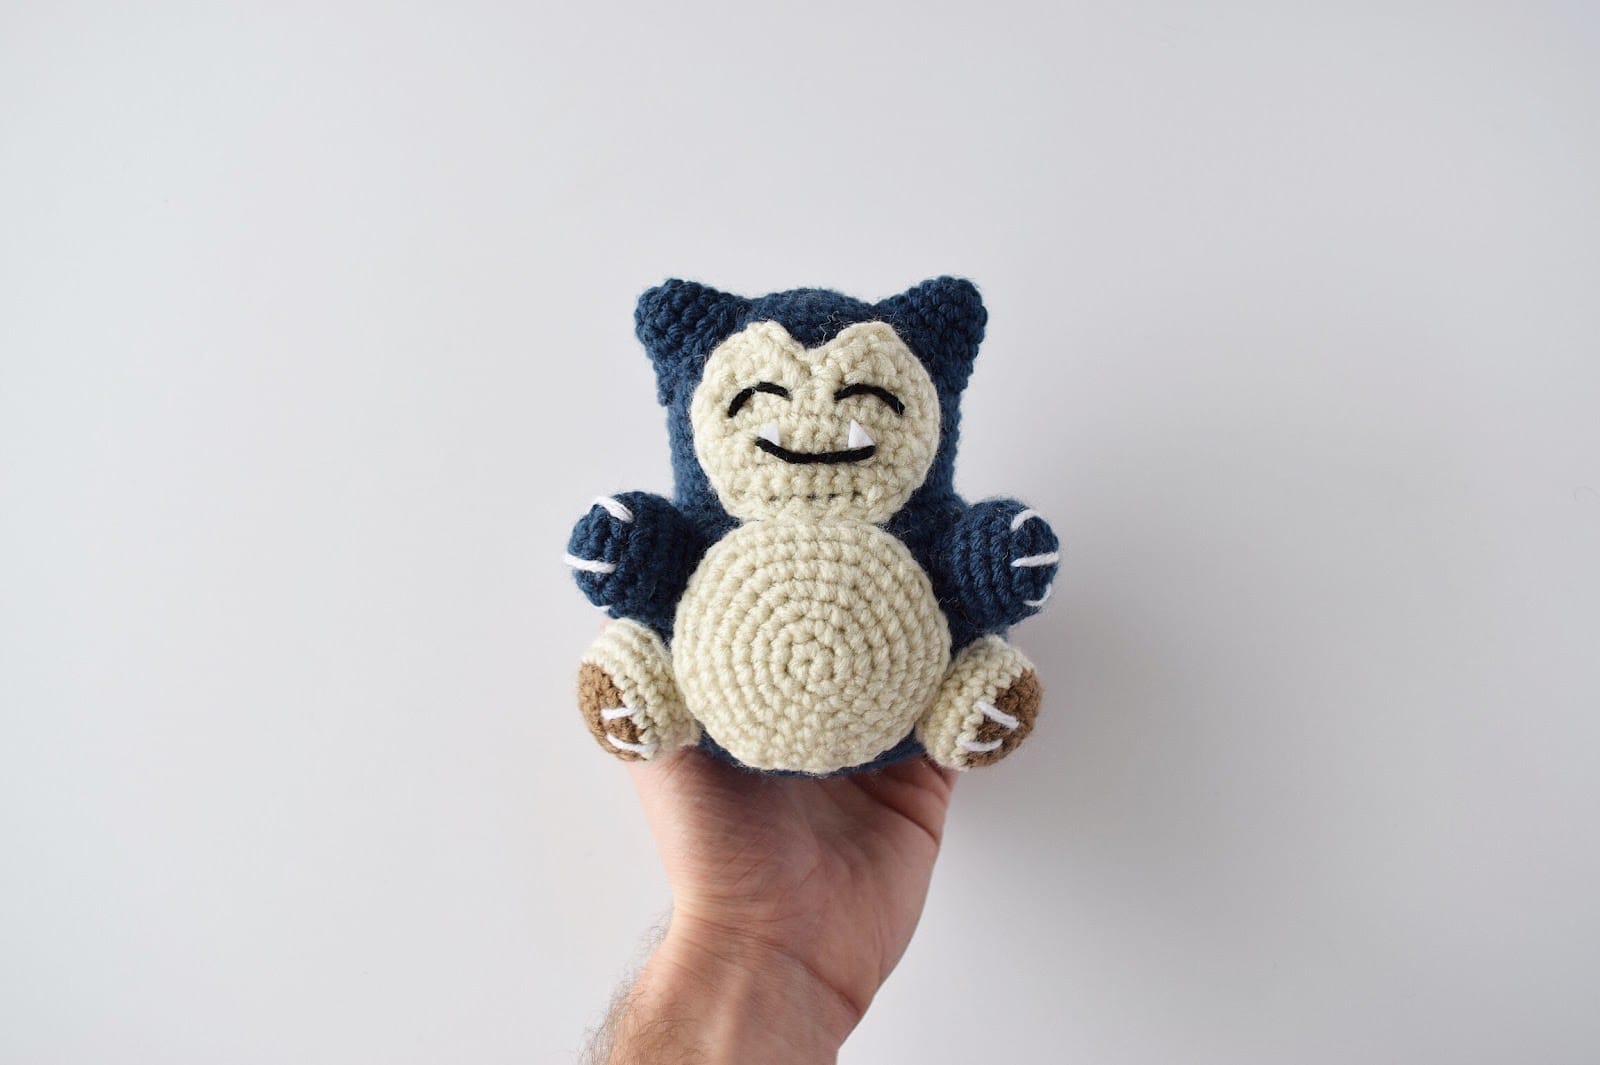
Snorlax Crochet Pattern
Before You Begin: Gathering Your Supplies
Are you ready to bring an adorable, pill-shaped friend to life with your crochet hook? This comprehensive guide will walk you through creating a charming amigurumi character, perfect for gifting, decorating, or simply cuddling. Whether you’re an experienced crocheter looking for a fun new project or an intermediate crafter eager to expand your skills, this pattern is designed to be both enjoyable and rewarding.
Successful crocheting starts with having all your materials at hand. Here’s what you’ll need to embark on this creative journey. Remember, while specific brands and colors are suggested, the beauty of crochet lies in its flexibility. Feel free to substitute yarns and colors to personalize your creation!

- Yarn: The primary material for your amigurumi.
- Worsted Weight Yarn: This pattern is designed for worsted weight yarn, a versatile and commonly available option that provides good stitch definition and a sturdy fabric. If you’re substituting, ensure your chosen yarn has a similar weight for consistent results.
- Color Palette (Suggested):
- 1 Skein JOANN Big Twist Value in Black: Essential for facial features and other small details.
- 1 Skein JOANN Big Twist Value in Dark Denim: The main color for your pill’s body. This deep blue provides a classic and calming base.
- 1 Skein JOANN Big Twist Value in Cream: Perfect for the stomach section, offering a lovely contrast to the main body color.
- 1 Skein JOANN Big Twist Value in White: For eye details or other accent areas.
- 1 Skein JOANN Big Twist Value in Camel: Ideal for the feet, giving them a warm, earthy tone.
- 1 Skein Lion Brand’s Basic Stitch in Raspberry: This vibrant pink is designated for the blush, adding a touch of cuteness. If Raspberry isn’t available, any bright, cheerful pink will do the trick!
- Crochet Hook:
- 4mm Hook: This size is recommended to achieve the dense fabric necessary for amigurumi, which helps prevent stuffing from showing through. A snug gauge is key for a polished finish.
- Tools & Notions:
- Scissors: For cutting yarn tails and finishing off your work.
- Darning Needle (or Tapestry Needle): Absolutely crucial for weaving in ends, sewing pieces together, and adding embroidered details. A blunt tip is preferred to avoid splitting yarn fibers.
- Polyfill (Fiberfill): The stuffing that gives your amigurumi its plump, huggable form. Make sure you have enough to firmly stuff all the pieces.
- Measuring Tape: Useful for checking the dimensions of your finished pieces, ensuring they align with the pattern’s specifications.
Understanding Your Project: Dimensions and Skill Level
Before diving into the stitches, let’s get a clear picture of what you’ll be creating and the skills you’ll need.
- Approximate Dimensions:
- Height: Around 5.5 inches
- Width: Around 5 inches
- These dimensions create a perfectly palm-sized companion, ideal for a desk, shelf, or small hands.
- Skill Level: Intermediate
- This pattern is classified as intermediate. This means you should be comfortable with basic crochet stitches and techniques. You’ll be working in the round, decreasing, increasing, and assembling multiple pieces. If you’re a beginner, don’t be discouraged! This pattern offers a fantastic opportunity to level up your skills, especially with the included video tutorials for key techniques.
Cracking the Code: Crochet Abbreviations
Crochet patterns use a shorthand system of abbreviations. If you’re new to reading patterns, familiarize yourself with these common US terms:
- Ch: Chain – The foundational stitch, creating a series of loops.
- Sc: Single Crochet – A fundamental and versatile stitch that creates a dense fabric.
- Inc: Increase – Making two stitches into one stitch to expand your work.
- Dec: Decrease – Working two stitches together to reduce the number of stitches, shaping your piece.
- *: Repeat – Indicates that the instructions following the asterisk should be repeated the specified number of times.
- FO: Finish Off – Securely cutting and weaving in the yarn end to complete a section.
Important Notes for a Smooth Crocheting Experience
These notes are designed to help you navigate the pattern with ease and achieve the best results:
- Working in the Round (No Joins): This pattern is primarily worked in continuous rounds. This means you won’t be joining at the end of each round with a slip stitch; instead, you’ll work directly into the first stitch of the previous round. This method helps create a seamless fabric, characteristic of amigurumi. Using a stitch marker to mark the first stitch of each round is highly recommended to keep track of your progress.
- The Magic Ring: Many amigurumi patterns begin with a Magic Ring (also known as a Magic Circle or Adjustable Ring). This technique creates a tight, closed center, preventing a hole at the start of your piece. If you’re new to this, there’s a helpful how-to video linked in the original pattern. Mastering the Magic Ring is a game-changer for amigurumi!
- Pattern Structure: The pattern is organized by individual pieces (Head/Body, Stomach, Ears, Arms, Feet, Face). You’ll create each component separately, and then the assembly instructions will guide you on bringing them all together at the end.
- Helpful Tutorials: Don’t hesitate to utilize the provided tutorials for tips and tricks, especially if you encounter a new technique or want to refine your existing skills.
- Color Customization: The pattern provides suggested color changes for the main body. Feel free to experiment! This “pill” character can be customized to resemble your favorite color combinations or even specific themes.
Let’s Get Hooking: Step-by-Step Instructions
Now, let’s dive into the core of the pattern! Remember to keep your stitch count accurate at the end of each round – this is crucial for successful shaping.
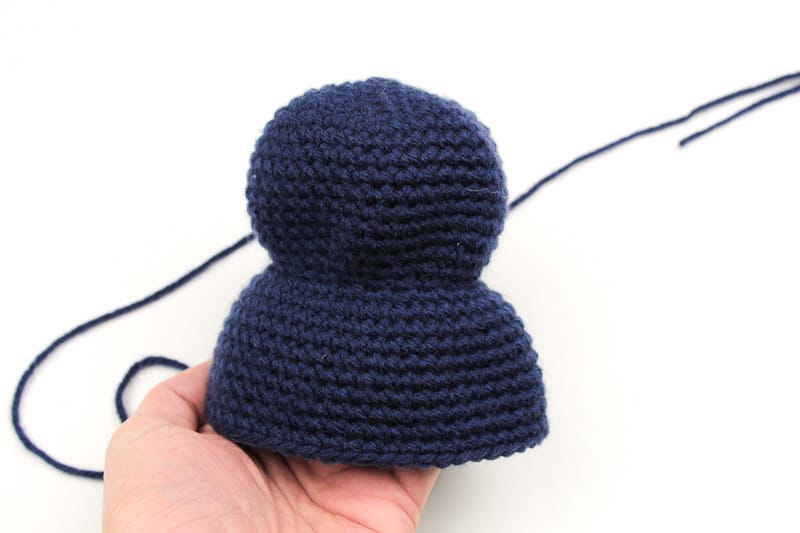
Piece 1: The Head/Body (The Core of Your Pill)
This section forms the main structure of your amigurumi. It starts with increasing to create the rounded head, then works straight for a section, followed by decreases to shape the body and bottom.
Color: Begin with Dark Denim (or your chosen main body color).
- Rnd 1: 6 Single crochet (sc) in a Magic Ring. (6 stitches)
- Tip: If new to the Magic Ring, practice a few times until you’re comfortable. A tight center is key!
- Rnd 2: Increase (Inc) in each stitch around. (12 stitches)
- An increase means crocheting two single crochets into the same stitch.
- Rnd 3: [Sc 1, Inc] around. (18 stitches)
- Rnd 4: [Sc 2, Inc] around. (24 stitches)
- Rnd 5: [Sc 3, Inc] around. (30 stitches)
- Rnd 6: [Sc 4, Inc] around. (36 stitches)
- Rnd 7: [Sc 5, Inc] around. (42 stitches)
- You’ve now created the widest part of the head.
- Rnd 8-14: Single crochet (sc) in each stitch around. (42 stitches for 7 rounds)
- These rounds create the height of the head before shaping the body.
- Rnd 15: [Sc 5, Decrease (Dec)] around. (36 stitches)
- A decrease means crocheting two single crochets together to form one stitch, reducing the total stitch count.
- Rnd 16: [Sc 4, Dec] around. (30 stitches)
- Rnd 17: [Sc 3, Dec] around. (24 stitches)
- Rnd 18: Increase (Inc) in the Front Loop Only (FLO) around. (48 stitches)
- Working in the Front Loop Only creates a distinct ridge, which will be useful for attaching other pieces or creating a design element later on.
- Rnd 19-26: Single crochet (sc) in each stitch around. (48 stitches for 8 rounds)
- These rounds form the main body section.
- Rnd 27: [Sc 6, Dec] around. (42 stitches)
- Rnd 28: [Sc 5, Dec] around. (36 stitches)
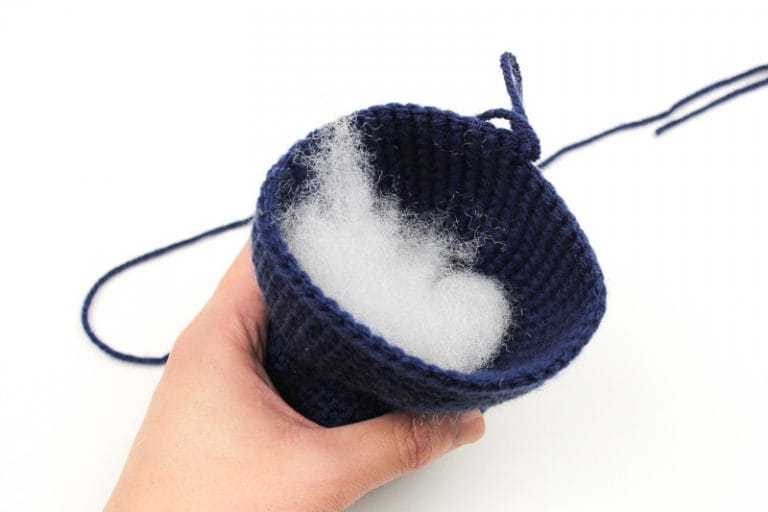
- Important Stuffing Note: Begin to firmly stuff the head at this point. As you continue to decrease and close the body, you’ll keep adding stuffing to ensure your pill is plump and well-formed. Don’t be shy with the Polyfill – a firmly stuffed amigurumi holds its shape much better!
- Rnd 29: [Sc 4, Dec] around. (30 stitches)
- Rnd 30: [Sc 3, Dec] around. (24 stitches)
- Continue Stuffing: Keep adding Polyfill as you work these final decreasing rounds. Push the stuffing in firmly and evenly, ensuring there are no lumpy spots. A chopstick or the blunt end of a crochet hook can be helpful for pushing stuffing into tight areas.
- Rnd 31: [Sc 2, Dec] around. (18 stitches)
- Rnd 32: [Sc 1, Dec] around. (12 stitches)
- Closing the Hole: Once you’ve completed Rnd 32, you’ll have a small opening. Use your darning needle to weave the remaining yarn tail through the front loop of each of the 12 stitches, then pull tight to close the hole securely. The original pattern links to a helpful tutorial for this closing technique.
- Finish Off (FO): Cut your yarn, leaving a tail long enough to weave in securely. Weave in any remaining ends.
Piece 2: The Stomach (A Contrasting Panel)
This piece adds a lovely visual break and shaping to the front of your pill character.
Color: Begin with Cream (or your chosen contrasting color).
- Rnd 1: 6 Single crochet (sc) in a Magic Ring. (6 stitches)
- Rnd 2: [Inc] x 6. (12 stitches)
- Rnd 3: [Sc 1, Inc] around. (18 stitches)
- Rnd 4: [Sc 2, Inc] around. (24 stitches)
- Rnd 5: [Sc 3, Inc] around. (30 stitches)
- Rnd 6: [Sc 4, Inc] around. (36 stitches)
- Rnd 7: [Sc 5, Inc] around. (42 stitches)
- Finish Off (FO): Cut your yarn, leaving a long tail for sewing this piece onto the main body later. Do not stuff this piece.
Piece 3: The Ears (Make 2)
These adorable ears will give your pill character a distinct personality.
Color: Use the same color as your Head/Body (e.g., Dark Denim) or a contrasting color if you prefer.
- Rnd 1: 5 Single Crochet (sc) in a Magic Ring. (5 stitches)
- Rnd 2: [Inc] around. (10 stitches)
- Rnd 3: Sc around. (10 stitches)
- Rnd 4: [Sc 1, Inc] around. (15 stitches)
- Rnd 5: [Sc 2, Inc] around. (20 stitches)
- Finish Off (FO): Cut your yarn, leaving a long tail for sewing. Do not stuff the ears. Fold them flat before sewing for a neat look.
Piece 4: The Arms (Make 2)
Give your pill character little welcoming appendages!
Color: Use the same color as your Head/Body (e.g., Dark Denim) or a contrasting color if desired.
- Rnd 1: 6 Single crochet (sc) in a Magic Ring. (6 stitches)
- Rnd 2: [Inc] around. (12 stitches)
- Rnd 3: Sc around. (12 stitches)
- Rnd 4: [Sc 1, Inc] around. (18 stitches)
- Rnd 5: Sc around. (18 stitches)
- Rnd 6: [Sc 1, Decrease (Dec)] around. (12 stitches)
- Finish Off (FO): Cut your yarn, leaving a long tail for sewing. Do not stuff the arms at this point; they will be flatter.
Piece 5: The Feet (Make 2)
These two-toned feet add a charming detail and allow your pill to “stand” (with a little help!).
Color: Begin with Camel (or your chosen brown).
- Rnd 1: 6 Single crochet (sc) in a Magic Ring. (6 stitches)
- Rnd 2: [Inc] around. (12 stitches)
- Rnd 3: [Sc 1, Inc] around. (18 stitches)
- Rnd 4-6:Switch to White. Single crochet (sc) in each stitch around. (18 stitches for 3 rounds)
- To change colors: On the last yarn over of the last stitch of Rnd 3, drop the old color and pick up the new color. Pull the new color through to complete the stitch. Continue with the new color for Rnds 4-6.
- Finish Off (FO): Cut your yarn, leaving a long tail for sewing. Do not stuff the feet.
Piece 6: The Face (Shaping Facial Features)
This flat piece is designed to give your pill character a distinct facial outline, which you’ll then embroider features onto. This is a unique technique, creating two “points” for the pill’s top section.
Color: Use White or Cream (ensure it contrasts with your main body color for visibility).
- Rnd 1: Chain (Ch) 8. Single crochet (sc) in the second chain from your hook, then sc across the remaining chains. (7 stitches)
- Rnd 2: Chain 1 (Ch 1), turn your work. [Inc, Sc 5, Inc] to the end. (9 stitches)
- Rnd 3: Ch 1, turn. [Inc, Sc 7, Inc] to the end. (11 stitches)
- Rnd 4: Ch 1, turn. [Inc, Sc 9, Inc] to the end. (13 stitches)
- First Head Point (Triangle 1):
- Rnd 5: Ch 1, turn. Decrease (Dec), Sc 3. (4 stitches)
- Rnd 6: Ch 1, turn. Sc 2, Decrease (Dec). (3 stitches)
- Rnd 7: Ch 1, turn. Decrease (Dec), Sc 1. (2 stitches)
- Rnd 8: Ch 1, turn. Decrease (Dec). (1 stitch)
- Finish Off (FO): Cut your yarn, leaving a tail for sewing. This completes the first “peak” of your pill face.
- Second Head Point (Triangle 2):
- This is a slightly unconventional technique to create the second point.
- Insert your hook into the 4th stitch from the base of the first triangle (refer to the original image for visual guidance – there should be 3 stitches separating the two peaks).
- Pull through a loop with your working yarn and make a single crochet (sc) in that same stitch.
- After your first sc, sc two more times across. Then, decrease (dec) in the final stitch of this section. This mirrors the previous triangle.
- From here, follow the same decreasing pattern as the first triangle:
- Ch 1, turn. Sc 2, Decrease (Dec).
- Ch 1, turn. Decrease (Dec), Sc 1.
- Ch 1, turn. Decrease (Dec).
- It should look like two small peaks with a dip in between.
- Working Along the Outside Edge:
- Ch 1 from where you finished the second triangle.
- Now, working along the outside edge of the entire face piece, single crochet (sc) all around until you reach the space between the two triangles you just created.
- Skip 2 stitches (these are the stitches in the “dip” between the triangles), and sc into the first stitch of the next triangle.
- Continue to single crochet (sc) up to the point of the last triangle.
- Finish Off (FO): Cut your yarn, leaving a long tail for sewing this face piece onto the head.
Bringing It All Together: Assembly Instructions
Now that all your individual components are crocheted, it’s time for the magic of assembly! A darning needle is your best friend for this stage. Take your time, use plenty of pins to hold pieces in place, and step back frequently to ensure symmetry.
- Attach the Stomach:
- Position the Cream Stomach piece onto the front of the Dark Denim Head/Body. Align the center of the stomach with the center of the body. The stomach piece should cover the area from approximately Round 18 (the FLO increase round) down to around Round 26-27 of the body.
- Use pins to secure it firmly in place.
- Using the long yarn tail from the stomach piece and your darning needle, sew the stomach securely to the body using a whip stitch or mattress stitch for a seamless finish. Weave in the yarn end once attached.
- Attach the Face:
- Carefully position the White/Cream Face piece onto the front of the Head/Body, centered above the stomach. The “dip” between the two peaks of the face piece should align with the center top of the head.
- Pin it in place, making sure it’s symmetrical.
- Using the long yarn tail from the face piece and your darning needle, sew the face securely to the head.
- Add Facial Details (Eyes and Blush):
- Eyes: Using Black yarn (or black embroidery floss for finer details) and your darning needle, embroider two small eyes onto the face. You can use French knots, backstitches, or simple straight stitches for the eyes. Position them evenly on either side of the face.
- Blush: Using the Raspberry (or vibrant pink) yarn and your darning needle, embroider small blush marks on each “cheek” of the face. Simple straight stitches or small circles can work well here.
- Attach the Ears:
- Position the two Ears on either side of the head, slightly above where the face piece is attached. Aim for them to be symmetrical and slightly angled.
- Pin them in place.
- Using the long yarn tails from the ears and your darning needle, sew them securely to the head.
- Attach the Arms:
- Position the two Arms on the sides of the body, just below the widest part of the head, and slightly above the stomach piece.
- Pin them in place, ensuring they are symmetrical.
- Using the long yarn tails from the arms and your darning needle, sew them securely to the body.
- Attach the Feet:
- Position the two Feet on the bottom of the body, towards the front, ensuring they are evenly spaced.
- Pin them in place.
- Using the long yarn tails from the feet and your darning needle, sew them securely to the bottom of the body.
- Final Touches:
- Weave in any remaining loose yarn ends securely into the amigurumi.
- Gently reshape your finished pill character, ensuring the stuffing is evenly distributed and all features are well-defined.
Congratulations! Your Amigurumi Pill is Complete!
You’ve successfully crocheted an adorable, charming amigurumi pill character! This project not only yields a delightful finished product but also helps you refine essential amigurumi techniques like working in the round, increasing, decreasing, and meticulous assembly. Each stitch you made contributes to this unique creation.
Whether you’ve followed the colors exactly or put your own spin on it with a personalized palette, this little friend is ready to bring a smile to anyone’s face. They make wonderful gifts, quirky desk companions, or simply a testament to your growing crochet skills.
What other amigurumi creatures are you dreaming of crocheting next?