Stunning Starburst Granny Square Projects: Your Next Crochet Obsession!
Master the Art of the Starburst Granny Square: Your Complete Crochet Guide
Ready to add a burst of color and unique texture to your crochet projects? The starburst granny square is a fantastic pattern that transforms a simple circle into a vibrant, textured square, perfect for blankets, cushions, bags, and so much more! If you’re looking for a fun and rewarding crochet challenge, you’ve come to the right place.
In this comprehensive guide, we’ll walk you through every step of creating your very own starburst granny square. From gathering your materials to mastering each stitch, you’ll be creating stunning, eye-catching squares in no time. Let’s dive in!

Watch the Step-by-Step Video Tutorial
Prefer to learn visually? This video guides you through each round of the starburst granny square in detail.
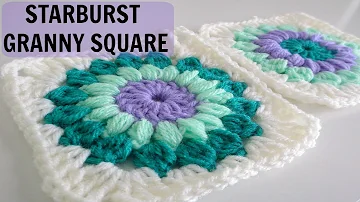
Video Tutorial: How to Crochet a Starburst Granny Square

A beautifully finished Starburst Granny Square with its distinctive puff stitch center.
What You’ll Need to Crochet Your Starburst Granny Square
Before we begin, gather your supplies. For this pattern, you’ll need a few essentials:
- Yarn: Three colors are recommended to create the “starburst” effect. The example uses purple, mint green, and teal.
- Crochet Hook: A 5mm hook is suggested, but always check your yarn label for the recommended size.
- Sewing Needle: For weaving in ends.
- Scissors: For cutting yarn.
Essential Crochet Stitches You’ll Master
This starburst granny square pattern utilizes a variety of fundamental crochet stitches. If any are new to you, don’t worry – the video tutorial provides clear demonstrations.
- Chain (ch): The foundation stitch.
- Slip Stitch (sl st): Used to join rounds.
- Half Double Crochet (HDC): A stitch taller than single crochet but shorter than double crochet.
- Double Crochet (DC): A common and versatile stitch.
- Triple Crochet (TRC): A tall stitch for height.
- Puff Stitch: Creates a lovely, textured “puff.”
Step-by-Step Instructions to Crochet Your Starburst Granny Square
Round 1: The Vibrant Center of Your Starburst Granny Square
We begin with the center of our starburst granny square, usually in your first chosen color (e.g., purple).
- Make a slipknot and place it on your hook.
- Chain 5 (ch 5).
- Slip stitch (sl st) into the very first chain you made to form a ring. This creates the foundation for your center.
- Chain 3 (ch 3). This chain 3 counts as your first Double Crochet (DC).
- Work 15 Double Crochets (DC) into the center of the ring. You will insert your hook directly into the hole formed by your ring.
- Once you’ve made 15 DC, you will have a total of 16 stitches (15 DC + the initial ch 3).
- Slip stitch (sl st) into the 3rd chain of your initial chain 3 to join the round.
- Chain 1, pull your yarn through, and cut it. You’ve completed the first colorful center!
Pro Tip: You can weave in your ends now, or wait until you’ve completed a few rounds for efficiency.
Round 2: Creating the Puff Stitch Burst
Now, let’s add the signature “burst” with puff stitches using your second color (e.g., teal).
- Attach your new color yarn to any stitch from the previous round. You can insert your hook into a ‘V’ stitch from Round 1, then wrap the new yarn around and knot it securely.
- Insert your hook back into that same stitch, yarn over, and pull up a loop.
- Chain 3 (ch 3).
- Now, you’ll make a Puff Stitch into the same stitch where you attached the yarn. To make a Puff Stitch:
- Yarn over, insert into the stitch, yarn over, pull up a loop (3 loops on hook). Pull the loop up a bit to keep it loose.
- Yarn over, insert into the same stitch, yarn over, pull up a loop (5 loops on hook).
- Yarn over, insert into the same stitch, yarn over, pull up a loop (7 loops on hook).
- Yarn over and pull through all 7 loops on your hook.
- Chain 1 (ch 1) to secure the puff stitch.
- Repeat the puff stitch process (Puff Stitch + ch 1) in each of the remaining 15 Double Crochet stitches from Round 1. You should have 16 puff stitches in total.
- After your last puff stitch and chain 1, slip stitch (sl st) into the 3rd chain of your initial chain 3 from this round to join.
- Chain 1, pull your yarn through, and cut it. Round 2 is complete!
Round 3: The Textured Ring (The Intriguing “Unknown” Stitch!)
This round adds another layer of texture using your third color (e.g., green). This particular stitch is unique, and while its formal name isn’t widely known, it creates a beautiful effect!
- Attach your new color yarn into any of the gaps between the puff stitches from Round 2.
- Insert your hook into the gap, yarn over, and pull up a loop.
- Chain 3 (ch 3).
- Now, let’s make this special stitch into the same gap. This stitch is essentially doing the first part of a Double Crochet multiple times before closing all loops:
- Yarn over, insert into the gap, yarn over, come out (3 loops on hook). Yarn over, pull through only the first 2 loops. (2 loops remaining)
- Yarn over, insert into the gap, yarn over, come out (4 loops on hook). Yarn over, pull through only the first 2 loops. (3 loops remaining)
- Yarn over, insert into the gap, yarn over, come out (5 loops on hook). Yarn over, pull through only the first 2 loops. (4 loops remaining)
(For the very first stitch, the initial Chain 3 counts as one part, so you’ll do this partial DC process 3 more times for a total of 4 “legs”).
- You should now have 4 loops on your hook (for the first stitch). Yarn over and pull through all 4 loops.
- Chain 2 (ch 2). This secures the stitch and creates the next gap.
- Repeat this “unknown” stitch + Chain 2 combination into each of the 15 remaining gaps between the puff stitches. For subsequent stitches, you’ll perform the partial DC process 4 times, resulting in 5 loops on your hook before you yarn over and pull through all of them.
- After your last stitch and Chain 2, slip stitch (sl st) into the stitch *after* the original Chain 3 (this gives a cleaner join for this round).
- Chain 1, pull your yarn through, and cut it.
Do YOU Know the Name of This Stitch?
If you’re a seasoned crocheter and recognize this unique stitch, please share its name in the comments below! We’d love to learn it!
Round 4: Shaping Your Starburst Granny Square (The White Border)
Finally, we’ll transform our circular motif into the iconic starburst granny square shape using your final color (e.g., white) and weaving in all those pesky ends!
- First, take a moment to weave in all the yarn ends from the previous rounds with your sewing needle. This creates a clean finish.
- Attach your new color yarn into any of the gaps created by the Chain 2 from Round 3.
- Insert your hook into the gap, yarn over, and pull up a loop.
- Chain 4 (ch 4). This chain 4 counts as your first Triple Crochet (TRC).
- Work 2 more Triple Crochets (TRC) into the same gap. (You now have a corner cluster of 3 TRC).
- In the next gap, work 3 Double Crochets (DC).
- In the next gap, work 3 Half Double Crochets (HDC).
- In the next gap, work 3 Double Crochets (DC).
- In the next gap, work 3 Triple Crochets (TRC). This completes one side of your square.
- To form the corner: Chain 3 (ch 3), then work 3 more Triple Crochets (TRC) into the *same gap* as your last 3 TRC.
- Repeat steps 6-10 three more times to complete the remaining sides and corners of your starburst granny square. Remember the pattern for each side: (TRC, DC, HDC, DC, TRC).
Important Note on Corners vs. Sides: Unlike some traditional granny squares, there are NO chains between the stitch clusters on the sides of your Starburst Granny Square. You only chain in the corners (Chain 3).
- After completing your last side and corner TRC cluster, chain 3 (ch 3) to finish the final corner.
- Slip stitch (sl st) into the 4th chain of your initial chain 4 from this round to join.
- Chain 1, pull your yarn through, and cut it. Weave in this final end.
Beyond the Square: Creative Project Ideas & Expert Tips
Congratulations! You’ve just crocheted a beautiful starburst granny square. The possibilities for what you can create with these vibrant squares are endless:
- Blankets: Join many squares together to make a stunning blanket or afghan.
- Cushion Covers: Sew a few squares together for unique throw pillows.
- Bags & Totes: Combine squares to create a stylish and sturdy bag.
- Scarves & Shawls: A row of starburst squares makes a beautiful accessory.
- Wall Hangings: Frame a single square or a small collection for unique decor.
Experiment with different color combinations to create unique effects. Imagine a blanket with varying sets of three colors for each square!
Frequently Asked Questions (FAQs) & Expert Tips for Your Starburst Granny Square
- Q: What yarn weight works best?
A: Medium (worsted weight) yarn is commonly used and recommended for this pattern, as it creates good stitch definition. However, you can experiment with different weights for varying sizes and textures. - Q: Can I use fewer or more colors?
A: Absolutely! While three colors highlight the ‘starburst’ effect, you can use two colors for a simpler look, or even more for a truly kaleidoscopic square. - Q: How do I make my square bigger or smaller?
A: To change the size, you can adjust your hook size (larger hook = larger square) or yarn weight. You can also add more rounds of simple double crochet or half double crochet borders after Round 4 to increase the size. - Q: My edges aren’t perfectly straight in Round 4. What went wrong?
A: This is usually a tension issue or a missed stitch. Ensure your tension is consistent throughout the round, and double-check your stitch counts for each section (TRC, DC, HDC). Practice makes perfect! - Q: I’m struggling with the “unknown” stitch in Round 3. Any advice?
A: It’s a unique stitch! Focus on pulling the loops up to the same height to keep them loose, making it easier to pull through all loops at the end. Re-watching the video for Round 3 can be very helpful. - Q: How do I join my Starburst Granny Squares together?
A: There are many methods for joining granny squares, including slip stitch, single crochet, whip stitch, or the “join-as-you-go” method. Search for tutorials on “how to join granny squares” for various techniques.
Connect and Create!
Thank you for joining us on this creative journey to crochet your very own starburst granny square! We hope you enjoyed learning this fun and beautiful pattern.
If you liked this tutorial, please give it a thumbs up and subscribe to our channel for more exciting crochet patterns and tips. Don’t forget to share your finished starburst granny squares with us in the comments or on social media – we’d love to see your creations!