
Stunning Texture, Simple Steps: Your Ultimate Bamboo Stitch Knitting Tutorial
Master the Beautiful Bamboo Stitch Knitting Tutorial: Your Complete Guide
Welcome, fellow knitters! Are you ready to add a gorgeous, unique texture to your next project? Look no further than the delightful bamboo stitch. This pattern is renowned for being incredibly quick and straightforward, yet it produces a fabric with a neat, ordered, and highly effective texture that resembles segments of bamboo.
In this comprehensive bamboo stitch knitting tutorial, we’ll walk you through every step, ensuring even beginners can master this beautiful technique. Get ready to transform your yarn into something truly special!
What You’ll Need & Getting Started
The beauty of the bamboo stitch lies in its simplicity. All you really need is your favorite yarn and a pair of knitting needles appropriate for your yarn weight. To begin this bamboo stitch knitting tutorial, you will need to:
- Cast on an even number of stitches. This is crucial for the pattern repeat to work correctly. For example, if you’re just practicing, casting on 14 stitches is a perfect start.
Step-by-Step Bamboo Stitch Knitting Tutorial
The bamboo stitch is a simple two-row repeat. Once you’ve mastered these two rows, you’ll be able to create stunning fabric effortlessly!
Row 1: The Right Side of Your Knitting
This row is where the magic happens, creating those characteristic horizontal bars. Mastering Row 1 is key to the bamboo stitch knitting tutorial.
- Yarn Over (YO): This is the first step of Row 1. If you’re new to yarn overs, it’s simply where you wrap the working yarn around your right-hand needle.
- Ensure your working yarn is at the back, behind your needles.
- Take the working yarn and wrap it once clockwise around the right-hand needle. This means you bring the yarn around the outside of the right-hand needle, then between the needles to the back again. That completes one yarn over.
- Knit Two Stitches (K2): After your yarn over, knit the next two stitches as you normally would.
- Pass Yarn Over Over Knits: At this point, you’ll have three stitches on your right-hand needle: the yarn over (which was the first ‘stitch’), and the two knit stitches. Now, take your left-hand needle and use it to pick up that very first yarn over. Carefully lift it over the two knit stitches next to it and drop it off the end of the needle. This binds the two knit stitches together with the yarn over, forming a distinct horizontal bar.
- Repeat: This sequence of “Yarn Over, Knit Two, Pass Yarn Over Over Two Knits” is the repeating section for Row 1. Continue repeating these steps across the entire row until you reach the end.
After completing Row 1, if you turn your work slightly, you should already be able to see faint horizontal bars of yarn on the back of your work. These are formed by taking the yarn overs over the knit stitches.
Row 2: The Wrong Side of Your Knitting
This row is incredibly simple, serving to set up the stitches for the next Row 1.
- Purl All Stitches: For Row 2, all you need to do is purl stitches right across the entire row. That’s it!
The Pattern Repeat & Visualizing the Bamboo Stitch
That’s the entire pattern repeat! By consistently repeating these two rows – Row 1 (YO, K2, pass YO over) and Row 2 (Purl all) – you will achieve the beautiful and distinctive bamboo stitch texture. The more you repeat, the clearer the bamboo-like segments will become.
Watch the Bamboo Stitch Knitting Tutorial in Action!
Sometimes, seeing is believing, especially with knitting techniques. To truly grasp the technique and see how the horizontal bars form, watch this helpful bamboo stitch knitting tutorial video:
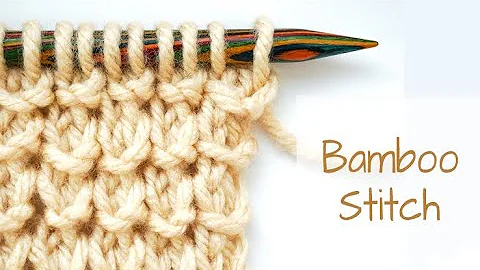
And here’s a clear image showcasing what the finished bamboo stitch looks like:
 A close-up of the beautifully textured bamboo stitch.
Why Choose the Bamboo Stitch? Beyond the Basics
The versatility of the bamboo stitch knitting tutorial makes it perfect for a wide array of projects. Here are a few reasons why knitters love it:
- Unique Texture: It creates a distinctive, elegant fabric that feels both rustic and refined.
- Quick to Knit: Despite its sophisticated look, it’s a very fast pattern, making it ideal for gifts or larger projects.
- Beginner-Friendly: Involves only basic knits, purls, and a simple yarn over, making it accessible.
- Great for Various Yarns: Works well with many yarn weights and fibers, from smooth cottons to rustic wools.
Project Ideas for Your New Skill
Now that you’ve mastered the bamboo stitch knitting tutorial, what can you make? The possibilities are endless!
- Scarves & Cowls: The texture is wonderfully warm and inviting.
- Blankets & Throws: Adds a luxurious feel to home decor items.
- Dishcloths & Washcloths: The texture is practical for scrubbing.
- Baby Items: Soft and visually appealing for blankets, sweaters, or hats.
- Sweaters & Cardigans: Use it for entire garments or as an accent panel.
Tips for Success in Your Bamboo Stitch Knitting Tutorial
To ensure your bamboo stitch projects turn out beautifully:
- Gauge Matters: Always swatch to check your gauge, especially if you’re following a pattern that uses this stitch.
- Even Tension: Try to maintain consistent tension, especially with the yarn overs, to keep the bars uniform.
- Blocking: While not always necessary, blocking your finished item can help to even out the stitches and enhance the texture.
Conclusion
We hope this detailed bamboo stitch knitting tutorial has empowered you to confidently add this beautiful pattern to your knitting repertoire. It’s truly a testament to how simple stitches can create extraordinary results.
Don’t be afraid to experiment with different yarn types and colors to see how the bamboo stitch transforms. Happy knitting, and enjoy your beautiful bamboo stitch knitting tutorial creations!