
Vessel (Sleep Token) Crochet Doll Free Pattern
Hello fellow fiber enthusiasts!
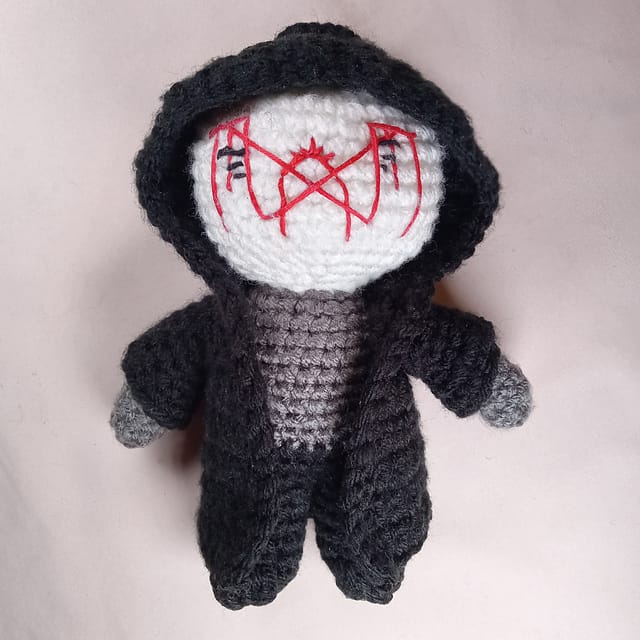
I’m thrilled to share my latest creation with you today – a mysterious little hooded Vessel (Sleep Token) Crochet Doll Free Pattern that has completely stolen my heart! This adorable amigurumi stands about 20cm tall and has such a distinctive personality with its embroidered face and oversized cloak.
Skill Level: Intermediate Beginner (Basic crochet stitches, color changes, embroidery)
Materials:
- Yarn:
- Worsted weight yarn in White
- Worsted weight yarn in Black
- Worsted weight yarn in Dark Gray
- Worsted weight yarn in Light Gray (a shade lighter than Dark Gray)
- Small amount of Red yarn for embroidery
- Small amount of Black yarn for embroidery
- Crochet Hook: 3.75mm (or size appropriate for your yarn to achieve tight stitches for amigurumi)
- Stuffing: Fiberfill or similar stuffing material
- Embroidery Needle: For embroidering the mask details
- Scissors
- Stitch Markers
- Yarn Needle: For sewing parts together and weaving in ends
Gauge: Gauge is not crucial for amigurumi, but aim for tight stitches so stuffing doesn’t show through. If you want to match the approximate size, crocheting a small square of 10×10 single crochet stitches with your chosen yarn and hook should measure around 2.5cm x 2.5cm (1 inch x 1 inch).
Abbreviations (US Terms):
- Rnd: Round
- ch: chain
- sc: single crochet
- inc: increase (2 sc in the same stitch)
- dec: decrease (sc 2 stitches together) – invisible decrease recommended for amigurumi
- sl st: slip stitch
- st(s): stitch(es)
- […]: repeat instructions within brackets as indicated
- (…): total stitches at the end of the round
- FO: Fasten Off
Doll Parts:
1. Head (White Yarn)
- Rnd 1: 6 sc in a magic ring (6)
- Rnd 2: [Inc] around (12)
- Rnd 3: [Sc, inc] around (18)
- Rnd 4: [Sc 2, inc] around (24)
- Rnd 5: [Sc 3, inc] around (30)
- Rnd 6: [Sc 4, inc] around (36)
- Rnd 7-13: Sc around (36) – 7 rounds
- Rnd 14: [Sc 4, dec] around (30)
- Rnd 15: [Sc 3, dec] around (24)
- Rnd 16: [Sc 2, dec] around (18)
- Rnd 17: [Sc, dec] around (12)
- Rnd 18: [Dec] around (6)
- FO. Leave a long tail for sewing. Stuff the head firmly.
2. Body (Gradient Gray)
Start with Dark Gray Yarn
- Rnd 1: 6 sc in a magic ring (6)
- Rnd 2: [Inc] around (12)
- Rnd 3: [Sc, inc] around (18)
- Rnd 4: [Sc 2, inc] around (24)
- Rnd 5: [Sc 3, inc] around (30)
- Rnd 6-8: Sc around in Dark Gray (30) – 3 rounds
- Transition to Light Gray gradually over the next few rounds. For a smooth transition, you can alternate rounds of Dark Gray and Light Gray, or use a gradient yarn if available. Alternatively, in each round, switch to Light Gray halfway through. For simplicity, we’ll switch to Light Gray completely in the next round.
- Rnd 9-14: Sc around in Light Gray (30) – 6 rounds
- Rnd 15: [Sc 3, dec] around (24)
- Rnd 16: [Sc 2, dec] around (18)
- Rnd 17: [Sc, dec] around (12)
- Rnd 18: [Dec] around (6)
- FO. Leave a long tail for sewing. Stuff the body firmly.
3. Arms (Light Gray Yarn) – Make 2
- Rnd 1: 6 sc in a magic ring (6)
- Rnd 2: [Inc] around (12)
- Rnd 3-9: Sc around (12) – 7 rounds
- Rnd 10: [Dec] around (6)
- FO. Leave a long tail for sewing. Stuff the arms lightly.
4. Legs (Dark Gray Yarn) – Make 2
- Rnd 1: 6 sc in a magic ring (6)
- Rnd 2: [Inc] around (12)
- Rnd 3-6: Sc around (12) – 4 rounds
- Rnd 7: [Dec] around (6)
- FO. Leave a long tail for sewing. Stuff the legs lightly.
5. Hoodie (Black Yarn)
This is made in flat pieces and then seamed together.
(a) Back Panel
- Row 1: Ch 26, sc in 2nd ch from hook and in each ch across, turn (25)
- Row 2-20: Ch 1, sc in each st across, turn (25) – 19 rows
- FO.
(b) Front Panels – Make 2
- Row 1: Ch 14, sc in 2nd ch from hook and in each ch across, turn (13)
- Row 2-20: Ch 1, sc in each st across, turn (13) – 19 rows
- FO.
(c) Hood – Make 2
- Row 1: Ch 20, sc in 2nd ch from hook and in each ch across, turn (19)
- Row 2-15: Ch 1, sc in each st across, turn (19) – 14 rows
- FO.
Hoodie Assembly:
- Shoulders: Place the Back Panel and Front Panels right sides together. Seam the top 7 rows (approx.) of each Front Panel to the top edges of the Back Panel to form the shoulders.
- Sides: Seam the side edges of the Front Panels to the side edges of the Back Panel, leaving armholes open at the top.
- Hood: Place the two Hood pieces right sides together and seam along the back curved edge.
- Attach Hood to Neckline: Attach the Hood to the neckline of the robe, aligning the center back of the hood with the center back seam of the robe. Seam around the neckline.