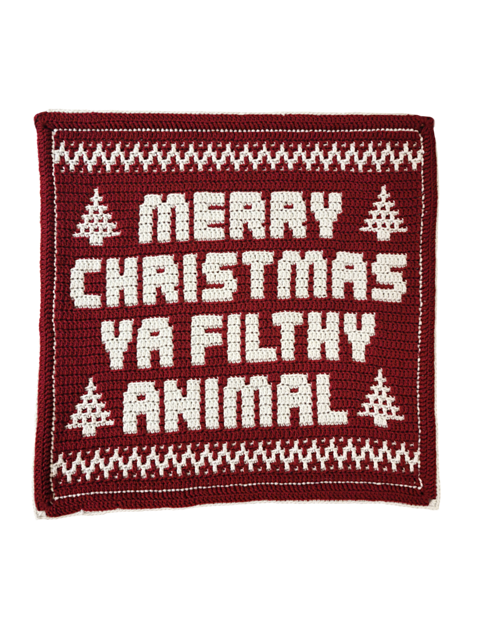
“Ya Filthy Animal!” Crochet This Hilarious Holiday Wall Hanging
“`html
How to Crochet a “Ya Filthy Animal” Festive Wall Hanging: Step-by-Step Mosaic Crochet Pattern
Add some holiday humor to your home decor with this festive mosaic crochet wall hanging. Whether you use it as a piece of wall art or turn it into a quirky cushion cover, this project is a great way to practice overlay mosaic crochet. This pattern uses US terminology and is designed for a square finish.
Materials Needed
To create this project, you will need DK weight yarn and the following tools:
- Yarn:
- Color A (Main background): Approximately 246 yards
- Color B (Pattern color): Approximately 225 yards
- Border Yarn (Color A): Approximately 158 yards
- Crochet Hooks:
- 4mm hook (for the main body)
- 3mm hook (for the double border)
- Additional Tools:
- Scissors
- Stitch markers
Project Specifications
- Finished Size: Approximately 20″ x 20″ (50cm x 50cm) without the border.
- Gauge: 18 stitches and 18 rows = 4″ x 4″ (10x10cm) using a 4mm hook.
Abbreviations (US Terms)
- SC: Single crochet
- DC: Double crochet
- BS: Border stitch (Single crochet worked through BOTH loops)
Understanding the Mosaic Crochet Technique
Before starting, it is important to understand the unique rules of overlay mosaic crochet used in this pattern:
- One Color Per Row: Every row is worked using only one color. You will fasten off and snip the yarn at the end of every single row.
- No Turning: You always work on the front side only. Do not turn your work; instead, start the next row from the right-hand side.
- Stitch Placement:
- Blank Boxes/SC: Work a single crochet in the BACK LOOP of the stitch in the row immediately below.
- X Boxes/DC: Work a double crochet in the FRONT LOOP of the stitch two rows below.
- BS: The border stitch is a single crochet through both loops.
- Note on Texture: It is normal for long rows of double crochets to create a slight “flap” on the back and for the back of the piece to have a striped effect.
Getting Started: The Foundation
Row 1 (Color A)
Chain 84. Work a single crochet (SC) in the 2nd chain from the hook and in every chain across. You should have 83 stitches total, including the two border stitches. Fasten off and snip your yarn.
Row 2 (Color B)
Start from the right-hand side of your work. Tie on your yarn and work your first border stitch (BS) by crocheting a single crochet through both loops of the first stitch. Continue working SC in the back loop of each stitch until one stitch remains. End with a final BS (SC through both loops). Chain 1 to fasten, then snip off your yarn.
Main Body Instructions
From Row 3 onwards, follow the mosaic pattern. The project consists of 81 total rows. You can follow a mosaic chart or the written instructions. Each row starts and ends with a Border Stitch (BS).
Pattern Summary (Rows 3-81)
The written instructions follow a sequence of colors and stitch counts. For example:
- Solid Rows: Some rows (like Row 3 or 4) may require SC or DC across the entire row.
- Patterned Rows: Rows will specify combinations of DC and SC. For example, “BS. (DC, SC) x 40, DC. BS.” means work the border stitch, then repeat the sequence of one double crochet and one single crochet 40 times, followed by one double crochet and the final border stitch.
Creating the Double Border
To prevent the border from becoming wavy, drop down to a 3mm hook. This pattern uses a double border to hide all yarn ends.
Step 1: The First Round (Color A)
Starting on the front side at the bottom, work front post double crochet (FPDC) around each stitch. When you reach a corner, work (2 FPDC, chain 2, 2 FPDC) into the corner stitch. Continue around all four sides.
Step 2: The Second Round (Color A)
Work a normal double crochet (DC) through both loops in every stitch around. In the corner chain-2 spaces, work (2 DC, chain 2, 2 DC).
Step 3: The Back Side
Repeat Step 1 and Step 2 on the back side of the wall hanging using Color A.
Step 4: Joining the Borders
Join the front and back borders together using a single crochet (SC) or a slip stitch. In the corner spaces, work (2 SC, chain 2, 2 SC) to keep the corners square.
Final Assembly
To turn your crochet piece into a wall hanging:
- Select a wooden dowel slightly longer than the width of your finished piece.
- Slide the dowel between the front and back top border sections.
- Join the borders around the dowel to secure it. This ensures the piece hangs straight and the dowel remains hidden.
“`