
Your Ultimate Guide to the Dreamy Puff Flower Crochet Blanket (It’s Easier Than It Looks!)
Alright, let’s have a little heart-to-heart. You’ve seen it. I’ve seen it. We’ve all seen it scrolling through our feeds — that gloriously squishy, breathtakingly beautiful, looks-like-it-was-plucked-from-a-magical-meadow puff flower crochet blanket.
Your first thought was probably, “Wow, I need that in my life.” Your second thought was likely, “Wow, I could never make that.”
Well, pull up a comfy chair and grab your favorite hook, because I’m here to tell you that you absolutely can. This project is the definition of “trust the process.” It might feel a little like trying to pat your head and rub your tummy while learning a new TikTok dance at first, but I promise, after a couple of rows, you’ll have an “AHA!” moment so big it’ll knock your yarn bowl over.
This isn’t just a pattern; it’s an adventure in texture and color. We’re going to break down this join-as-you-go (JAYG) masterpiece step-by-step, transforming a seemingly complex design into a series of simple, repetitive motions. Get ready to unleash some serious hook magic.
Why You’ll Be Totally Obsessed with This JAYG Blanket
Before we dive into the nitty-gritty, let’s talk about why this puff flower crochet blanket is about to become your new favorite project.
- Texture for Days: Seriously, the puff stitches create these pillowy, 3D petals that are irresistibly soft and squishy. It’s like a blanket and a fidget toy all in one.
- The Magic of Join-As-You-Go (JAYG): Say goodbye to sewing a million granny squares together at the end! With the JAYG method, you’ll construct and connect your flowers as you work. It’s efficient, satisfying, and means your blanket is basically finished the moment you snip that final piece of yarn.
- Endless Yarn-spirations: This pattern is a playground for color! Go for a rainbow meadow, a chic monochromatic field, or use it to bust through that yarn stash you’ve been “collecting.” Each row can be a new color, making it a visual delight to create.
- That “I Made This?!” Feeling: Finishing this blanket will make you feel like a true crochet wizard. It’s a statement piece that looks incredibly intricate and impressive (we’ll just keep how fun it was to make our little secret).
Gather Your Supplies: The Maker’s Toolkit
Let’s get our crochet ducks in a row. For this project, you’ll need the basics. The beauty of this pattern is its flexibility, so feel free to adapt your hook and yarn to achieve the drape and size you want.
- Yarn: A DK or Worsted Weight yarn works beautifully. The tutorial uses a lovely mix of colors, and I highly recommend choosing at least 3-4 complementary shades to make the flower pattern pop.
- Crochet Hook: A size that corresponds with your yarn choice. The tutorial maker, Robin, uses what looks like a 4mm or 5mm hook. The key is to use a hook that allows you to work loosely.
- Your Essentials: A pair of scissors for snipping yarn and a darning needle for weaving in those few ends.
- Good Vibes: This is a “relax and let it flow” kind of project. Put on your favorite podcast, brew a cup of tea, and get ready to get cozy.
Let’s Talk Puffs: Mastering the Magical Puff Stitch
The star of our show is the puff stitch. The secret to a perfect puff? Keep it tall and keep it loose. Don’t strangle your hook! Relax your tension and let the yarn glide.
We’ll be using two variations:
- Beginning Puff Stitch: This is what you’ll use to start a new flower motif. You’ll yarn over and pull up a loop 4 times.
- Regular Puff Stitch: For all the other petals in your flower. You’ll yarn over and pull up a loop 5 times.
Don’t worry, we’ll walk through this in detail. The most important thing to remember is to pull each loop up to the height of your hook to give your puffs that gorgeous, well, puff.
How to Crochet Your Puff Flower Blanket: The Step-by-Step Guide
Deep breath. You’ve got this. We’re going to build this blanket row by glorious row.
Row 1: Planting Your First Flower Seeds
This first row creates the bottom half of our first line of flowers.
- Create Your First Flower Center: Start with a slip knot and chain 9.
- Form the Ring: Skip the first 5 chains from your hook, and slip stitch into the 6th, 7th, and 8th chains (that’s 3 slip stitches in a row). That chain-5 space you skipped? That’s the magic ring where your petals will live.
- The Stem: Pop your hook through that very last, 9th chain (the one near your slip knot). It doesn’t matter if you go through the top or bottom loop, whatever feels easiest is the right way. You should now have two loops on your hook.
- First Petal (Beginning Puff): Now for our first puff! Yarn over, insert your hook into the chain-5 ring, and pull up a tall, loose loop. Repeat this 4 times in total. You’ll have a bunch of loops on your hook. Yarn over and pull through all the loops. This can feel a bit snug, especially at the beginning—just point your hook down and gently pull. Finish by making a chain 1 to lock the puff stitch in place. Congrats, you made a petal!
- Build More Petals (Regular Puffs):
- Chain 3.
- Work a Regular Puff Stitch (yarn over and pull up a loop 5 times) into the same center ring. Chain 1 to lock it.
- Repeat this twice more (Chain 3, Regular Puff, Chain 1).
- You should now have a little half-flower with 4 petals: your beginning puff and three regular puffs, all separated by chain-3 spaces.
- Create the Next Half-Flower: To start the next flower in the row, chain 10. Repeat the process: skip 5 chains, slip stitch into the next 3, pop your hook through the next chain along, and then work another 4-petal half-flower just like the first one.
Continue adding these half-flowers for the desired width of your blanket. For our sample, let’s say we make 5 half-flowers.
Row 2: The First Bloom (The Return Trip)
Now we turn around and complete the flowers. This is where the magic starts to take shape!
- Complete the End Flower: You’re at the end of your row of half-flowers. To make it a full, 6-petal flower, simply chain 3 and work a regular puff stitch back into that same center ring. Chain 3 again, and work one final puff stitch into the ring. You now have a full flower with 6 petals!
- Join and Move On: Now, we’ll connect to the next flower. Chain 3. See the little chain space between your two flower motifs? Single crochet right around that space to anchor it. Chain 3 again.
- Complete the Next Flower: Move to the next half-flower in your row. Work two more puff stitches into its center (separated by a chain 3, of course) to bring its petal count up to 6.
- Repeat! Continue this pattern all the way back to the start: [Chain 3, Single Crochet in the join, Chain 3], then [Puff, Chain 3, Puff] into the next flower.
- Finishing the Row: When you’ve completed the very first flower you started, chain 3 and slip stitch to the top of that very first beginning puff stitch to close the round. Fasten off.
Take a moment to admire your work! You have a beautiful, complete row of puffy flowers. It’s no longer just a weird string of half-blooms; it’s a foundation. This is the moment I knew this pattern and I were going to be best friends. It felt a bit messy and chaotic, but then with one simple return pass, everything clicked into a perfect, neat row. It’s one of the most satisfying “frogging-free” feelings in crochet!
If you’re loving the join-as-you-go method, you might also enjoy our Seamless JAYG Granny Square Cardigan pattern!
Rows 3 & 4: The Inset Row (Building the Valleys)
Now, grab your next color! We’re going to create a new row of flowers that nestles perfectly into the “valleys” of the first row. This row will have one fewer flower than your first row.
- Row 3 (The Half-Flowers): This is very similar to Row 1, but with a joining step.
- Start a new half-flower with a new color, exactly like before (Chain 9, create ring, work a Beginning Puff and one Regular Puff). So you have two petals.
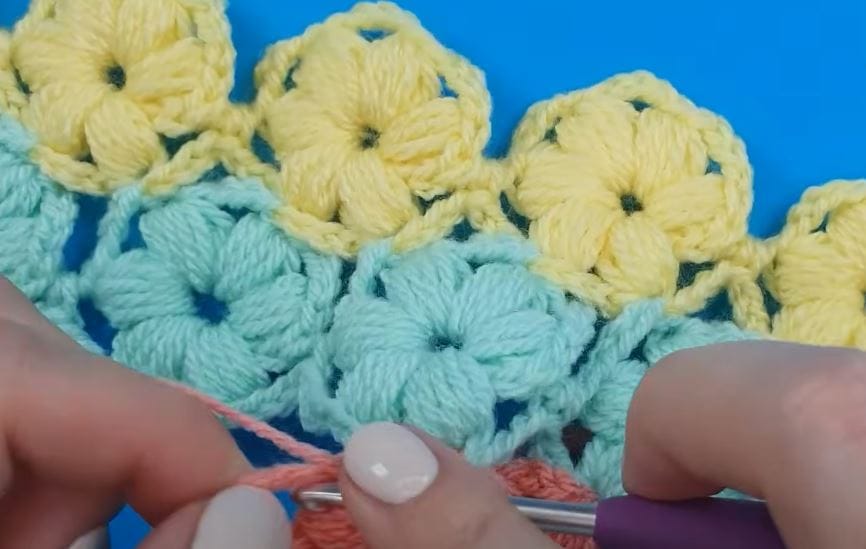
- Time to Connect: Pause. Bring your first row of flowers close. We’re going to join into the dips. Find the first “valley” on your yellow row. You’ll see two top petals on adjacent flowers. We’ll join to these.
- Take the loop off your hook. Insert your hook into the top of the petal to the left of the valley. Put the loop back on your hook and pull it through.
- Chain 3. Work another puff back into your new flower’s center.
- Connect Again: Repeat the joining process, this time connecting to the petal on the right side of the valley.
- Chain 3, and work your fourth and final puff into the new flower’s center. You now have a 4-petal half-flower that is connected on both sides to the row below.
- To start the next flower in this row, chain 10 and repeat the process, working a half-flower and joining it into the next valley.
- Row 4 (The Return Bloom): This is an exact repeat of Row 2! Work your way back, adding two more petals to each flower and connecting them with a [Chain 3, SC, Chain 3] in the joins.
Choosing colors is half the fun! For some yarn-spiration, check out our guide to Creating a Modern Crochet Color Palette.
Rows 5 & 6: The Outset Row (Back to Full Width)
Time for your third color! This row will align with your very first row, bringing your blanket back to its full width (5 flowers in our case). The process is nearly identical to the inset row, with one tiny change in where you start.
- Row 5 (The Half-Flowers):
- With your new color, start a new flower, but this time work three petals before you join (Beginning Puff, ch-3, Regular Puff, ch-3, Regular Puff).
- The Join: Instead of joining to the petals right next to the valley, you’ll join to the outermost petal on the end of the previous row. This makes your new flower stick out, aligning with Row 1.
- Pull the loop through, chain 3, and work your fourth puff back in the center.
- The rest of the row is worked exactly like Row 3—chaining 10 and creating new flowers in the valleys.
- At the very end of the row, you’ll add one final, unattached half-flower to bring the row back to its full width.
- Row 6 (The Return Bloom): You guessed it! A perfect repeat of Row 2 and Row 4. Fill in your flowers and work your way back to the start.
Once your blanket is done, you’ll want it to look its best. Learn all the secrets in our post on How to Block Your Crochet Projects for a Professional Finish.
The Rhythm of the Blanket
You’ve done it! You’ve learned the entire repeat. From here on out, you just continue alternating between the inset rows (like 3 & 4) and the outset rows (like 5 & 6) until your blanket is the dreamy, meadow-like size you want it to be.
Repeat Rows 3, 4, 5, and 6 over and over, changing colors as you please.
This puff flower crochet blanket is more than a project; it’s a practice in patience and a testament to the beautiful things we can create one stitch at a time. It’s a journey that starts with a bit of confusion and ends in a stunning, cozy masterpiece that you’ll cherish forever.
So, did you try it? Are you diving into your own field of yarn flowers? Drop a comment below and tell me what colors you’re using! I can’t wait to see your yarn-spirations come to life.