
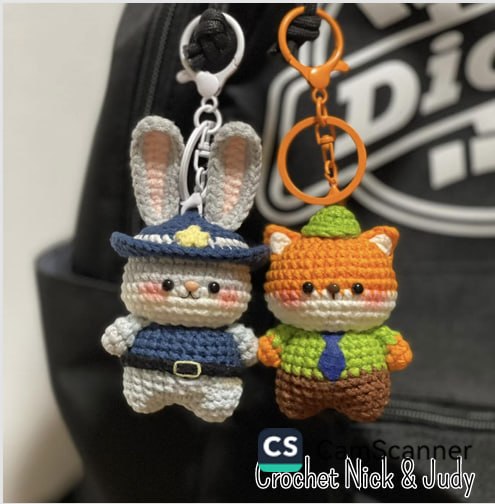
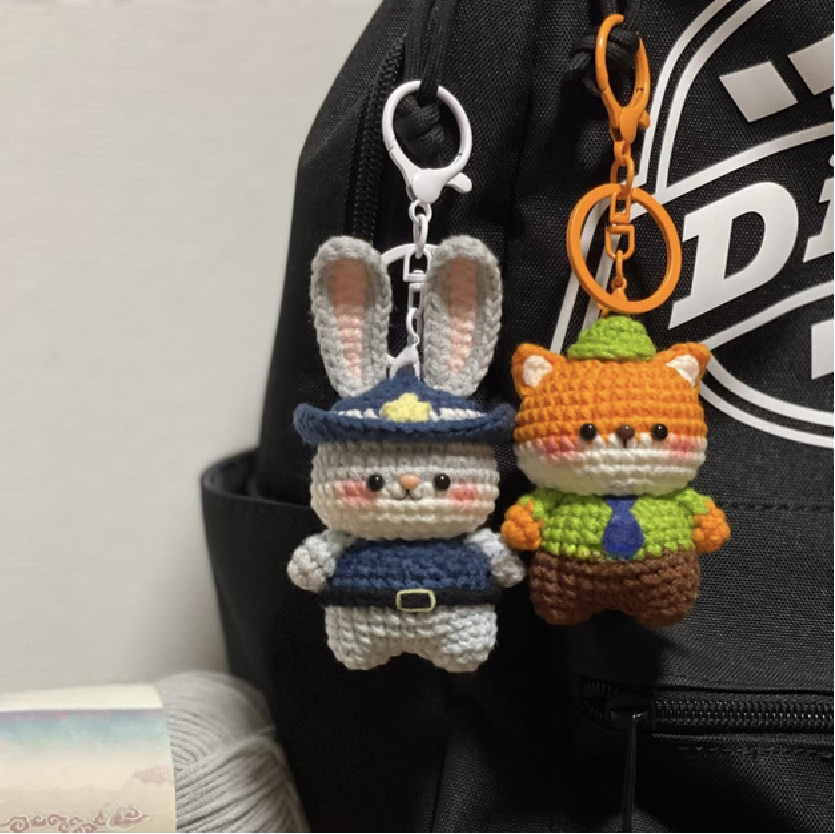
Zootopia’s Nick & Judy Amigurumi Pattern
Hi there! Thank you so much for choosing our crochet designs! Each pattern is made with love to bring a little extra joy to your crafting journey.
If you run into any problems, please don’t hesitate to send us a message on Etsy—we’re always ready to assist and support you. Wishing you lots of fun and creativity with your crochet project!
Here are some instructions and details that will help you before you start working on the pattern.

Materials
- 4-ply milk cotton yarn (in appropriate colors for Nick & Judy)
- 2.5 mm crochet hook
- Eyes size: 3 mm
- Nose size: 3.5 mm
- Tapestry needle
- Scissors
- Stitch markers
- Fabric glue (or hot glue)
- Peach pink powder (or blush)
- Black felt for Nick’s tie
- Yellow yarn for Judy’s belt buckle
- Optional: Thin wire for Judy’s ears if extra firmness is desired
- Optional: 1.5mm crochet hook and split yarn for mini star and inner ears
Abbreviations (US Terminology)
- ch: chain
- sc: single crochet
- sl st: slip stitch
- dec: decrease (sc2tog – single crochet 2 together)
- inc: increase (2 sc in one stitch)
- dc: double crochet
- hdc: half double crochet
- sc3tog: single crochet 3 stitches together
- pop: popcorn stitch
- BLO: Back Loop Only
- FLO: Front Loop Only
- sk: skip
- MR: magic ring
- FO: fasten off
- R: round
- [ ] : indicate the number of stitches you should have after each round.
- tr: treble crochet

Important Notes:
- It is highly recommended to use a stitch marker to mark the first stitch of each round to avoid getting lost.
- This pattern is intended for personal use only. Distribution or sharing of the pattern on social media or other platforms is prohibited.
- I always try to make my patterns as perfect as possible, but please let me know if anything is unclear or if you encounter any mistakes. You can reach me via Etsy’s message.
Well, this should be a good start for your project! Good luck with your project!
~ Angelanewco
Pattern Instructions (Applies to both Judy and Nick)
Head
- R1: MR 6 sc [6]
- R2: 6 inc [12]
- R3: (1 sc, 1 inc) x6 [18]
- R4: (1 sc, 1 inc, 1 sc) x6 [24]
- R5: (3 sc, 1 inc) x6 [30]
- R6: 30 sc [30]
- R7: (2 sc, 1 inc, 2 sc) x6 [36]
- R8-R9: 36 sc [36]
- Color Change (White Yarn)
- R10-R11: 36 sc [36]
- R12: (2 sc, 1 dec, 2 sc) x6 [30]
- R13: (3 sc, 1 dec) x6 [24]
- R14: (1 sc, 1 dec, 1 sc) x6 [18]
Leave a long tail for sewing, fasten off.
Arms (Make 2)
- R1: MR 6 sc [6]
- R2: 6 sc [6]
- Change color
- R3-R4: 6 sc [6]
Leave a long tail for sewing, fasten off.
Legs (Make 2) + Body
- R1: MR 6 sc [6]
- R2: (1 sc, 1 inc) x3 [9]
After completing one leg, cut the yarn. Repeat R1-2 for the second leg.
Do not cut yarn after the second leg. Chain 3 to connect both legs.

- R3: 9 sc (around first leg), 3 sc (across chain), 9 sc (around second leg), 3 sc (across chain) [24]
- R4-R6: 24 sc [24]
- Change color
- R7-R10: 24 sc [24]
- R11: (2 sc, 1 dec) x6 [18]
Cut the yarn, fasten off.
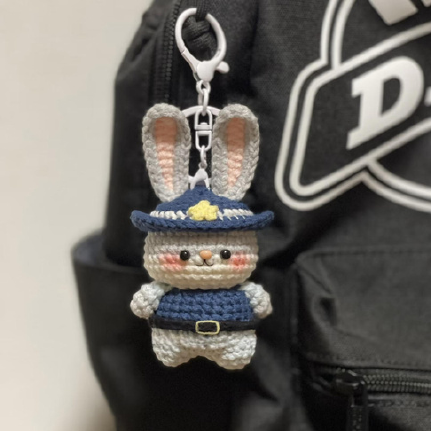
Nick’s Accessories & Assembly
Nick’s Hat (Green Yarn)
- R1: MR 6 sc [6]
- R2: 6 inc [12]
- R3: 12 sc [12]
- R4: BLO: 6 hdc, sl st (into the next stitch, not a chain)
Cut the yarn, fasten off.
Nick’s Ears (Make 2)
Outer Ear (Orange Yarn)
Chain 4. Starting from the 2nd chain from the hook:
- 1 sc
- 1 hdc
- 1 dc
Inner Ear (White Yarn)
Split the yarn into 2 plies and use a 1.5mm crochet hook.
Chain 4. Starting from the 2nd chain from the hook:
- 1 sc
- 1 hdc
- 1 dc
Nick’s Assembly
- Insert the eyes between R9-R10 of the head, leaving 4 stitches between them.
- Add the nose between the eyes.
- Use black thread to embroider a small vertical line beneath the nose to create his snout detail.
- Attach the white inner ears to the orange outer ears, then sew the assembled ears onto R4-R6 of the head.
- Use fabric glue or sew the hat onto the head. Lightly stuff the hat with a bit of fiberfill.
- Cut a tie shape out of black felt and attach it to Nick’s neck.
- Add some peach pink powder or blush to the cheeks for a touch of color.
Judy’s Accessories & Assembly
Judy’s Ears (Make 2)
- R1 (Pink Yarn): Chain 13. Crochet from the third chain from the hook: 1 tr, 4 dc, 3 hdc, 2 sc, 1 sl st.
- R2 (Gray Yarn): Make slip stitches all the way around the edge of the ear.
Belt (Black Yarn)
Chain 30. Join the beginning and end with a slip stitch to form a ring.
Judy’s Hat (Dark Blue and Aqua Yarn)
- R1 (Dark Blue): MR 6 sc [6]
- R2: 6 inc [12]
- R3: (sc, inc) x 2, 2 ch, skip 2, sc, inc, 2 sc, 2 ch, skip 2 [15 stitches (excluding chains)]
- R4: (sc, inc, sc) x 5 [20]
- R5: (3 sc, inc) x 5 [25]
- R6: (2 sc, inc, 2 sc) x 5 [30]
- R7 (Switch to Aqua Yarn): (5 sc, inc) x 5 [35]
- R8 (Dark Blue Yarn): 35 sc [35]
- R9: 15 sc, dc, dc inc, dc inc, dc inc, dc, 9 hdc, dc, dc inc, dc inc, dc inc, dc, sc.
Cut the yarn, fasten off.
Mini Star (Yellow Yarn)
Split the yarn into 2 plies and use a 1.5mm crochet hook.
- R1: MR 5 sc [5]
- R2: (Chain 3, starting from 2nd chain from hook: sc, hdc, then sl st into the same magic ring stitch) x 5 times.
Cut the yarn, fasten off.
Judy’s Assembly
- Insert the eyes between R9-R10 of the head, leaving 4 stitches between them.
- Add the nose between the eyes.
- Use black yarn to embroider two small curved lines just below the nose to form the mouth.
- Sew the ears onto R2-R3 of the head. If the ears are too soft, you can insert thin wire while crocheting R2 of the ears for stability.
- Attach the mini star to the hat and place the hat on Judy’s head.
- Put the belt on Judy’s body, and use yellow yarn to embroider a small rectangle on the belt as a buckle. You can use glue to secure it more firmly.
- Apply a bit of pink blush to the cheeks for a touch of color.
If you are satisfied with this pattern, please rate it 5 stars. That will be a great motivation for me.
If you encounter any problems, please contact me via my Etsy account.
Thank you for your order!
~ Angelanewco
“`