Crochet Christmas Tree Keychain Pattern
Crochet Christmas Tree Keychain Pattern
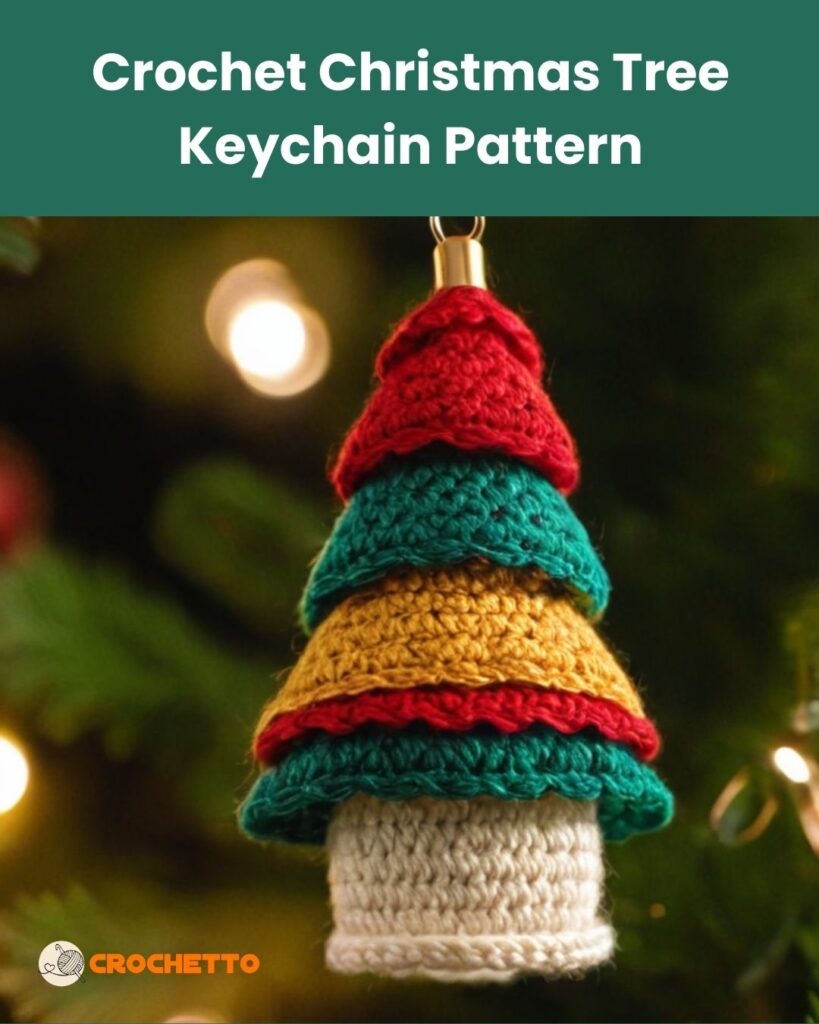
Looking for a quick, fun, and festive crochet project? This adorable Christmas tree ornament is perfect for bringing holiday cheer to your home or gifting to loved ones! With its vibrant layers of red, green, and yellow, topped off with a creamy white trunk, this little tree captures the spirit of the season beautifully. The scalloped edges give it a charming, textured look, making it a standout decoration for your tree, gifts, or even as a keychain.
Whether you’re an intermediate crocheter or an adventurous beginner ready for a challenge, this project is as rewarding as it is fun. Follow the detailed instructions below to create your very own crochet Christmas tree ornament that’s sure to spread joy and spark compliments. Let’s get started! 🎄✨
Skill Level: Intermediate
Finished Size: Approx. 4 inches tall, 2 inches wide (at the bottom layer)
Materials Needed
- Yarn:
- Bright crimson red (Top layer)
- Teal green (Middle layer)
- Mustard yellow (Lower layer)
- Creamy off-white (Trunk)
- Hook: Size 3.5 mm (E-4) crochet hook
- Keychain hardware: Gold-toned with a clasp
- Stuffing: Fiberfill or yarn scraps for trunk (optional, if desired)
- Tapestry needle: For weaving in ends
- Scissors
Abbreviations (US Terminology)
- ch: Chain
- sc: Single crochet
- sl st: Slip stitch
- dc: Double crochet
- st(s): Stitch(es)
- shell: 5 dc in the same stitch
- inc: Increase (2 sc in one stitch)
- dec: Decrease (sc 2 together)
Pattern Instructions

Tree Layers
Each layer is worked separately in the round and attached as you go.
Top Layer (Red)
Middle Layer (Green)
- Start with a Magic Ring.
- Round 1: Ch 2. Work 6 dc into the ring. Sl st to close. (6 dc)
- Round 2: Ch 2. (dc in next st, 2 dc in the next st) repeat around. Sl st to close. (9 dc)
- Round 3: Ch 2. (dc in next 2 sts, 2 dc in next st) repeat around. Sl st to close. (12 dc)
- Round 4: Ch 2. (dc in next 3 sts, 2 dc in next st) repeat around. Sl st to close. (15 dc)
- Edging: Ch 1. Work a shell (5 dc) in every 3rd stitch around to create the scalloped edges. Sl st to close. Fasten off and leave a tail for sewing.
Lower Layer (Yellow)
- Start with a Magic Ring.
- Round 1: Ch 2. Work 6 dc into the ring. Sl st to close. (6 dc)
- Round 2: Ch 2. (dc in next st, 2 dc in the next st) repeat around. Sl st to close. (9 dc)
- Round 3: Ch 2. (dc in next 2 sts, 2 dc in next st) repeat around. Sl st to close. (12 dc)
- Round 4: Ch 2. (dc in next 3 sts, 2 dc in next st) repeat around. Sl st to close. (15 dc)
- Round 5: Ch 2. (dc in next 4 sts, 2 dc in next st) repeat around. Sl st to close. (18 dc)
- Edging: Ch 1. Work a shell (5 dc) in every 3rd stitch around to create the scalloped edges. Sl st to close. Fasten off and leave a tail for sewing.
Trunk (Off-White)
- Ch 10 and join with a sl st to form a ring.
- Round 1: Ch 1. Sc in each stitch around. (10 sc)
- Rounds 2-5: Sc in each stitch around. (10 sc)
- Round 6: (Sc in next 2 sts, dec) repeat around. (7 sc)
- Stuff with fiberfill or yarn scraps (optional).
- Round 7: (Sc in every st). Sl st to close and fasten off, leaving a long tail for sewing.
Assembly
- Layer the Tree Sections:
- Position the red (top) layer above the green (middle) layer, followed by the yellow (bottom) layer.
- Use the tails to sew each layer to the one below it, aligning them so the scalloped edges overlap slightly.
- Attach the Trunk:
- Sew the trunk to the bottom of the yellow layer using the long tail.
- Ensure the trunk is centered and secure.
Keychain Attachment
- Thread the keychain hardware through the top of the red layer (use a tapestry needle if necessary).
- Secure tightly, ensuring the ornament hangs evenly.
Finishing
- Weave in all loose ends using a tapestry needle.
- Block the layers lightly if needed to maintain shape.
Enjoy your festive crochet Christmas tree ornament! Perfect for gifts, decor, or as a charming accessory. 🎄


