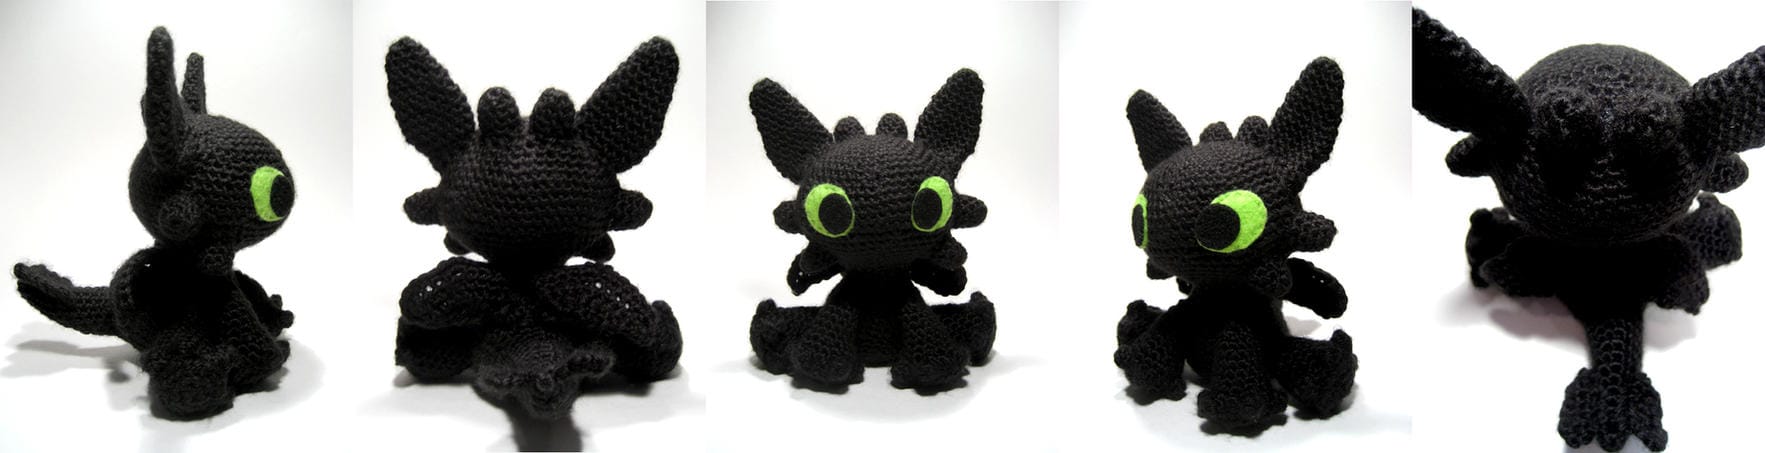
Craft Your Own Dragon: A Detailed toothless crochet pattern
Unleash your inner dragon trainer with this comprehensive amigurumi pattern to crochet your very own adorable “Toothless”! This guide provides all the instructions you need to bring this beloved character to life, from his sleek body and expressive head to his iconic wings and charming tail fins. Get ready to crochet a legendary companion!
Materials You’ll Need
To embark on your Toothless amigurumi adventure, gather the following supplies:
- Yarn: Worsted weight yarn (approximately 1 skein of Vanna’s Choice yarn or similar).
- Crochet Hook: Size F (3.75 mm).
- Stuffing: Polyester fiberfill.
- Felt: Black, green, and yellow acrylic felt (small sheets).
- Fabric Glue: Strong fabric adhesive (e.g., Fabri-tac).
- Scissors: Small, precise scissors for cutting felt.
- Optional: Long knitting needle or skewer for head/body assembly.
Important Pattern Notes
Before you begin, please note the following:
- “inc 2” Instruction: When the pattern states “inc 2” (e.g., in the Head section, R12), it means to single crochet 3 into the same single crochet (sc). This effectively increases your stitch count by two stitches in that single stitch, rather than the usual one.
- Stitch Abbreviations:
- MR: Magic Ring
- sc: Single Crochet (US)
- inc 1: Single crochet 2 into the next single crochet (standard increase)
- dec 1: Single crochet 2 together (standard decrease)
- HDC: Half Double Crochet (US)
- BLO: Back Loop Only
- ch: Chain
- st(s): Stitch(es)
- ss: Slip Stitch
- Numbers in parentheses
()at the end of a round indicate the total stitch count for that round.
Crochet the Body (Starting from the Bottom Up)
Craft the core of your Toothless with these body instructions. Remember to stuff firmly as you go!
- R1: MR (6)
- R2: Sc 2 in each sc around (12)
- R3: (Sc 1, inc 1) 6 times around (18)
- R4: (Sc 2, inc 1) 6 times around (24)
- R5: (Sc 3, inc 1) 6 times around (30)
- R6: (Sc 4, inc 1) 6 times around (36)
- R7-8: Sc around (36)
- R9: Sc 12, dec 6, sc 12 (This creates the shaping for Toothless’s distinctive “butt”) (30)
- R10: Sc around (30)
- R11: (Sc 3, dec 1) 6 times around (24)
- R12-13: Sc around (24)
- R14: (Sc 4, dec 1) 4 times around (20)
- R15: Sc around (20)
- R16: (Sc 3, dec 1) 4 times around (16)
Fasten off. You won’t need a long tail for sewing the body. Stuff the body firmly.
Crochet the Head (Creating Toothless’s Expressive Face)
The head is where Toothless’s personality truly shines! Pay attention to the shaping instructions.
- R1: MR (6)
- R2: Sc 2 in each sc around (12)
- R3: (Sc 1, inc 1) 6 times around (18)
- R4: (Sc 2, inc 1) 6 times around (24)
- R5: (Sc 3, inc 1) 6 times around (30)
- R6: (Sc 4, inc 1) 6 times around (36)
- R7: Sc around (36)
- R8: (Sc 5, inc 1) 6 times around (42)
- R9: (Sc 6, inc 1) 6 times around (48)
- R10-11: Sc around (48)
- R12: Sc 23, inc 2 in next 2 sc (refer to “inc 2” note above), sc 23 (52)
- R13: Sc around (52)
- R14: Sc 25, inc regularly in the next 2 sc, sc 25 (54)
- R15: (Sc 7, dec 1) 6 times around (48)
- R16: (Sc 6, dec 1) 6 times around (42)
- R17: (Sc 5, dec 1) 6 times around (36)
- R18: (Sc 4, dec 1) 6 times around (30)
- R19: (Sc 3, dec 1) 6 times around (24)
- R20: (Sc 4, dec 1) 4 times around (20)
- R21: (Sc 3, dec 1) 4 times around (16)
- R22: Sc around (16)
Fasten off, leaving a long tail for sewing. Stuff the head, paying close attention to shaping. The increases in R12 and R14 create a slight point for the snout. You’ll need to manipulate the stuffing to achieve this shape, often putting more stuffing in the back of the head, less in the front, but enough in the snout point to define it.
Assembly Tip: It’s often easiest to sew the head and body together at this stage. To help keep the neck thin and stable, insert a long knitting needle or skewer from the head down through the body while sewing.
Crafting the Legs (Front and Back) and Toes
Toothless’s formidable claws start with these leg pieces!
Toe Instructions:
To create a toe (marked with * below):
HDC 5 in the same stitch. Once you’ve completed the fifth HDC, remove your hook from the loop, gently loosen the loop, then reinsert your hook into the first HDC of the group. Grab the dropped loop and pull it through the first HDC, like a slip stitch. Continue your round from there.
Front Legs (Make 2):
- R1: MR (6)
- R2: Sc 2 in each sc around (12)
- R3: (Sc 1, inc 1) 6 times around (18)
- R4: In BLO (except for the toes), sc 4, (Make toe*, sc 2) until you have 4 toes with 2 sc’s between each, sc 4 (18)
- R5: Sc around (18). Note: The toes can obscure stitches, especially the one just before the toe. If you have trouble seeing it, pull the toe to the left to reveal the stitch.
- R6: (Sc 7, dec 1) 2 times around (16)
- R7: Sc around (16)
- R8: (Sc 6, dec 1) 2 times around (14)
- R9: (Sc 5, dec 1) 2 times around (12)
- R10-12: Sc around (12)
- R13: (Sc 4, dec 1) 2 times around (10)
Fasten off and leave a long tail for sewing.
Back Legs (Make 2):
- R1: MR (6)
- R2: Sc 2 in each sc around (12)
- R3: (Sc 1, inc 1) 6 times around (18)
- R4: In BLO (except for the toes), sc 4, (Make toe*, sc 2) until you have 4 toes with 2 sc’s between each, sc 4 (18)
- R5: Sc around (18)
- R6: (Sc 7, dec 1) 2 times around (16)
- R7: Sc around (16)
- R8: (Sc 6, dec 1) 2 times around (14)
- R9-10: Sc around (14)
Fasten off and leave a long tail for sewing.
Assembly Tips for Legs:
- It’s generally easier to sew the back legs onto the body before the front legs.
- When stuffing the front legs, only stuff the bottoms, leaving very little stuffing at the top. This allows the legs to sit flatter against Toothless’s body.
- When attaching the back legs, sew all the way around their circumference. For the front legs, squish the opening flat and sew the ends together as you attach them to the body; this helps them lie flatter.
Ears and Mini-Horns (Adding Character)
These small details give Toothless his unique charm!
Ears (Make 2):
- R1: MR (6)
- R2: Sc 2 in each sc around (12)
- R3-4: Sc around (12)
- R5: (Sc 2, inc 1) 4 times around (16)
- R6-7: Sc around (16)
- R8: (Sc 3, inc 1) 4 times around (20)
- R9-14: Sc around (20)
- R15: (Sc 3, dec 1) 4 times around (16)
- R16-17: Sc around (16)
Fasten off and leave a tail for sewing. Do not stuff the ears; flatten them before sewing onto the head.
Mini-Horns (Make 6):
- R1: MR (6)
- R2: (Sc 1, inc 1) 3 times around (9)
- R3-5: Sc around (9)
Fasten off and leave a tail for sewing. Attach two horns between the ears on the top of the head, and two horns on each side of the head.
Tail and Wings (The Signature Dragon Features)
Give Toothless his iconic flight capabilities!
Tail:
For the tail, refer to the instructions provided at: http://mygurumi.blogspot.com/2009/08/only-to-show-you-im-still-here-post.html. The designer typically stops at Round 15, but you can adjust the length to your preference.
Wings (Courtesy of Stitch Bitch):
- Ch 6, work sc in 2nd ch from hook and the one after it, sc 3 in next ch, sc 1 in each of the next 2 chs; ch 1 and turn (7 sc)
- Sc in first 3 sts, 3 sc in next st, sc in next 3 sts; ch 1 and turn (9 sc)
- Sc in first 4 sts, 3 sc in next st, sc in next 4 sts; ch 4 and turn (11 sc)
- Sc in 2nd ch from hook and next 2 chs, sc in next 5 sts, 3sc in next st, sc in next 5 sts, 3 foundation sc; ch 1, and turn (19 sc)
- Sc in next 9 sts, 3 sc in next st, sc in next 9 sts; fasten off (21 sc)
Tailfins (Adding the Final Touch)
Complete Toothless’s tail with these two sets of fins.
Tailfins Set A (Base of Tail, Near Body – Make 2):
Attach these two fins to the centerline of the tail, close to the body.
- Ch 5, work sc in 2nd ch from hook, sc 3 in next ch, ss to last ch and fasten off.
Tailfins Set B (End of Tail – Make 2):
Make two black fins, or one black and one red (the red fin goes on the left side of the tail when the tail is facing you).
- Row 1: Ch 5, work sc in 2nd ch from hook, sc in next 2 ch, inc in last ch; ch 1 and turn (5sc)
- Row 2: Sc in first 3sc, sc2tog in last 2 sc. ch 1 and turn. (4sc)
- Row 3: Sc in first 2sc, sc 3 in next sc, ss (slip stitch) to last sc. Place 2 more ss through ends of previous rows to form the curved shape at the end of the fin. Fasten off and attach to tail.
Crafting the Eyes (Bringing Toothless to Life)
Toothless’s striking green eyes are a key feature!
Materials for Eyes:
- Acrylic Craft Felt: Small sheets of black, green, and yellow (easily found in the kids’ craft section of stores like Michaels, Jo-Ann’s, or AC Moore). These are inexpensive and readily available.
- Fabric Glue: Fabri-tac glue is recommended as it dries quickly and permanently.
Cutting and Attaching the Eyes:
- Prepare Templates: You can either right-click and save the eye template image provided at the top of the original pattern (it should print to the correct scale), or simply draw the general shapes yourself.
- Cut the Felt:
- For the main eye shape (green/yellow), fold the felt sheet in half and cut out a general shape that’s slightly larger than your desired final eye. Folding it ensures you get two pieces that are roughly the same shape. You can then trim and refine the edges to make them cleaner and more precise.
- Repeat this process for the pupils (black felt).
- Adhere the Eyes: Due to the bumpy texture of crochet, fabric glue is recommended over sewing for applying the eyes. This helps the eye shape remain consistent. Apply Fabri-tac glue carefully, as it dries quickly and is permanent.
You’ve now completed your Toothless amigurumi! Enjoy your new dragon companion and share your creation with the crochet community!