Astronaut Amigurumi
Let’s get ready to crochet your very own space-faring friend! This detailed guide will walk you through crafting an adorable astronaut amigurumi, perfect for collectors, as a thoughtful gift, or simply to brighten your space. Designed for intermediate crocheters, this project offers a rewarding challenge and a chance to expand your skills.


Blast Off Prep: What You’ll Need
Before we dive into the exciting world of stitches, let’s make sure your crafting station is fully equipped. Having all your materials ready will make for a smooth and enjoyable crocheting experience.
- Yarn: The foundation of your amigurumi.
- Cotton Yarn (Weight unspecified, but typically worsted weight for amigurumi): Cotton yarn is a fantastic choice for amigurumi due to its durability, stitch definition, and minimal stretch, which helps keep stuffing securely inside.
- Colors:
- White: Essential for the helmet’s outer shell, arms, and parts of the legs/body and backpack.
- Blue: The core color for the inner helmet.
- Grey: For the distinct ear covers.
- Red: A vibrant accent for the leg and chest pad details.
- Yellow: Another pop of color for the chest pad.
- Crochet Hook:
- G6 / 4.00 mm: This size is ideal for achieving the tight stitches necessary for amigurumi, ensuring your stuffing doesn’t peek through and your astronaut holds its shape.
- Stuffing:
- Polyfill (Fiberfill): The fluffy magic that brings your astronaut to life! Make sure you have enough to firmly stuff all the components.
- Darning Needle (or Tapestry Needle): Your indispensable tool for weaving in ends, assembling pieces, and adding those crucial embroidered details. A blunt tip works best to prevent splitting yarn.
Decoding the Cosmos: Crochet Abbreviations
Crochet patterns speak their own language through abbreviations. If you’re not yet fluent, here’s a quick guide to the terms you’ll encounter in this pattern:
- ch: Chain Stitch – The starting point for many projects, forming a flexible base chain.
- st: Stitch – A general term referring to any single crochet stitch or loop on your hook.
- slst: Slip Stitch – Used to join rounds, move yarn without adding height, or subtly finish off a piece.
- sc: Single Crochet – A fundamental stitch that creates a dense fabric, perfect for amigurumi.
- inc: Increase – Making two stitches into one stitch, which expands the fabric and creates shaping.
- invdec: Invisible Decrease – A technique to combine two stitches into one while minimizing the visual bulk, resulting in a cleaner decrease line, essential for smooth amigurumi shaping.
- FLO/BLO: Front / Back Loops Only – Instructions to work only into the front or back loop of a stitch, creating a distinct texture or ridge.
- bo: Bobble Stitch (4-dc bobble) – A textured stitch created by working multiple double crochet stitches into the same stitch and then drawing all loops together. (A full video tutorial is linked for this special stitch!)
- yo: Yarn Over – A step in creating most crochet stitches, where you wrap the yarn around your hook.
Navigating Your Mission: Useful Information & Tutorials
Here are some insights and resources to help you along your crocheting journey:
- Gauge: 5 Rounds and 4 stitches per 1 inch.
- Gauge refers to the density of your stitches. While not always critical for amigurumi, it ensures your finished project matches the intended size. If your stitches are much tighter or looser, your astronaut might turn out smaller or larger.
- Finished Size: Approximately 5 inches tall.
- A compact and adorable size, perfect for display or gentle play.
- Worked: In the Round (without turning).
- This means you’ll be crocheting in a continuous spiral, typically without joining at the end of each round. This creates a seamless look ideal for amigurumi. Using a stitch marker to mark the first stitch of each round is highly recommended to keep track of your place.
- Useful Tutorials:
- Chapter 10 (Part 5): Sewing Together: This tutorial will be invaluable when it’s time to assemble all your crocheted pieces into the final astronaut. Amigurumi assembly can be challenging, so a good guide is key.
- The Bobble Stitch – Season 5: This specific tutorial will walk you through creating the bobble stitch for the arms, ensuring your astronaut’s “hands” have the right texture.
The Grand Blueprint: The Pattern
Alright, recruit! It’s time to follow the pattern and bring your astronaut to life. The pattern is broken down into individual components, and remember, the time codes often refer to a corresponding video tutorial if you need visual guidance. Use the checkboxes provided in the original pattern to track your progress – it’s incredibly satisfying to tick them off!
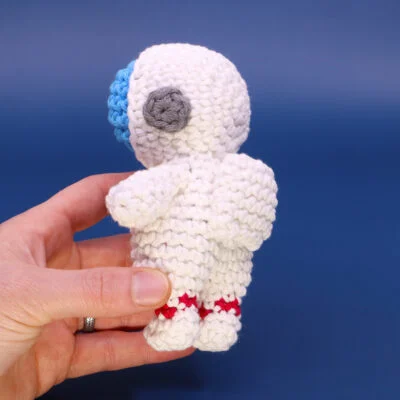
Section 1: Space Helmet – Part A (The Inner Helmet)
This blue component forms the inner layer of the astronaut’s iconic helmet.
Color: All in Blue
- (04:28) Magic Loop: Begin with a magic loop (also known as a magic ring or adjustable ring). This creates a tight, closed center, crucial for preventing holes in your amigurumi.
- Rnd 1: Single crochet (sc) 6 into the magic loop. (6 stitches)
- Rnd 2: Increase (inc) in each stitch. (12 stitches)
- Rnd 3: 6 times. (18 stitches)
- Rnd 4: 6 times. (24 stitches)
- Note: This is equivalent to around for 6 times.
- Rnds 5 – 8: Single crochet (sc) in each stitch. (24 stitches for 4 rounds)
- These rounds create the height of the helmet’s main section.
- Rnd 9: 6 times. (18 stitches)
- Using the invisible decrease here helps maintain a smooth curve as you shape the helmet.
- Rnd 10: 6 times. (12 stitches)
- Stuff mostly. At this stage, begin to stuff Part A. You want it firm but still pliable enough for the final shaping and closure.
- Rnd 11: Invisible decrease (invdec) in each stitch. (6 stitches)
- Cut the yarn and pull through. This fastens off your work.
- Stuff fully and sew closed. Add any remaining stuffing to ensure the helmet is firm and well-shaped. Then, use your darning needle to weave the yarn tail through the remaining 6 stitches and pull tight to close the hole. Secure the end.
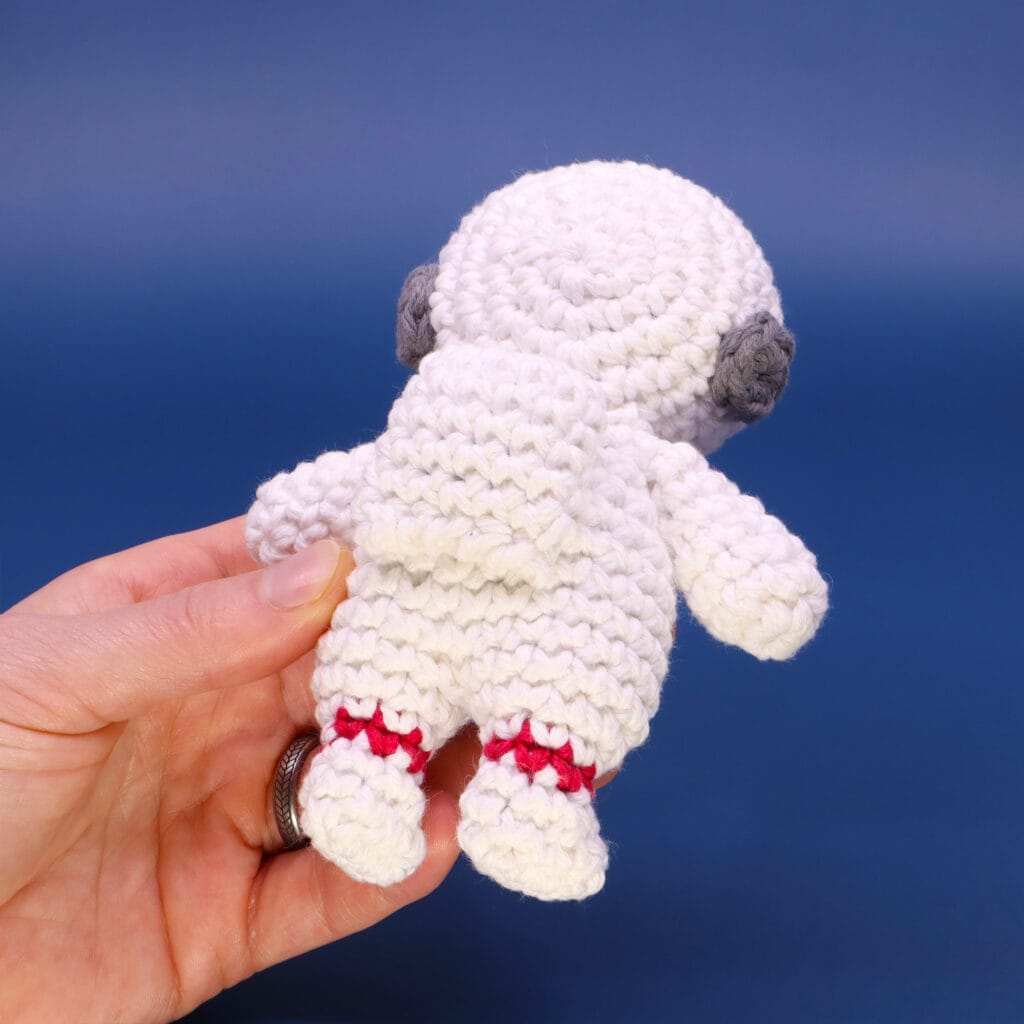
Section 2: Space Helmet – Part B (The Outer Helmet)
This white component forms the visible outer shell of the helmet, which will fit over Part A.
Color: All in White
- (29:30) Magic Loop: Begin with a magic loop.
- Rnd 1: Single crochet (sc) 6 into the magic loop. (6 stitches)
- Rnd 2: Increase (inc) in each stitch. (12 stitches)
- Rnd 3: 6 times. (18 stitches)
- Rnd 4: 6 times. (24 stitches)
- Rnds 5 – 9: Single crochet (sc) in each stitch. (24 stitches for 5 rounds)
- Cut leaving a long tail for sewing and use the Hidden End method. This technique helps create a clean, invisible finish.
- Insert Part A into Part B (with the rounds going horizontally). Gently push the blue inner helmet (Part A) into the white outer helmet (Part B). The wider parts of both pieces should align.
- Weave through a few times to secure it in place. Use the long tail from Part B to make a few stitches that connect Part A and Part B, preventing the inner helmet from shifting.
- With the remaining yarn tail, embroider a shiny highlight on the upper right-hand corner of the helmet. This adds a realistic touch to the helmet’s visor. A simple straight stitch or two will suffice.
Section 3: Ear Covers (Make 2)
These grey circular pieces will adorn the sides of your astronaut’s helmet.
Color: All in Grey
- (37:25) Magic Loop: Begin with a magic loop.
- Rnd 1: Single crochet (sc) 6 into the magic loop. (6 stitches)
- Leave a long tail for sewing and use the Hidden End. Do not stuff these small pieces.
- Sew each ear cover onto the sides of the head, 1 Round away from the edge. Position them symmetrically on either side of the helmet, using the long tail and your darning needle to stitch them securely.
Section 4: Arms (Make 2)
These white arms feature a special bobble stitch for a distinctive “glove” or “hand” appearance.
Color: All in White
- (42:45) Magic Loop: Begin with a magic loop.
- Rnd 1: Single crochet (sc) 6 into the magic loop. (6 stitches)
- Rnd 2: 2 times. (8 stitches)
- Rnd 3: Single crochet (sc) in each stitch. (8 stitches)
- Rnd 4: Bobble Stitch (bo), sc 7. (8 stitches)
- Remember the bobble stitch instructions: Yarn over, insert hook into stitch, yarn over, draw loop back through stitch, yarn over and pull through 2 loops. Repeat this 3 more times until you have 5 loops on your hook. Yarn over and pull through all 5 loops. Be sure to push the bobbles facing outwards as you create them, so they pop out on the right side of your work. Refer to the full video tutorial if needed!
- Rnd 5: 2 times. (6 stitches)
- Rnds 6 – 7: Single crochet (sc) in each stitch. (6 stitches for 2 rounds)
- Lightly stuff. Don’t overstuff; the arms should be slightly flattened but still have some form.
- Add or undo a couple of stitches (sts) to align the start of your Round to the opposite side of the thumb. This step is crucial for symmetrical arm attachment. You want the “thumb” (bobble stitch) to face forward when the arm is attached. Adjust your stitch count slightly if your gauge has shifted the start of your round.
- Fasten off and leave a short tail. This tail will be used for weaving in, not for sewing the arm to the body, as the arms are joined directly into the body.
Section 5: Legs and Body (The Astronaut’s Core)
This is the most complex section, involving starting with an oval shape for the feet, color changes, and joining the legs to form the body.
Color: Starting in White
- (53:19) Chain (Ch) 5. This forms the base for the first leg.
- Rnd 1: Starting in the 2nd ch from the hook, single crochet (sc) into the next 3 stitches. Make 3 sc into the last stitch (this turns the corner). Turn and work along the bottom of the chain, sc into the next 2 stitches. Increase (inc) into the last stitch. Slip stitch (slst) into the first stitch of the round to join. (10 stitches)
- Note: The new round starts after the slst. This creates a flattened oval shape for the sole of the foot.
- Rnd 2: Single crochet (sc) in each stitch. (10 stitches)
- Rnd 3: sc 2, invisible decrease (invdec) 3 times, sc 2. (7 stitches)
- This round starts shaping the foot.
- Change to Red yarn. Do not cut off the White yarn. You’ll be switching back and forth between these colors.
- Rnd 4: Single crochet (sc) in each stitch. (7 stitches)
- Change to White yarn and cut off the Red yarn.
- Rnd 5: sc 2, increase (inc), sc 4. (8 stitches)
- Rnd 6: 4 times. (12 stitches)
- For the first leg, make 2-3 sc stitches as needed to reach the side of the leg. This step aligns the starting point for joining the legs.
- Stuff well. Firmly stuff the leg.
- Fasten off the first leg and leave a tail (we will use this to sew the gap in between the legs later).
- Do not fasten off the second leg. This leg will remain on your hook to continue with the body.
- Joining the Legs and Continuing onto the Body:
- We will join the legs together and continue onto the body in the next round. Each leg is 12 stitches, and together, we will get 24 stitches. Make sure that the toe area is facing forward! This is crucial for your astronaut to stand correctly.
- Continue the next round with the leg currently on your hook.
- Rnd 7: Single crochet (sc) 9 (you should now be in the inner part of the right leg, if you’re holding it correctly). Join to the other leg by making a single crochet (sc) into the same stitch you fastened off in on the first leg. Single crochet (sc) 11 more to complete going around the left leg. Make 3 single crochet (sc) to complete going around the right leg. (24 stitches total)
- This round can be tricky; take your time and ensure your stitches are evenly distributed when joining.
- Place a stitch marker in the current loop on your hook. This is your new beginning of the round.
- Using the yarn tail from the first leg, sew up the little gap between the two legs. This prevents a hole in the crotch area. Try working around this tail end to fully hide it.
- Rnds 8 – 12: Single crochet (sc) in each stitch. (24 stitches for 5 rounds)
- These rounds form the main body section.
- Rnd 13: 4 times. (20 stitches)
- Rnd 14: 4 times. (16 stitches)
- Depending on your tension, the start of your Round may have rotated. This is common. Add or undo a couple of stitches (sts) if needed to realign yourself with the side of the body for adding your arms. The pattern notes that 2 scs might need to be added.
- Rnd 15: This round integrates the arms directly into the body.
- Position the arm with the thumb facing forward and flatten the opening of the arm.
- Make 3 single crochet (sc) through both layers of arm and body (for a total of 3 layers: the arm’s front loop, the arm’s back loop, and a stitch on the body).
- Single crochet (sc) 5 across the chest.
- Attach the other arm and make 3 single crochet (sc) through all 3 layers.
- Single crochet (sc) 5 across the back. (16 stitches total)
- Fasten off and leave a long tail for sewing. This tail will be used to attach the head.
- Position the head onto the opening of the body and sew it on 1 Round away from the last Round of the helmet. Use the long tail from the body and your darning needle to attach the head securely. Work your stitches neatly around the circumference.
- When you have about 4 stitches remaining, stuff the neck area extra firm. This prevents the head from wobbling and helps it sit upright. Continue sewing until fully attached.
- Note: Try adding pipe cleaners to the arms to make them pose-able! This is an excellent tip if you want to give your astronaut dynamic poses.
Section 6: Chest Pad
This small, rectangular piece is adorned with embroidered details, adding a signature touch to your astronaut.
Color: All in White
- (1:38:11) Chain (Ch) 6.
- Row 1: Starting in the 2nd ch from the hook, single crochet (sc) into the next 5 stitches. (5 stitches)
- Rows 2 – 3: Chain 1 (ch 1), turn your work, single crochet (sc) in each stitch across. (5 stitches for 2 rows)
- Fasten off and leave a tail for sewing. Do not stuff this piece.
- Embroider the Details:
- Secure all of the yarn tails in knots on the backside of the panel and cut them short. This keeps the front neat.
- Step 1: Cut a strand of Red yarn and embroider a “button” in the top left-hand corner, 1 stitch wide. Go over it twice to make it thicker and more pronounced.
- Step 2: Do the same thing with Blue yarn and create another button 1 stitch over from the red one.
- Step 3: Cut a strand of Yellow yarn and create a horizontal line underneath the buttons, 4 stitches wide. This adds a visual accent.
- Sew the chest pad onto the front of the body, 2 Rounds below the top of the body. Center it nicely and use the tail to secure it.
Section 7: Backpack
No astronaut is complete without their trusty backpack! This piece will add to the character’s silhouette.
Color: All in White
- (1:48:02) Chain (Ch) 6.
- Rnd 1: Starting in the 2nd ch from the hook, single crochet (sc) into the next 4 stitches. Make 3 sc into the next stitch (turns the corner). Turn and work along the bottom of the chain, sc into the next 3 stitches. Increase (inc) into the last stitch. Slip stitch (slst) into the first stitch of the round to join. (12 stitches)
- Note: The new round starts after the slst. This creates the oval base for the backpack.
- Rnds 2 – 6: Single crochet (sc) in each stitch. (12 stitches for 5 rounds)
- Fasten off and leave a long tail for sewing.
- Lightly stuff and then whipstitch it closed. This means you’ll flatten the top opening and sew it shut with a whip stitch, forming a rectangular shape for the backpack.
- With the whipstitched side facing downwards, sew the backpack onto the back of the body with the top of the backpack 1 Round below the head. Position it centrally and securely.
- Using the same yarn tail (from the backpack), secure the floating arms down against the body by weaving through them 1 Round away from where they are connected. This step is important for preventing the arms from flopping around, giving your astronaut a tidier appearance.