Craft Your Own Foxy Friend: A Free Amigurumi Crochet Pattern
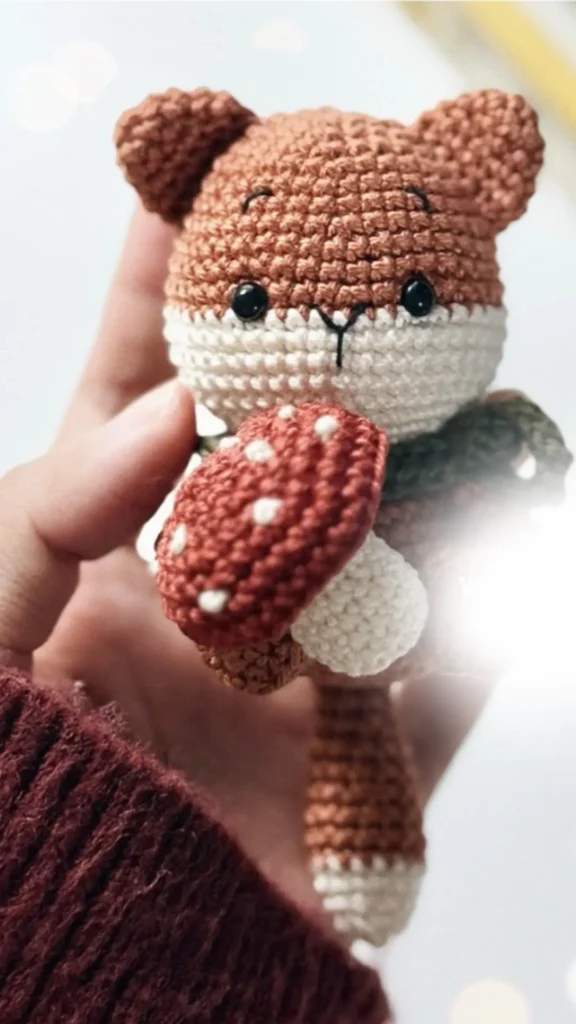
There’s something truly magical about bringing a character to life with just a hook and some yarn. If you’re looking for your next heartwarming project, look no further! Today, we’re sharing a delightful and free pattern for an adorable amigurumi fox, courtesy of the talented creator at Lulu Petite Doll.
This charming little fox is the perfect size for a keychain, a sweet nursery decoration, or a special handmade gift for someone you love. With its clever construction and irresistibly cute face, it’s a project you’ll be proud to show off.
So, grab your favorite hook, pick out some cozy yarn, and let’s get started!
What You’ll Need (Materials)
- Yarn: DK light or sport weight yarn in orange, white, and a color of your choice for the scarf.
- Hook: 2 mm
- Eyes: 5 mm black safety eyes
- Other: A needle for sewing and fiberfill for stuffing.
Abbreviations (US Terms)
- Rnd/Rw: Round/Row
- MR: Magic Ring
- st/sts: Stitch/Stitches
- ch: Chain
- sc: Single Crochet
- inc: Increase (2 sc in the same stitch)
- dec: Decrease (sc 2 stitches together)
- BLO: Back Loop Only
- FLO: Front Loop Only
- slst: Slip Stitch
- (…) * x…: Repeat instructions in parentheses x times
The Pattern
Let’s get down to the fun part! This pattern is worked in continuous rounds unless stated otherwise.
Head and Body
We’ll start with the head and work our way down to the body in one seamless piece.
Start with orange yarn.
- Rnd 1: MR 6 sc (6)
- Rnd 2: 6 inc (12)
- Rnd 3: (sc, inc)*6 (18)
- Rnd 4: (2 sc, inc)*6 (24)
- Rnd 5: (3 sc, inc)*6 (30)
- Rnd 6: (4 sc, inc)*6 (36)
- Rnd 7 – 8: 36 sc (2 rounds)
- Rnd 9: (5 sc, inc)*6 (42)
- Rnd 10 – 11: 42 sc (2 rounds)
- Rnd 12: (6 sc, inc)*6 (48)
Change to white yarn. (This creates the lovely white snout!)
- Rnd 13 – 16: 48 sc (4 rounds)
Time for a quick pause! Insert the 5 mm safety eyes between round 12 and round 13, with 8 stitches between them. Placing the eyes correctly is key to that super cute expression!
- Rnd 17: (6 sc, dec)*6 (42)
- Rnd 18: (5 sc, dec)*6 (36)
- Rnd 19: (4 sc, dec)*6 (30)
- Rnd 20: (sc, dec)*10 (20)
Change to orange yarn.
- Rnd 21: 20 sc
- Rnd 22: (3 sc, inc)*5 (25)
- Rnd 23: 25 sc
- Rnd 24: (4 sc, inc)*5 (30)
- Rnd 25: 30 sc
- Rnd 26: (5 sc, inc)*5 (35)
- Rnd 27 – 29: 35 sc (3 rounds)
Begin stuffing the head and body firmly but gently. Continue stuffing as you go.
- Rnd 30: (5 sc, dec)*5 (30)
- Rnd 31: (3 sc, dec)*6 (24)
- Rnd 32: (2 sc, dec)*6 (18)
- Rnd 33: 9 dec (9)
Fasten off, leaving a tail. Thread the tail through the front loops of the final 9 stitches and pull tight to close the hole. Weave in the end.
Legs (Make 2)
- Rnd 1: MR 6 sc (6)
- Rnd 2: 6 inc (12)
- Rnd 3: (3 sc, inc)*3 (15)
- Rnd 4: BLO 15 sc (This clever round creates a flat bottom for the feet!)
- Rnd 5: (3 sc, dec)*3 (12)
Fasten off and leave a long tail for sewing. Stuff with fiberfill.
Arms (Make 2)
- Rnd 1: MR 7 sc (7)
- Rnd 2 – 6: 7 sc (5 rounds)
Fasten off, leaving a long tail for sewing. Do not stuff the arms. This keeps them nice and flexible.
Ears (Make 2)
- Rnd 1: MR 5 sc (5)
- Rnd 2: 5 inc (10)
- Rnd 3: 10 sc
- Rnd 4: (sc, inc)*5 (15)
- Rnd 5: 15 sc
Fasten off, leaving a long tail for sewing. Fold the base slightly to give it shape.
Tail
The white tip is the signature of any good fox!
Start with white yarn.
- Rnd 1: MR 5 sc (5)
- Rnd 2: 5 inc (10)
- Rnd 3: 10 sc
- Rnd 4: (sc, inc)*5 (15)
- Rnd 5: 15 sc
Change to orange yarn.
- Rnd 5 – 7: 15 sc (3 rounds)
- Rnd 8: (3 sc, dec)*3 (12)
- Rnd 9 – 10: 12 sc
- Rnd 11: (2 sc, dec)*3 (9)
- Rnd 12 – 13: 9 sc
- Rnd 14: (sc, dec)*3 (6)
Fasten off, leaving a long tail for sewing. Stuff lightly with fiberfill.
Scarf
This tiny accessory adds so much personality! Use any color you like—the sample photo uses a festive combination.
- Chain 46.
- Starting in the second chain from the hook, work 45 sc.
- Fasten off and weave in the ends.
Assembly
Take your time with this final step—neat sewing makes all the difference!
- Legs: Sew the legs to the bottom of the body, positioning them between rounds 5 and 9.
- Tail: Attach the tail to the back of the body, centered between rounds 4 and 5.
- Arms: Sew the arms to the sides of the body, between rounds 21 and 22.
- Ears: Position the ears on the head, spanning from about round 3 to round 9.
- Scarf: Tie the scarf snugly around your fox’s neck.
And there you have it! Your very own, incredibly cute, handmade fox.
A huge thank you to Lulu Petite Doll for creating and sharing this wonderful pattern. Be sure to check out their website at www.lulupetitedoll.com for more amazing creations!
Happy Crocheting