Easy Crochet Chunky Blanket: Your Cozy Weekend Project
Easy Crochet Chunky Blanket: Your Cozy Weekend Project
Imagine this: it’s a chilly weekend, you have a warm cup of coffee in hand, and you’re sinking into the sofa, ready to start a project that’s both deeply satisfying and incredibly fast. That’s the magic of creating an easy crochet chunky blanket. There’s something so rewarding about watching a luxurious, cloud-like throw come to life in just a matter of hours, not weeks. Forget complicated patterns and tiny hooks; this is crochet at its most gratifying.
Whether you’re a seasoned crocheter looking for a quick win or a beginner eager to make something you can actually use right away, you’ve come to the right place. This guide is your complete roadmap. We’ll walk you through choosing the perfect squishy yarn, mastering a simple but beautiful stitch, and adding those professional finishing touches. Get ready to create a stunning, cozy masterpiece that will have everyone asking, “Wow, you made that?!”
Why a Chunky Blanket is the Perfect Crochet Project
In a world of intricate lace shawls and detailed amigurumi, the chunky blanket stands out for its glorious simplicity and speed. It’s the kind of project that reminds us why we fell in love with crochet in the first place: the joy of making something beautiful and functional with our own two hands. For women juggling work, family, and everything in between, finding time for a creative outlet can be tough. The chunky blanket respects your time and rewards you handsomely.
The Magic of a Quick Finish
The number one reason crocheters adore this project is the instant gratification. Using super bulky or jumbo yarn with a large hook means your fabric grows at an incredible pace. Each stitch is significant, and you can see your progress row by row. This is a huge motivator, especially for beginners who can sometimes get discouraged by slow-moving projects. You can realistically start this crochet throw blanket for your couch on a Friday night and be snuggling under it by Sunday afternoon. This quick turnaround makes it an ideal project for last-minute gifts for holidays, birthdays, or baby showers. It feels like a superpower to be able to whip up such a luxurious, handmade gift in a single weekend.
Ultimate Coziness and Style
Let’s be honest—we’re also here for the coziness factor! There is nothing quite like the weight and warmth of a handmade chunky blanket. It’s the perfect companion for movie nights, reading a good book, or just adding an extra layer of warmth to your bed. But beyond comfort, these blankets are a major style statement. They bring texture, warmth, and a touch of handcrafted “hygge” to any room. A neutral-toned blanket draped over an armchair adds sophisticated comfort, while a brightly colored one can be a fun pop of personality on a guest bed. You’re not just making a blanket; you’re creating a custom piece of home decor.
Choosing Your Perfect Materials: The Foundation of Your Blanket
The secret to a truly luxurious chunky blanket lies in the materials. The yarn and hook you choose will determine the blanket’s final feel, weight, drape, and washability. Making the right choice here is the first step toward a project you’ll be proud of. It’s less about strict rules and more about understanding the options to create the exact blanket you’re dreaming of.
The Best Yarn for a Chunky Crochet Blanket
Walking into the yarn aisle can be overwhelming, but we can simplify it. For a chunky blanket, you’ll be working with yarn in weight categories 6 or 7.
Super Bulky (Category 6) vs. Jumbo (Category 7)
Super Bulky (Category 6) is the most common and accessible choice. Yarns like Bernat Blanket Yarn or Lion Brand Wool-Ease Thick & Quick are fan favorites for a reason. They are thick enough to work up quickly but still manageable for creating defined stitches. You’ll get a plush, soft fabric that has a nice balance of structure and drape. This is the perfect starting point if you’re new to chunky projects.
Jumbo (Category 7) yarn is the next level up. This is the ultra-thick yarn you see in arm-knitting projects, but it can also be used with enormous crochet hooks (25mm or larger). These yarns create a very dramatic, open-weave fabric. While the project is incredibly fast, jumbo yarn can be more challenging to work with, as maintaining even tension is tricky. It’s fantastic for a statement piece, but Super Bulky is often more practical for a blanket meant for heavy snuggling.
Alt text: Infographic comparing different types of chunky yarn for a crochet blanket, showing differences between super bulky and jumbo weights, and pros and cons of acrylic vs. wool fibers.
Fiber Matters: Wool, Acrylic, and Blends
The fiber content is just as important as the weight.
- 100% Acrylic: This is a workhorse fiber. It’s affordable, widely available in a huge range of colors, hypoallergenic, and machine washable. Modern acrylics, like Bernat Blanket, are incredibly soft and not at all scratchy. This is the top recommendation for a beginner’s easy crochet chunky blanket.
- Wool & Wool Blends: Wool offers unparalleled warmth and a natural, rustic feel. It’s breathable and has a lovely weight. A blend, like Lion Brand’s Wool-Ease, gives you the best of both worlds: the warmth of wool and the washability of acrylic. Be mindful if you’re sensitive to wool or are making the blanket for a baby.
- Chenille/Velvet: These are typically polyester yarns that feel incredibly soft and velvety. They create a blanket with a beautiful sheen and luxurious feel. However, they can sometimes be slippery to work with, and the “worms” (little bits of fluff) can come loose if not handled carefully.
Selecting the Right Crochet Hook
Your standard set of aluminum hooks won’t work here. For Super Bulky (Category 6) yarn, you’ll typically need a hook in the 10mm (N/P) to 15mm (Q) range. For Jumbo (Category 7) yarn, you’ll need 19mm (S) or larger. The yarn label will always provide a recommended hook size, which is a great starting point. Don’t be afraid to go up a hook size from the recommendation! A larger hook will create a blanket with more drape and a looser, squishier feel, while a smaller hook will result in a denser, stiffer fabric.
A unique insight: Consider the hook’s material. A large plastic or resin hook is lightweight and easy on the hands. A wooden hook offers a bit more grip on the yarn, which can be helpful if you find your yarn is slippery. An ergonomic hook with a large handle can be a lifesaver for preventing hand cramps during a marathon crochet session.
Getting Started: The Essential First Steps
With your gorgeous yarn and giant hook in hand, you’re just about ready to dive in. But before you make that first chain, let’s cover a couple of quick but crucial steps. Taking a few minutes to understand the language of the pattern and check your gauge will set you up for a smooth, frustration-free crocheting experience. Think of it as your *mise en place* for crochet!
Crochet Lingo: A Quick Refresher on Abbreviations
Crochet patterns are written in a shorthand to keep them concise. Here are the only terms you’ll need for our easy pattern (written in standard US terms):
- ch: chain
- st(s): stitch(es)
- sc: single crochet
- sk: skip
- ch-1 sp: chain-1 space (the space created by a chain stitch in the previous row)
- *…*: repeat the instructions between the asterisks
The Importance of a Gauge Swatch (Yes, Even for a Blanket!)
I know, I know. Making a gauge swatch feels like homework before the fun part. For a project like a blanket where fit isn’t critical, it’s tempting to skip it. But here’s why you shouldn’t: a gauge swatch is your key to predicting the future! It tells you two vital things:
- Final Size: Your personal tension might be tighter or looser than the pattern designer’s. A swatch will tell you if your finished blanket will match the dimensions in the pattern. If your 4×4 inch swatch is bigger than the pattern’s, your final blanket will be bigger, and vice-versa.
- Yarn Quantity: This is the big one. If your gauge is off, you could run out of yarn before your blanket is finished—a truly heartbreaking scenario, especially if the dye lot is sold out. By knowing how much jumbo yarn you need for a blanket, a swatch confirms you’re on track to have enough.
To make a swatch, simply chain 15-20 stitches and work the pattern stitch for 15-20 rows to create a small square. Measure a 4×4 inch section in the center and count the stitches and rows. If your numbers match the pattern’s gauge, you’re golden! If not, try again with a larger hook (if you have too many stitches) or a smaller hook (if you have too few).
The Free & Easy Chunky Blanket Pattern: The “Cozy Corner Throw”
This is it! This pattern uses the beautifully simple and textured Moss Stitch. It’s just a repetition of single crochet and chain stitches, but it creates a modern, woven-look fabric without any complicated techniques. It’s the perfect quick chunky crochet blanket pattern for beginners.
Finished Size & Customization
- Finished Size: Approx. 50 inches x 60 inches (a generous throw size).
- Gauge: 6 sts and 6 rows in the Moss Stitch = 4 inches.
- Materials Needed:
- Approx. 1,320 yards of Super Bulky (Category 6) yarn. (This is equal to 6 skeins of Bernat Blanket Yarn, which has 220 yards per skein).
- 12mm (P/Q) crochet hook.
- Scissors & a large tapestry needle for weaving in ends.
To resize this blanket: Simply start with any even number of chains. This will give you the width. Then, just repeat the pattern row until you reach your desired length. It’s that easy!
The Pattern (US Terms)
Foundation Chain: Ch 126. (Or any even number for your desired width).
Row 1: Sc in the 4th ch from the hook. *Ch 1, sk next ch, sc in next ch.* Repeat from * to * across the entire row. Turn.
Row 2: Ch 2 (this counts as your first sc and ch-1). Sk the first sc. Sc into the next ch-1 sp. *Ch 1, sk next sc, sc in next ch-1 sp.* Repeat from * to * across. Your last sc should be worked into the space created by the turning ch from the previous row. Turn.
Repeat Row 2 until you run out of yarn, leaving a 12-inch tail for weaving in, or until your blanket measures approximately 60 inches long.
Final Step: Fasten off and weave in all ends securely.
Alt text: A step-by-step stitch diagram illustrating how to crochet the moss stitch for an easy crochet chunky blanket, showing where to insert the hook in the chain-1 spaces.
Pro Tips for Working with Bulky Yarn
Crocheting with chunky yarn is mostly a dream, but it has its own unique quirks. These tips will help you navigate them like a pro and ensure your finished blanket looks polished and professional, not lumpy or messy.
Keeping Your Tension Even
The biggest challenge with bulky yarn is maintaining consistent tension. Because the stitches are so large, any variation is more noticeable. The key is to find a comfortable way to hold both your yarn and your giant hook. Let the yarn glide smoothly through your fingers rather than pulling it tightly for each stitch. The goal is relaxed, even loops. If you notice your stitches getting tighter as you go, take a break! Shake out your hands and consciously relax your grip when you start again. Remember, the large hook is meant to do the work of creating big, lofty stitches for you.
Weaving in Those Giant Ends
Those thick yarn tails can be a real beast to weave in. Simply forcing them through the fabric with a needle can create ugly bumps. Here are two fantastic methods:
- Split the Plies: Most chunky yarns are made of several smaller strands (plies) twisted together. Use your tapestry needle to carefully untwist the last 4-5 inches of the yarn tail, splitting it in half. Weave one half in one direction and the other half in the opposite direction. This reduces bulk and locks the end in place much more securely.
- Try the Russian Join: This is a game-changer for joining a new skein of yarn. It creates a seamless join *without any knots or tails to weave in later*. It involves threading the yarn back on itself to create interlocking loops. A quick video search for “Russian Join” will show you exactly how it’s done, and it’s well worth learning for any project. According to Interweave, this method is particularly strong and effective for non-feltable yarns like acrylics and cottons, which are common for blankets [1].
Finishing Touches: Adding That Professional Flair
You’ve crocheted the last stitch and woven in the final end. Congratulations! Your blanket is beautiful as is, but a few optional finishing touches can elevate it from “handmade” to “handcrafted.”
To Add a Border or Not?
The Moss Stitch creates a beautiful, straight edge on its own, so a border isn’t strictly necessary. However, a simple border can give the blanket a clean, finished frame. A very easy option is to work one round of single crochet evenly around the entire blanket. To do this, work 1 sc in the end of each row along the sides and 1 sc in each stitch along the top and bottom. Place 3 sc stitches in each corner to help it lay flat. This simple step can make a big difference in the final appearance.
How to Add Tassels to a Crochet Blanket
Tassels are a fun, trendy way to add personality to your throw. They look impressive but are surprisingly easy to make!
- Find a Tassel Maker: Use a piece of cardboard, a book, or your phone that is the desired length of your tassel (e.g., 6 inches).
- Wrap the Yarn: Wrap your chunky yarn around the cardboard multiple times (10-15 wraps for a nice, thick tassel). The more you wrap, the fuller the tassel.
- Tie it Off: Cut a separate 12-inch piece of yarn. Slide it under the wraps at the top of the cardboard and tie a tight double knot. Don’t trim these tails; you’ll use them to attach the tassel.
- Cut the Loops: Slide the yarn bundle off the cardboard. Cut through the loops at the bottom.
- Create the Neck: Cut another 12-inch piece of yarn. About an inch down from the top knot, wrap this piece tightly around the tassel 3-4 times to create the “neck.” Tie a secure knot and hide the ends inside the tassel head with your tapestry needle.
- Attach and Trim: Use the long tails from the top knot to tie the tassel securely to a corner of your blanket. Trim the bottom of the tassel so all the strands are even. Repeat for all four corners!
Caring for Your Handmade Masterpiece
You’ve invested your time and love into this blanket, so let’s make sure it lasts a lifetime. Proper care is essential! Always check the care instructions on your yarn label first. However, here are some general guidelines for washing a handmade chunky blanket:
- For Acrylic/Polyester/Chenille (like Bernat Blanket): These are typically machine washable. To be safe, place the blanket in a large mesh laundry bag to prevent snagging. Wash on a gentle, cold water cycle with a mild detergent. Tumble dry on the lowest heat setting or, even better, lay it flat to air dry. High heat can damage or melt the fibers.
- For Wool/Wool Blends: Heat and agitation are the enemies of wool—they cause felting! Hand washing is the safest bet. Fill a tub with cool water and a gentle wool wash (like Eucalan or Soak). Submerge the blanket and let it soak for 20-30 minutes. Gently squeeze out the water (never wring or twist!). To dry, roll it up in a few clean, dry towels to absorb most of the moisture, then lay it flat to dry away from direct heat or sunlight. As noted by the experts at Lion Brand Yarn, proper blocking and washing can even out stitches and give your project a professional finish [2].
Quick Takeaways
- Chunky blankets are a perfect project for beginners and seasoned crocheters alike due to their speed and satisfying results.
- Choose a Super Bulky (Category 6) yarn like Bernat Blanket for the best balance of speed, softness, and ease of use.
- Always make a gauge swatch to ensure your blanket is the correct size and that you won’t run out of yarn.
- The Moss Stitch (alternating sc and ch 1) is a simple, modern stitch that creates a beautiful woven texture.
- Use techniques like splitting the plies or the Russian Join to manage bulky yarn ends for a cleaner finish.
- Finishing touches like simple borders or tassels can elevate your project from homemade to handcrafted.
- Always follow the yarn label’s care instructions, opting for gentle washing and low-heat or air drying to preserve your blanket.
Your Cozy Creation Awaits
You’ve now got everything you need to create your very own easy crochet chunky blanket. From the joy of picking out that perfectly squishy yarn to the rhythmic motion of the Moss Stitch, this project is a true creative escape. It’s a chance to slow down, focus your hands, and make something that brings tangible comfort and style into your home. Think of the pride you’ll feel when you drape your finished Cozy Corner Throw over your sofa, a beautiful and functional testament to your skill and creativity.
Don’t wait for the “perfect” time. The beauty of this project is its simplicity and speed. It’s designed to fit into your busy life and give you that wonderful feeling of accomplishment. So, grab your hook, put on your favorite playlist or podcast, and allow yourself to get lost in the stitches. You’re not just making a blanket; you’re weaving a little bit of comfort and joy into the fabric of your home.
Your Call to Action: Start your chunky blanket this weekend! Choose your yarn, follow the pattern, and create your cozy masterpiece. You can do this!
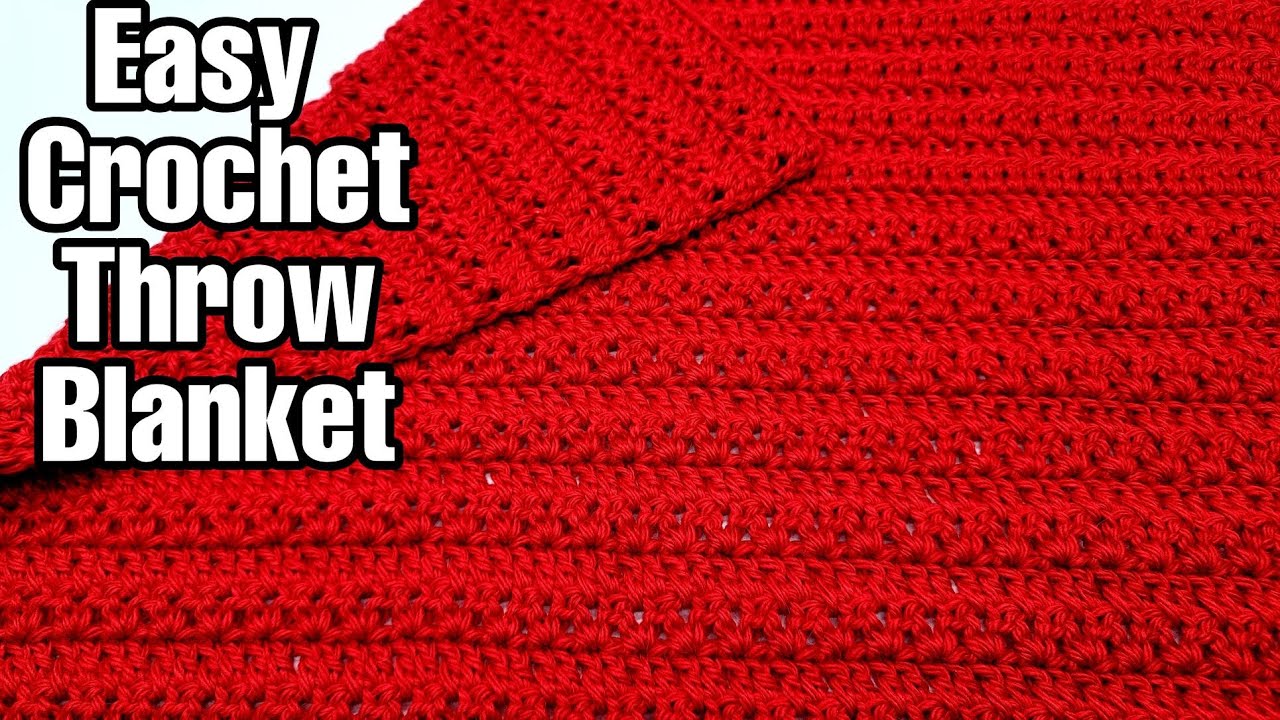
Alt text: A finished easy crochet chunky blanket in a neutral cream color, draped stylishly over an armchair, creating a cozy and inviting scene.
Frequently Asked Questions
1. How long does it really take to crochet a chunky blanket?
For an experienced crocheter, a throw-sized blanket like this one can be completed in about 8-12 hours. For a beginner, it might take closer to 15-20 hours. It’s the perfect weekend project you can pick up and put down easily.
2. My blanket feels a bit stiff. What did I do wrong?
Stiffness is almost always caused by tension that is too tight. Try to relax your grip on the yarn and hook. You can also try going up a hook size (e.g., from a 12mm to a 15mm) which will force you to make looser, more drapey stitches. Washing the blanket can also help soften it up.
3. How do I calculate the yarn needed for a different size blanket?
A great way to estimate is to use a yarn calculator like the one from the Crochet Crowd [3]. Alternatively, after you’ve made your gauge swatch, you can do some math. Calculate the area of your swatch (e.g., 4×4=16 square inches) and weigh it. Then, calculate the total area of your desired blanket (e.g., 60×70=4200 square inches). You can then set up a proportion to figure out the total weight of yarn needed.
4. What are some other simple chunky crochet blanket stitch ideas?
If you want to try something other than the Moss Stitch, the Granite Stitch (another name for Moss Stitch), the Half Double Crochet (HDC), or the classic Double Crochet (DC) are all fantastic, fast options. Working in the back loop only of these stitches can also create a beautiful ribbed texture.
5. Can I use this pattern with a different weight of yarn?
Absolutely! The core pattern (Row 2 of the Moss Stitch) will work with any yarn. The key is to adjust your starting chain for your desired width and your hook size to match the yarn. Just remember that using a thinner yarn will require many more stitches and rows, and the project will take significantly longer.
What Do You Think?
I’d love to see your finished Cozy Corner Throws! Share a picture on Instagram or Facebook and tag us! What color yarn did you choose for your blanket? Let me know in the comments below!
References
- Interweave. (n.d.). Learn It: The Russian Join. Retrieved from https://www.interweave.com/article/knitting/learn-it-the-russian-join/
- Lion Brand Yarn. (n.d.). How to Block Your Projects. Retrieved from https://www.lionbrand.com/blogs/how-to/how-to-block-your-projects
- The Crochet Crowd. (n.d.). Yarn Calculator for Throw, Blanket & Afghan Sizes. Retrieved from https://thecrochetcrowd.com/yarn-calculator-throw-blanket-afghan-sizes/