Easy Crochet Chunky Blanket: Quick, Cozy & Beginner-Friendly!
Mastering the Easy Crochet Chunky Blanket: Your Ultimate Guide!
Dreaming of snuggling up under a handmade, luxuriously soft blanket? You’re in the right place! Crocheting your own cozy throw might seem daunting, but with the right guidance, creating an Easy Crochet Chunky Blanket is a highly rewarding and surprisingly simple project, even for beginners. This comprehensive guide will walk you through every step, ensuring your first (or next!) blanket is a resounding success.
Using chunky yarn makes this an ideal project for those eager to see quick results. The bulkier yarn means fewer stitches per row and faster progress, allowing you to whip up a beautiful, warm blanket in no time. Let’s dive in and start crafting your very own Easy Crochet Chunky Blanket!
Why Choose an Easy Crochet Chunky Blanket?
- Speed: Chunky yarn works up incredibly fast, making it perfect for impatient crafters or last-minute gifts.
- Simplicity: The stitch pattern we’ll learn is straightforward and repetitive, ideal for beginners.
- Cozy Comfort: Chunky blankets are inherently warm, plush, and incredibly inviting.
- Cost-Effective: Often, chunky yarn allows you to complete a large project with fewer skeins than finer yarns, potentially saving on material costs.
Materials You’ll Need for Your Easy Crochet Chunky Blanket
To embark on your journey to create a beautiful Easy Crochet Chunky Blanket, gathering the right materials is key. Here’s what you’ll need:
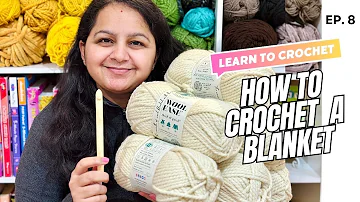
- Yarn: Approximately six skeins of super bulky weight yarn (Weight Category 6). For reference, the project shown uses Woolly’s “Thick & Quick” yarn in the color “Fisherman” (a lovely neutral white). The specific yardage can vary between brands, so always check the label. Bulky yarns are fantastic for their plush feel and the speed at which they work up.
- Crochet Hook: While your yarn might recommend an N13 (9 mm) hook, for this particular stitch and to achieve a wonderfully airy, soft fabric, a larger hook is recommended. A size P (11.5 mm) or even a 12 mm hook works exceptionally well. Consider an ergonomic hook (like a Clover hook) if you plan on crocheting for extended periods; they are much kinder to your hands and wrists, especially when working on a large project like an Easy Crochet Chunky Blanket.
- Scissors: For trimming yarn.
- Yarn Needle (Tapestry Needle): For weaving in ends.

Getting Started: The Foundation Chain
Every crochet project begins with a foundation chain. For an Easy Crochet Chunky Blanket sized perfectly for a baby, or as a generous lapghan, you’ll need to chain 74 stitches.
- Start with a slip knot and place it on your crochet hook.
- Chain 74 stitches.
Pro Tip: As you chain, aim for a loose and even tension. A tight foundation chain can cause your blanket’s edges to pucker or pull inward, making it difficult to keep straight. Consistency in stitch size will also contribute to a beautifully uniform blanket.
Row One: Introducing the Simple Pattern
Once your 74 chains are complete, it’s time to begin Row One. The beauty of this Easy Crochet Chunky Blanket pattern lies in its simplicity: a repeating sequence of single crochet and chain one.
- Skip the first chain from your hook.
- Insert your hook into the second chain from the hook, pull up a loop, and complete a single crochet (sc).
- Chain one (ch 1).
- Skip the next chain in the foundation row.
- Into the *next* chain, insert your hook, pull up a loop, and make a single crochet (sc).
- Repeat this sequence: Chain one, skip one chain, single crochet into the next chain all the way to the end of the row.
Nearing the End: For the last four chains of the row, follow this specific sequence to maintain the pattern:
- Chain one.
- Skip one chain.
- Single crochet into the next chain.
- Chain one.
- Skip one chain.
- Single crochet into the very last chain.
Take a moment to check your work. Ensure your foundation row isn’t twisted and the edges appear straight. This simple “single crochet, chain one, skip one” pattern forms the basis of your gorgeous blanket.
Row Two and Beyond: The Repeating Pattern for Your Easy Crochet Chunky Blanket
Now, let’s move on to Row Two, which is the repeating pattern you’ll use for the rest of your Easy Crochet Chunky Blanket. This stitch creates a lovely airy texture that looks intricate but is incredibly easy to master.
- Turn your work.
- Chain one (this acts as your turning chain and does not count as a stitch).
- Look closely at the row below. You’ll see distinct single crochet stitches separated by chain spaces.
- The key to this row (and all subsequent rows) is simple: Single crochet into each single crochet stitch from the previous row, and always skip the chain space beneath.
- Here’s the repeat:
- Single crochet into the first single crochet stitch from the previous row.
- Chain one.
- Skip the chain space from the previous row.
- Single crochet into the next single crochet stitch.
- Continue this pattern – chain one, skip the chain space, single crochet into the next single crochet stitch – until you reach the end of the row. For the very last stitch, you’ll simply single crochet into the final single crochet of the row.
You’ll quickly see your blanket growing in height. This stitch is incredibly simple yet creates a beautiful, textured fabric. Just keep repeating Row Two over and over again until you either run out of yarn or reach your desired blanket size!
Checking Your Progress and Joining New Yarn
As you work on your Easy Crochet Chunky Blanket, it’s a good idea to periodically check its width. For a generous baby blanket or lapghan, aiming for around 36 inches wide is a great target. If you’re going for a larger throw, measure regularly to ensure consistency.
You’ll likely need to join new skeins of yarn as you progress through your project. New yarn can be joined at the beginning or in the middle of a row. The most important thing is to secure the new yarn with a strong, secure knot. There are several methods for joining yarn seamlessly; a common approach is to tie the old and new yarn ends together with a square knot or magic knot, then crochet over the tails for a neater finish.
Finishing Your Easy Crochet Chunky Blanket
Once your blanket has reached your desired length (many opt for around 36-40 inches for a baby blanket/lapghan), it’s time to finish it off beautifully.
- Complete your last stitch of the row.
- Trim the yarn, leaving a tail of about 2 to 3 inches.
- Yarn over your crochet hook and pull that tail completely through the loop on your hook.
- Pull it tight to secure the stitch.
- Using a yarn needle or a smaller crochet hook, carefully weave in this remaining tail into the stitches of your blanket. This hides the end and prevents your blanket from unraveling. Repeat for any other yarn tails you might have from joining new skeins.
Your beautiful Easy Crochet Chunky Blanket is now complete! While adding a crochet border is always an option for more advanced crafters, a straight edge looks perfectly lovely and clean, especially for a beginner-friendly project like this.
Beyond Your First Blanket: Care and Customization
Now that you’ve mastered the Easy Crochet Chunky Blanket, here are a few tips to keep in mind:
- Care: Always check your yarn label for specific care instructions. Most chunky acrylic or wool blends can be machine washed on a gentle cycle and laid flat to dry or tumble dried on low. Proper care will help your blanket last for years.
- Customization:
- Size: To make a larger blanket (e.g., a throw, twin, or queen size), simply increase your starting chain in multiples of the pattern repeat (for this pattern, it’s generally a multiple of 2 plus 2 for the turning chain and end stitch, but always swatch!).
- Colors: Don’t limit yourself to one color! Experiment with stripes, color blocks, or even variegated chunky yarns for a unique look.
- Stitches: Once comfortable with this pattern, explore other beginner-friendly stitches like half-double crochet or double crochet to create different textures for future blankets.
There’s immense satisfaction in creating something beautiful and functional with your own hands. We hope you enjoyed learning how to make this cozy and simple blanket. Happy crafting!