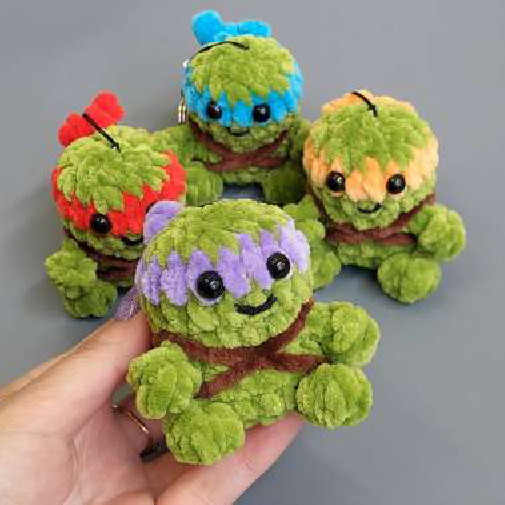
Craft an Adorable Ninja Turtle Keychain
Materials
Welcome to a detailed guide on crafting your very own adorable Ninja Turtle keychain! This pattern, brought to you by the talented Galina Burlakova, will walk you through each step of creating a compact hero. Get ready to dive into the world of amigurumi and crochet a delightful companion for your keys or bag.
Your Future Ninja Turtle: A Sneak Peek!
To embark on your Ninja Turtle crafting journey, gather the following essential materials:
- Plush Yarn: 100g/120m weight.
- Main Green color
- Brown for the shell
- Bandana colors: Red, Orange, Lilac, and Blue (choose your favorite or make a set!)
- Stuffing: Polyester fiberfill or similar.
- Needle: For weaving in ends and assembly.
- Marker: Stitch marker to keep track of your rounds.
- Safety Eyes: 8mm, for a charming and secure finish.
Abbreviations
Familiarize yourself with these standard crochet abbreviations to follow the pattern with ease:
- MR: Magic Ring
- Sc: Single Crochet
- Inc: Increase (working two single crochets into one stitch)
- Dec: Decrease (single crochet two stitches together)
- Sl st: Slip Stitch
- Ch: Chain
- Dc: Double Crochet
- Bobble: This special stitch is worked by making multiple double crochets into one stitch and then joining their tops together. For the legs, it’s formed with 4 double crochets (4dc bobble), and for the arms, with 3 double crochets (3dc bobble).
The Pattern: Step-by-Step Guide
Body and Head Construction
This section forms the main part of your Ninja Turtle, starting from the bottom up. Work primarily with your chosen green yarn.
- Round 1: Begin by working 8 single crochets into a Magic Ring (8 stitches total).
- Round 2: Work 3 increases. Then, to create the first leg: chain 3, and starting from the 2nd chain from the hook, work a 4dc Bobble stitch. Finish the leg by making a slip stitch into the Bobble and then a slip stitch into the base stitch of your main work (the stitch after the 3rd increase). Continue with 2 increases. For the second leg: chain 3, starting from the 2nd chain from the hook, work a 4dc Bobble stitch. Make a slip stitch into the Bobble, and then a slip stitch into the base stitch. Finish the round with 3 increases (16 stitches total).

- Round 3-4: Crochet 16 single crochets in each round (16 stitches). This establishes the initial height of the body.
- Round 5: Work 2 single crochets, then 1 decrease, followed by 2 single crochets. For the first arm: chain 4, and starting from the 2nd chain from the hook, work 2 slip stitches, then make a slip stitch into the base stitch of your main work. Continue with 1 decrease, then 2 single crochets. For the second arm: chain 4, from the 2nd chain from the hook, work 2 slip stitches, then make a slip stitch into the base stitch. Finish the round with 2 single crochets, then 1 decrease (12 stitches total).
Before proceeding, begin stuffing your body. Continue to add stuffing as you work to ensure a firm and evenly shaped figure.
- Round 6: Repeat the sequence (single crochet, increase) 6 times (18 stitches). This round starts shaping the base of the head.
- Round 7: Crochet 18 single crochets (18 stitches). Please note: the next row will be worked with your chosen bandana color.
- Round 8: Crochet 18 single crochets (18 stitches), now using your bandana color yarn. This row forms the base for the bandana.
- Round 9: Repeat the sequence (single crochet, decrease) 6 times (12 stitches). This round begins to close the top of the head.
- Round 10: Work 6 decreases (6 stitches). Fasten off and use your needle to sew the remaining opening closed securely. Ensure the head is fully and firmly stuffed before closing.


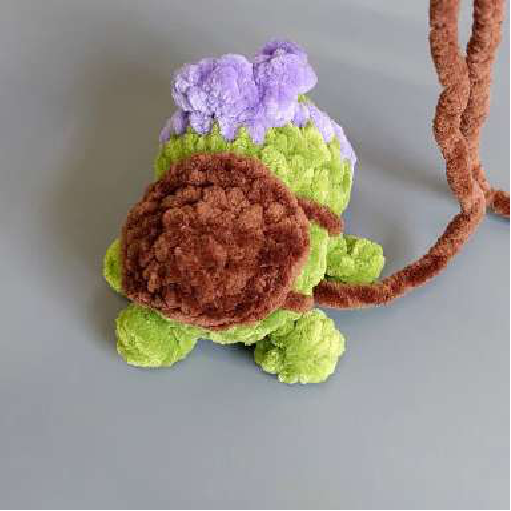
Crafting the Shell
The shell adds a vital layer of detail and stability to your Ninja Turtle. Work with brown yarn for this section.
- Round 1: Start with 6 single crochets into a Magic Ring (6 stitches).
- Round 2: Work 6 increases (12 stitches).
- Round 3: Repeat the sequence (single crochet, increase) 6 times (18 stitches). Make a slip stitch to finish the round, then cut the yarn, leaving a long tail approximately 12-15 inches for later attachment to the body.


Assembly and Finishing Touches
Now it’s time to bring your Ninja Turtle to life with its iconic features and assemble all the components.
- Eye Placement: Carefully glue the 8mm safety eyes onto the head in the row where you worked with the bandana color (Round 8). Ensure they are evenly spaced and positioned to give your turtle character.
- Mouth Embroidery: Using a needle and a darker shade of green or black yarn (or embroidery floss), embroider a simple smile or a determined mouth onto the face.
- Shell Attachment: Using the long tail you left on the shell, sew it securely to the back of the green body. Position it centrally and evenly for a polished look.
- Bandana Ties: On the back of the head, in Round 8 (the bandana color row), join your bandana color yarn. Create the first tie by making 3 chains. From the 2nd chain from the hook, work a slip stitch, then a single crochet, and then a slip stitch into the base stitch where you initially joined the yarn. Immediately next to the first tie, create the second tie by repeating the process: chain 3, from the 2nd chain from the hook, work a slip stitch, then a single crochet, and then a slip stitch into the base. Cut yarn, fasten off securely, and weave in any remaining ends neatly to complete your turtle’s iconic mask.


Conclusion
Congratulations! You have successfully crafted your very own Ninja Turtle keychain, bringing a beloved hero to life through the art of amigurumi. This detailed project, guided by Galina Burlakova, not only results in a charming and personalized accessory but also helps to refine your crochet skills. Display your creation proudly, gift it to a fellow fan, or attach it to your keys to carry a piece of your favorite heroes wherever you go. We hope you found this pattern enjoyable and rewarding!