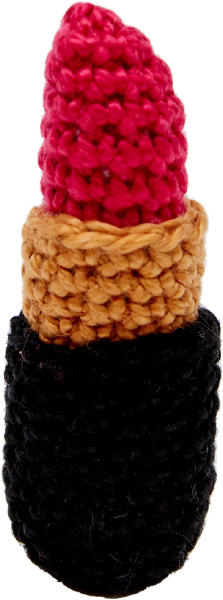
Barbiecore Lipstick Amigurumi: Crochet Glam!
Amigurumi Lipstick Crochet Pattern: A Barbiecore Delight
Welcome, fellow makers, to a delightful new addition to your amigurumi collection! If you’re looking for a fun, quick, and undeniably chic project, you’ve come to the right place. Inspired by the vibrant Barbiecore aesthetic, this Amigurumi Lipstick is not just a pattern; it’s a playful statement piece perfect for gifting, decorating, or simply adding a pop of color to your crafting world. At Crochetto, we love bringing you unique and engaging crochet patterns content, and this one promises to be a joy from start to finish. Get ready to hook up some glamour!
Materials You’ll Need
To create your very own charming Amigurumi Lipstick, gather the following:
* DMC Cotton Perle Size 3
* 2.5MM Crochet Hook
* Sewing Needle
* Toy Stuffing (or use some left-over yarn for stuffing!)
Colours
Choose your vibrant shades!
| CODE N° | COLOUR | N° OF SKEINS |
| :—— | :—– | :———– |
| A | 310 | x 1 |
| B | 436 | x 1 |
| C | 600 | x 1 |
Essential Crochet Techniques
Familiarize yourself with these fundamental techniques before you begin:
* **CHAIN STITCH (CH)**
* **SLIP STITCH (SL)**
* **SINGLE CROCHET (US) / DOUBLE CROCHET (UK)**
* **SINGLE CROCHET DECREASE (SC DEC)**
Single Crochet Decrease (SC DEC)
This technique allows you to reduce your stitch count.
1. Insert your hook into the next stitch. Yarn over, and pull it through the stitch. There are now two loops on your hook.
2. Repeat step 1: Insert your hook into the next stitch, yarn over, and pull it through the stitch. You now have three loops on the hook.
3. Yarn over again and pull it through all three loops on your hook. You have now made one decrease.
* **MAGIC LOOP / MAGIC RING**
Abbreviations Guide
To make the instructions easier to read, we will use some simple abbreviations:
* **SC1:** make one single crochet stitch
* **SC2:** make two single crochet stitches
* **SC3:** make three single crochet stitches
* **SC DEC:** make one single crochet decrease
* **CH:** chain
* **DC:** double crochet
* **SL:** slip stitch
Getting Started: The Components
The case, tube, and applicator (lipstick) are all crocheted separately, in the round. The applicator slots into the tube, and the tube slots into the case. Make sure to insert the applicator into the tube before you add the stuffing.
Case Pattern Instructions
Using the DMC pearl cotton in Colour A:
1. Make a magic loop and SC6 around it. Join in the round by making a slip stitch into the first stitch of the round.
2. **Increase round:** SC2 into every stitch of the round. (12 stitches.)
Work each stitch of the next round through the back loop:
3. **Increase round:** SC2 into the next stitch, SC5. Repeat the section inside the stars once more. (14 stitches.)
4. Work 7 rounds in SC.
5. Cut your yarn approx. 10cm/4″ from the last stitch. Pull on the loop on your hook until the end pops through – you have now secured your last stitch.
Tube Pattern Instructions
Using the DMC pearl cotton in Colour B:
1. Make a magic loop and SC6 around it. Join in the round by making a slip stitch into the first stitch of the round.
2. **Increase round:** SC2 into every stitch of the round. (12 stitches.)
3. Work 1 round in SC working each stitch through the back loop.
4. Work 10 rounds in SC.
5. Cut your yarn approx. 10cm/4″ from the last stitch. Pull on the loop on your hook until the end pops through – you have now secured your last stitch.
Applicator (Lipstick) Pattern Instructions
Using the DMC pearl cotton in Colour C:
1. Make a magic loop and SC5 around it. Join in the round by making a slip stitch into the first stitch of the round.
2. **Increase round:** SC2 into every stitch of the round. (10 stitches.)
3. Work 1 round in SC working each stitch through the back loop.
4. Work 9 rounds in SC.
5. Slot the applicator inside the tube and fill with stuffing.
6. **Decrease round:** SC4, SC DEC, SC4. (9 stitches.)
7. **Decrease round:** SC4, SC DEC, SC3. (8 stitches.)
8. Cut your yarn approx. 10cm/4″ from the last stitch. Pull on the loop on your hook until the end pops through – you have now secured your last stitch.
9. To completely seal the top of your lipstick, thread your sewing needle with your yarn tail and pass your needle underneath each stitch in your last round. Pull your yarn tight, the stitches should pull together in a drawstring effect, sealing in any stuffing.
Assembly and Finishing Touches
Weave in any loose ends to give your Amigurumi Lipstick a clean, polished look. Your playful, Barbiecore-inspired creation is now complete!
We hope you enjoyed crafting this fabulous Amigurumi Lipstick! This pattern is a fantastic way to add a touch of playful elegance to your handmade collection. We adore seeing your finished projects, so please share your creations with us on social media and tag Crochetto. Your artistry inspires our community every day. Happy crocheting, and keep an eye out for more exciting crochet patterns content from Crochetto!