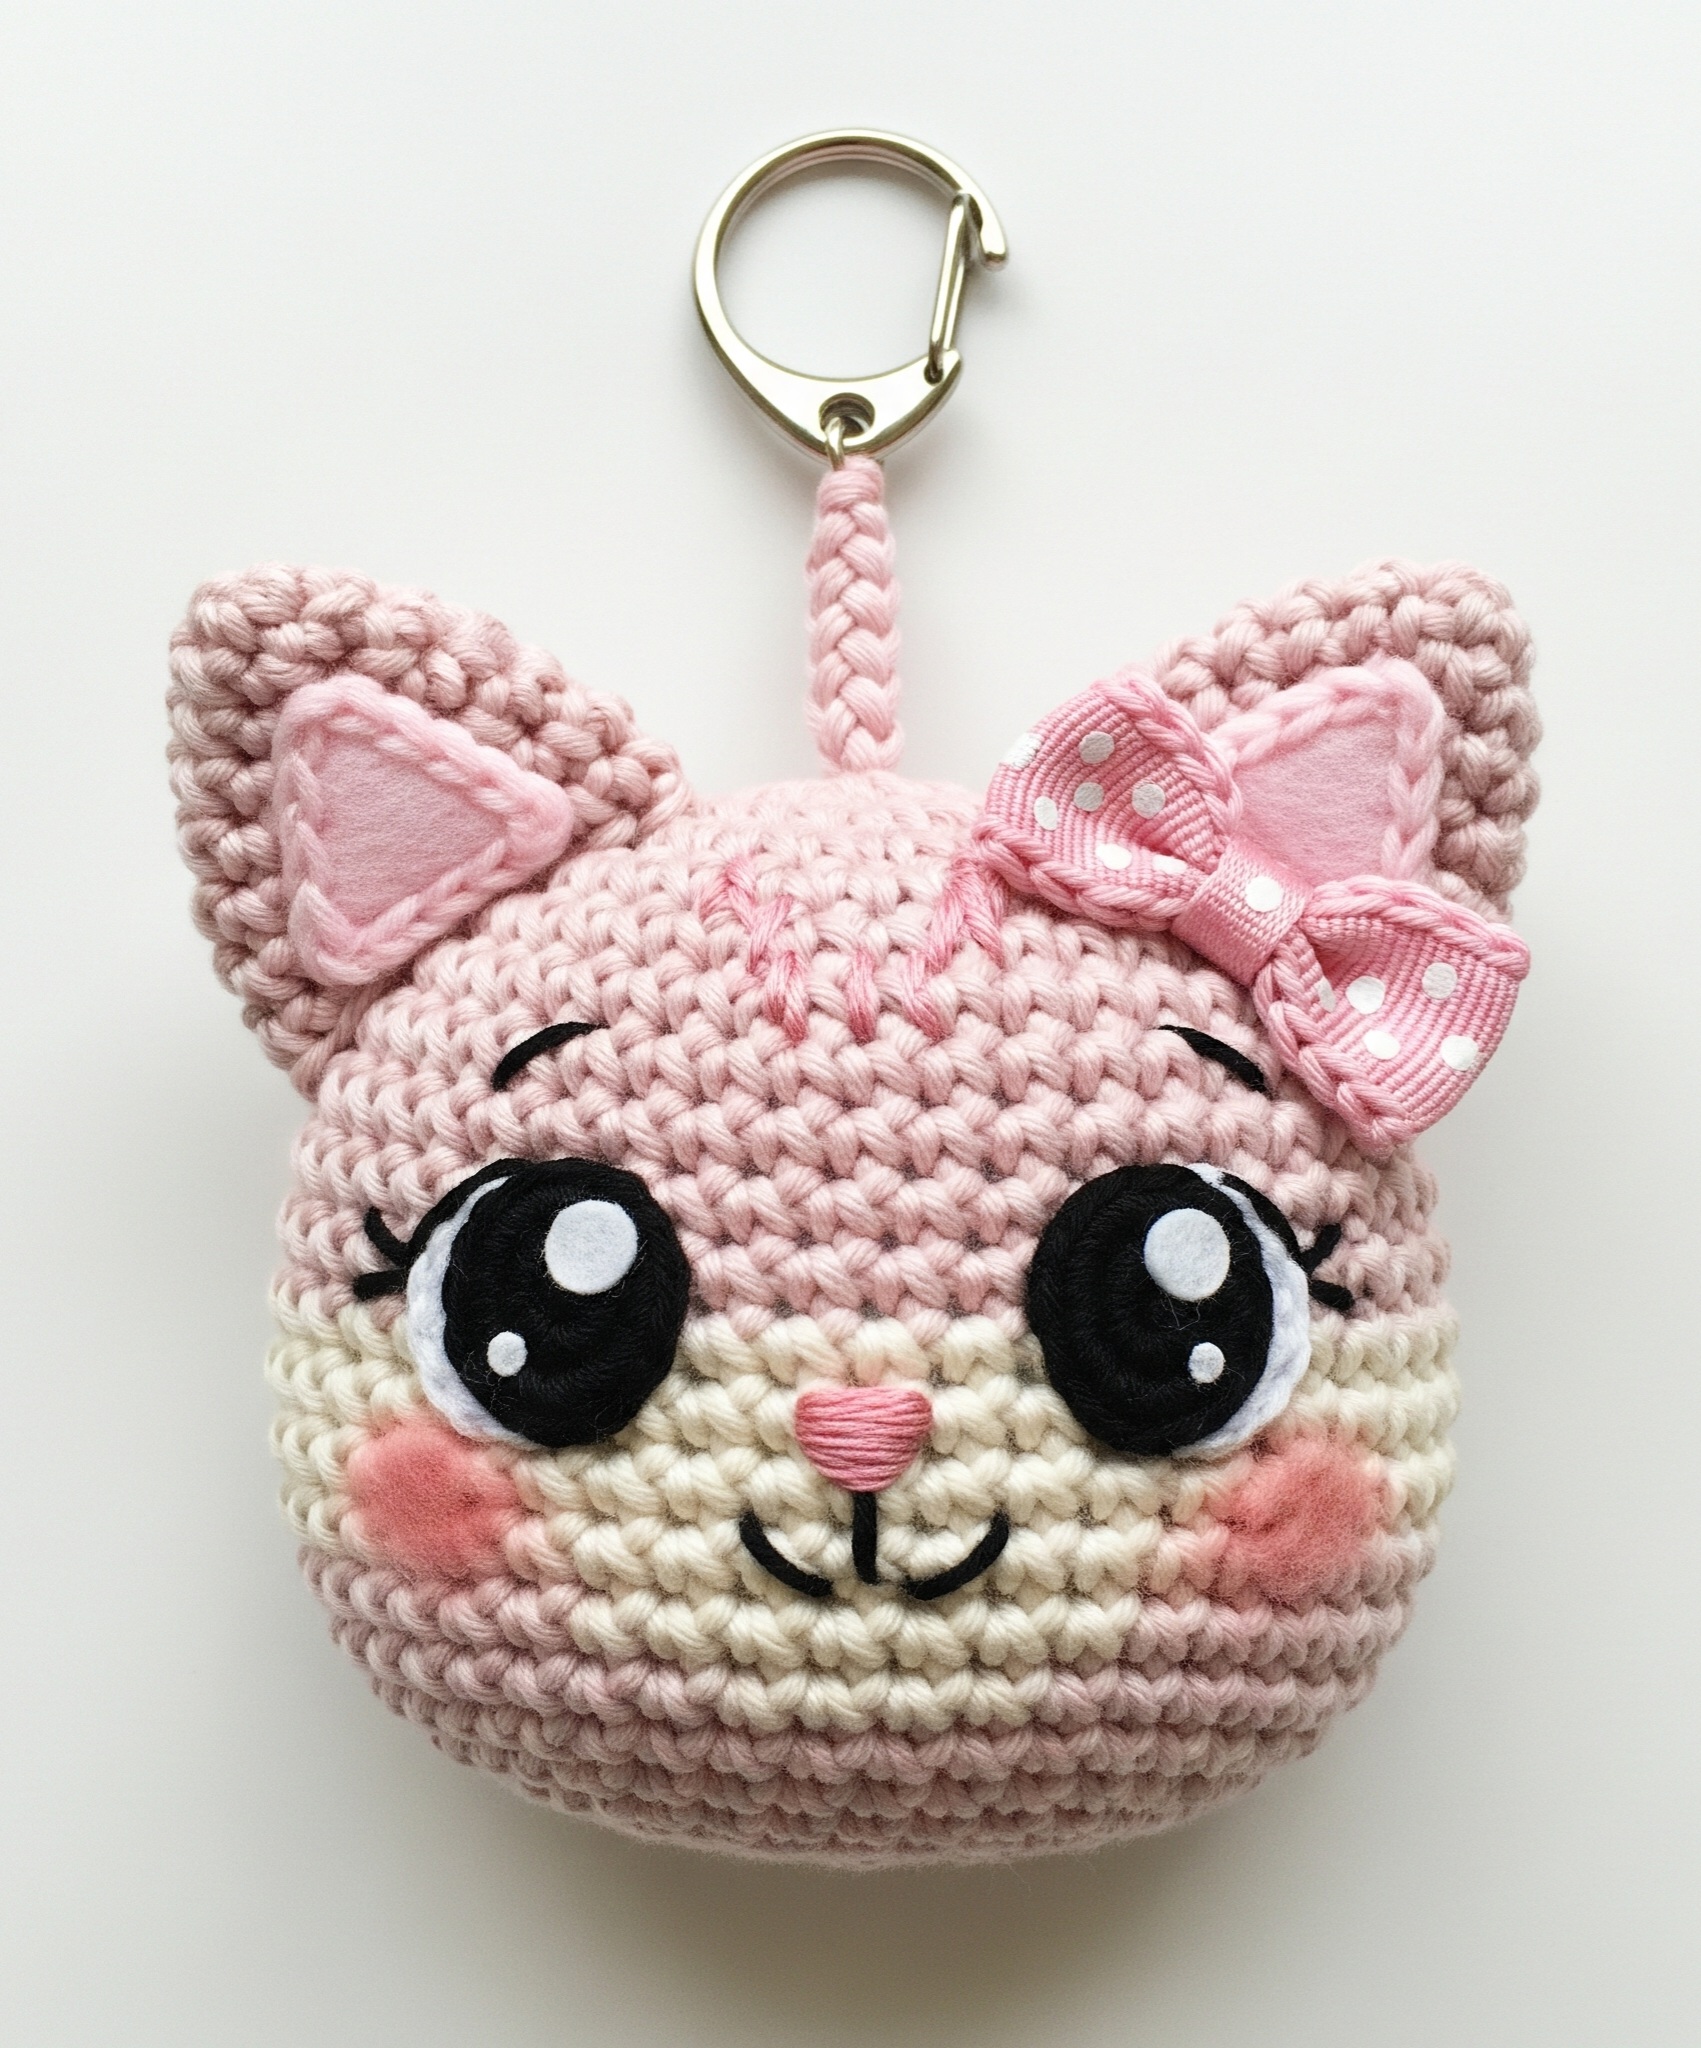
Pink Cuty Girly Cat face keychain
Important notes before you start
- This pattern uses US crochet terms.
- It’s written for worsted weight yarn (#4) and a 3.5 mm (E/4) crochet hook to match the chunky texture in the photo. If you use a different yarn/hook, the finished size will change — follow the gauge/resizing tips at the end.
- Work amigurumi in continuous spiral (no joining) unless otherwise stated.
- I give both felt-appliqué (preferred match to the photo) and crocheted-disc eye options.
- Safety: if giving to children under 3, use embroidered eyes instead of small safety parts.
Materials
- Worsted weight yarn (#4)
- Main pink — approx 20 g (light dusty pink)
- Contrast cream/ivory — approx 8–10 g
- Accent darker pink (nose + embroidery) — small amount
- Hook: 3.5 mm (E/4) — this makes the same chunky stitches as the photo. Use 3.25 mm or 3.0 mm if you crochet loose.
- Polyester stuffing (fiberfill).
- Stitch marker, tapestry needle, small sharp scissors.
- Felt (wool or craft felt): black, white, and light pink.
- Black felt circle: Ø 28 mm (or Ø 30 mm if you like bigger eyes)
- White felt highlights: Ø 10 mm and Ø 6 mm (or trimmed shapes)
- Light pink felt for inner ear triangle and small nose triangle
- Ribbon: small dotted or gingham bow approx 12–15 mm wide, cut to make a 3–3.5 cm bow (or ready bow).
- Keyring hardware: 20–30 mm split ring + small lobster clip (or just a split ring).
- Small amount blush (soft pastel or powdered makeup) or pink yarn for crocheted cheeks.
- Optional: cotton thread for sewing felt, hot glue or Fray-Check (for sealing ribbon ends).
Finished size
- Head diameter: ~7.6–8.5 cm (3.0–3.3 in) depending on your tension.
- Total drop with braided loop: ~11–12 cm (4.3–4.7 in)
- Eye diameter (felt black): 28 mm (as in photo)
Gauge (important for matching scale)
- ~8 single crochets = 2.5 cm (1 in) in stockinette-style amigurumi with 3.5 mm hook and worsted yarn.
- If your gauge differs, either change hook size or expect the head to be larger/smaller. See resizing tips at the end.
Abbreviations (US terms)
MR = magic ring • sc = single crochet • inc = 2 sc in same st • dec = invisible decrease • sl st = slip stitch • ch = chain • BLO = back loop only • FO = fasten off • st(s) = stitch(es)
Complete Round-by-Round Head Pattern (color changes included)
We’ll crochet a mostly-spherical head and make a cream band around the lower face to match the photo.
Start with Main Pink (A). Use a stitch marker at first st of each round if desired, but keep rounds continuous.
- R1: MR, 6 sc — (6)
- R2: inc ×6 — (12)
- R3: (sc 1, inc) ×6 — (18)
- R4: (sc 2, inc) ×6 — (24)
- R5: (sc 3, inc) ×6 — (30)
- R6: (sc 4, inc) ×6 — (36)
- R7: (sc 5, inc) ×6 — (42)
- R8: (sc 6, inc) ×6 — (48) ← You now have 48 sts around.
- R9: sc around — (48)
- R10: sc around — (48)
- R11: sc around — (48)
Change to Cream (B) at the end of R11 — carry color or fasten off and join.
- R12: sc around (cream) — (48)
- R13: sc around (cream) — (48) ← This is the middle of the cream band; good place to place eyes (see placement section).
- R14: sc around (cream) — (48)
- R15: sc around (cream) — (48)
Change back to Main Pink (A) at the end of R15
- R16: sc around — (48)
- R17: sc around — (48)
- R18: sc around — (48)
Start decreases: (all with Main Pink)
- R19: (sc 6, dec) ×6 — (42)
- R20: (sc 5, dec) ×6 — (36)
- R21: (sc 4, dec) ×6 — (30)
- R22: (sc 3, dec) ×6 — (24)
- R23: (sc 2, dec) ×6 — (18)
- R24: (sc 1, dec) ×6 — (12)
- R25: dec ×6 — (6) — FO; leave long tail, close remaining opening, weave in neatly.
Notes on counts: the decrease sequence reduces 6 stitches per round, as each “dec” reduces one stitch and there are 6 repeats.
Eye construction — Felt appliqué (recommended match)
The photo shows smooth black “kawaii” eyes with white highlights — that’s easily reproduced with felt layers.
Cut felt pieces:
- Black circle: Ø 28 mm (1.1 in). If you want slightly larger eyes (bolder look) cut Ø 30 mm.
- Large white highlight: Ø 10 mm round (or small crescent cut from felt)
- Small white dot: Ø 6 mm round
Assembly (felt):
- Glue or tack the two white highlight circles to the black circle in the same positions as the photo (one larger circle near upper-right, one small near lower-left). If you prefer permanence, hand-sew them.
- For the thin white crescent (the other highlight in the photo), cut a tiny crescent from white felt or embroider a curved white stitch along the black edge.
- If you prefer crocheted textured discs instead of felt: make a flat crochet disc in black (MR6 → 12 → 18 → 24 → 30 sc rounds) then glue or stitch the white felt highlights on.
If using safety eyes (not recommended for small children):
- Choose 30 mm safety eyes (if available) to match scale; install washers from inside before stuffing too firmly.
Eye placement (exact placement so it looks like the photo)
This is critical for the same kawaii expression.
- Place eyes on Round 13 (the middle of the cream band). That means the center of each felt eye aligns roughly with the centerline of R13.
- Center-to-center spacing:9 stitches (this matches the proportion in the photo using the 48-st round).
- Why 9 sts? With our gauge (≈8 sc per 2.5 cm), 9 sts ≈ 2.8 cm (28 mm) center separation, which visually matches that large-eye look.
- Practical method to mark:
- Lay your crocheted head so the seam (if you have one) is at the back. Decide the front midline — mark the stitch at the front center with a removable stitch marker. That is “front center.”
- From front center, count 4 stitches to the right and mark that stitch — this mark is the center of the right eye. From front center, count 4 stitches to the left and mark — this is the center of the left eye. (That yields a total separation of 9 stitches between the two marked stitches: 4 left + 1 center + 4 right.)
- Place the center of your felt black circle over each marked stitch on Round 13. Pin lightly and check symmetry. Sew or glue in place. For the neatest look, use tiny even blanket stitches with matching thread so the felt sits flat.
Tip: If the eyes look crowded, move them 1 stitch apart (i.e., 10 stitches separation). If they look too far, decrease separation to 8 stitches. Small adjustments change expression, but start with 9 stitches for the photo match.
Cheeks (soft blush)
The photo shows soft fuzzy cheeks — two ways to reproduce.
Option A — felt/needle-felted blush (preferred):
- Cut two circles of blush pink felt Ø 12–15 mm. Lightly needle-felt them into the cream band on each side of the eyes, or glue and tack them in place. For a soft edge, use pastel dust or a dry blush powder to feather the outer edges.
Option B — small crocheted discs:
- MR 6 → inc all (12) → FO with tail. Flatten slightly and sew centered about 2 sts below the eye centers, with their outer edge visually aligned with the eye bottom.
Place cheeks roughly directly below each eye outer half, at same vertical location as pictured (on the cream band, just under the eyes).
Nose & Mouth (embroidery)
- Cut a small triangle from light pink felt ~10 × 8 mm (isosceles triangle). Sew to the center of the cream band between the eyes, about 2 rounds below the eye centers (center of nose on R15).
OR embroider a tiny raised triangle using 4–6 strands of yarn/floss with satin stitches.
Mouth:
- Using black embroidery floss or black yarn single strand, stitch a small rounded “3” style smile under the nose:
- From nose bottom center, bring one short down stitch (2–3 mm) then two curved stitches forming the smile left and right (mirror), meeting at a small vertical center split like in the photo. Keep stitches small and symmetric.
Ears — outer crochet + inner felt triangle (pattern and sizes)
The photo shows crocheted outer ear with a felt inner triangle, finished with a visible ridge or slip-stitch border. I’ll give the precise sizes and a reliable method to match the look.
Inner felt triangle (pink) — cut two:
- Equilateral/rounded triangle about H 4.5 cm × base 3.6 cm. See template dimensions below. Slightly curved corners like in the photo — round corners by trimming.
Outer crochet ear (creates the thick textured rim):
Work these flat (we will join to head and slip-stitch / rope the outer edge):
Using the main pink (same yarn as head) and 3.5 mm hook:
- Make a foundation chain of 12. Turn.
- Row 1: sc in 2nd ch from hook and next 9 ch → 10 sc, 3 sc in last ch (turn to work along underside), sc in next 9 ch, 2 sc in last ch (the base). You now have 10 + 3 + 9 + 2 = 24 sts along the oval shaped row. (FO short tail.)
- Join yarn at the edge and work in rounds around this oval:
- R1 (rounding out): sc around evenly increasing in corners (place 3 sc in each end corner) so the count becomes approx 30 sts (increase as needed so the ear’s outer shape is ~5.5–6 cm tall total including border).
- R2: sc around (no increase) — gives a slightly raised edge.
- R3: BLO sc around (this creates a recessed inner groove to seat the felt triangle).
- FO leaving long tail (~30–40 cm) for sewing.
Finish ears & assemble felt inner triangle:
- Center the pink felt triangle on the back (BLO ridge) of the crochet ear (felt right side facing out). Using small needle and matching thread, tack in place via several small stitches through the felt and into the inner loop of the BLO round (this keeps the felt attached without sewing through to the visible front).
- For the outer rope/rim look: with the same yarn, join at the outermost loop and work a crab stitch (reverse sc) around the outside edge to produce the thick rolled rim seen in the photo. FO and weave tail into back.
- Repeat for second ear.
Ear placement on head:
- Position ears symmetrically on top of the head. Make small marks with pins:
- From the front center stitch (the one used as eye center reference), count 10 stitches to the left and right and place ear bases centered there (approx). If you prefer a more visual method: place ears so each ear base spans about 6 stitches on the topmost round and their inner base edges are 3–4 stitches apart (a small gap between ears, same as photo).
- Sew the ear bases securely to the head with the long tail, making several passes so the ear sits upright and slightly angled outward.
Braided loop / keyring hanger
This photo has a small braided cord suspended from the top center (between the ears) to the split ring.
Method:
- Make 3 small cords: ch 40 each; turn, sl st back along chain (this makes a small firm cord). Make 3 cords. (Each cord length before braiding = ~8–9 cm; adjust to final length you want.)
- Knot one end of the three cords together. Braid the three cords together neatly for about 7–8 cm (braid tight). Knot the opposite end.
- Attach the loop to the keyring: slip both knots onto the split ring and tie or sew the top portion so the knot sits snugly against the ring. Trim tails and wrap a tiny bit of yarn around the top of the braid to create a neat collar (secure with a few stitches).
- Sew the braid base to the head: position the braid insert between the two ears at the top center. Use the yarn wrap at the base to stitch it in place so it’s anchored strongly into the head (stitch through head rounds and braid wrap multiple times). Hide knots inside stuffing for strength.
Bow (right ear)
- Make a small ribbon bow ~3–3.5 cm across. Attach with a few stitches to the right ear at its front top edge (as in the photo). Secure with thread and a dot of Fray-Check or hot glue on the underside of the bow center to keep it neat.
Inner ear pink embroidered ridge
To mimic the little inner embroidered ridge line in the photo:
- Use the darker pink yarn or floss and a tapestry needle:
- Whip-stitch a small ridge line following the felt triangle shape about 2–3 mm in from the felt edge. Use a chain stitch or blanket stitch to create that raised line. Make it neat and mirror both ears.
Final finishing steps & shaping
- Stuffing: Stuff the head firmly but not overly tight until it holds shape like the photo (a slightly flattened sphere).
- Close: Close the final rounds tightly and weave in the end so the surface is smooth.
- Attach felt eyes securely by whip-stitching around their edges. If you used glue, stitch additionally for durability.
- Sew nose & mouth as described.
- Add blush: feather some pastel pink powder around the cheeks, or needle-felt a soft circle of pink wool and tack in place.
- Sew bow, and ensure braid is anchored.
- Trim stray fibers, tidy stitches and hide tails.
Templates & measurements (printable guide)
- Black eye: Ø 28 mm (cut circle from felt)
- White highlights: Ø 10 mm and Ø 6 mm (cut from white felt)
- Inner ear felt triangle: Height 4.5 cm, base 3.6 cm, rounded corners
- Outer crochet ear: Oval base chain 12, final height approx 5.5–6 cm including outer rim
- Head: 48 sts around after increases (R8), final diameter approx 7.6–8.5 cm
(If you want, I can produce a printable PDF containing these template shapes at life-size — tell me and I’ll generate it.)
Troubleshooting & adjustments (very important to hit photo look)
- Head looks too small compared to large eyes: add one extra increase round (make R8 result 54 sts instead of 48), then maintain the larger count for the mid rounds. This makes the head slightly wider.
- Eyes crowded or too far apart: move them one stitch closer or further. Start with 9 stitches center-to-center; if it looks wrong on your project, adjust by ±1 stitch.
- Ears flop: add a small piece of thin plastic canvas strip glued or sewn into the back of each ear behind the felt before finishing the crab-stitch rim.
- Braided hanger pulls out: stitch the wrapped section of the braid thoroughly into the head and reinforce with a short hidden loop of yarn inside the head.
Quick stitch map & summary (one-page cheat sheet)
- Increase rounds to 48 sts by R8.
- Maintain 48 sts through R9–R11 (pink), change to cream at end R11.
- Cream band R12–R15 (4 rounds). Eyes placed with centers on Round 13, 9 stitches apart.
- Pink rounds R16–R18. Decrease R19→R25 to close.
- Felt eyes Ø28 mm (black) + white highlights Ø10 mm & Ø6 mm.
- Ears: crochet outer panels (foundation ch12 → rounds → BLO ridge), felt inner triangle H 4.5 × base 3.6 cm, crab-stitch border.
- Braided loop: 3 cords, braid 7–8 cm, secure to split ring, sew base between ears.
- Small ribbon bow sew to right ear front.
- Blush: felt circles or powdered pastel. Nose: small pink triangle felt or satin-stitched triangle.
Care & safety
- Spot clean; do not machine wash if using glued felt pieces. If you must wash, hand wash gently and reshape while damp.
- For children under 3, replace glued/small felt parts with embroidered equivalents to remove choking hazards.