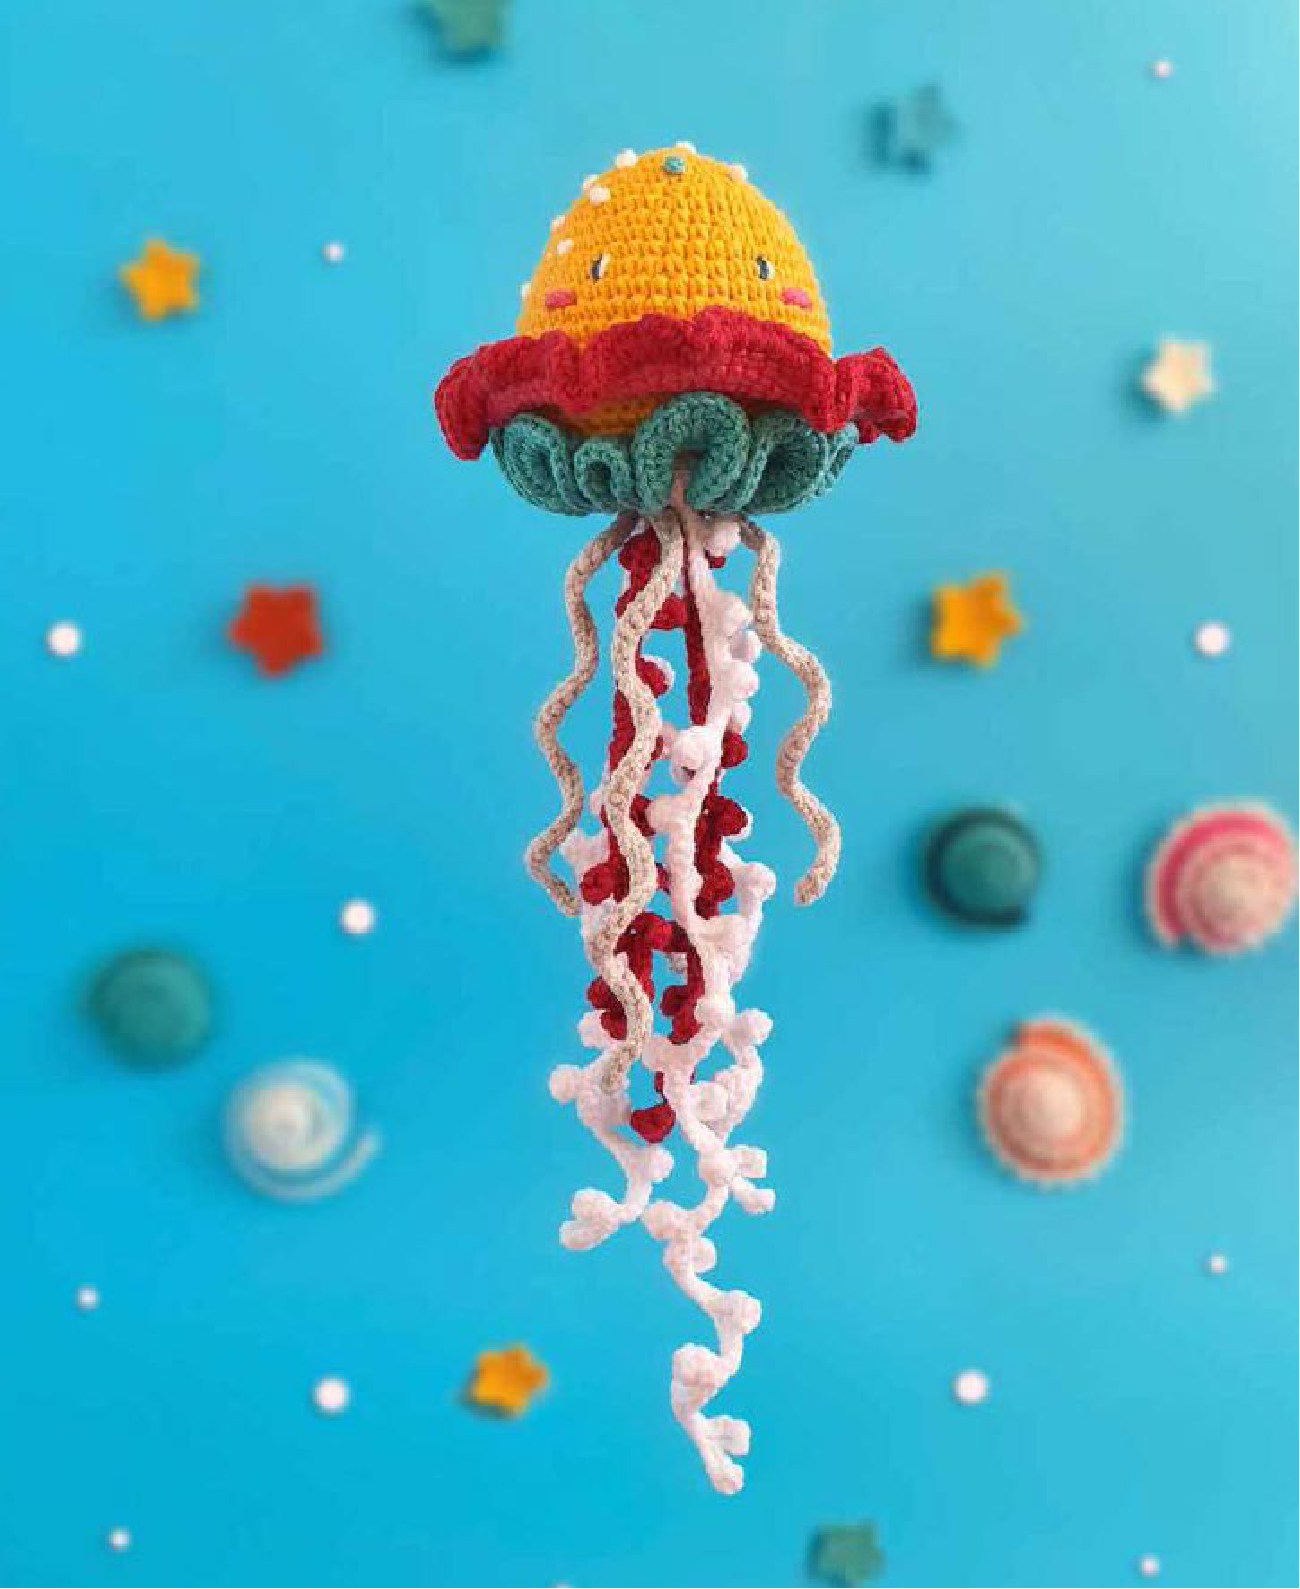
Adorable Jellyfish Amigurumi Free Pattern
Dive into the world of amigurumi with this enchanting jellyfish pattern! Perfect for adding a whimsical touch to any nursery, making a unique gift, or simply enjoying a fun crochet project. This pattern guides you step-by-step to create a charming jellyfish with delightful ruffles and curly tentacles. Let’s get started!
Materials
- Yarn: Worsted weight (or preferred weight for amigurumi) in the following colors:
- Yellow
- Pink
- Red
- Emerald
- White
- Light Grey
- Small amounts of Dark Turquoise and White for embroidery
- Small amount of Pink for cheeks
- Crochet Hook: Appropriate size for your chosen yarn (e.g., 2.5mm – 3.5mm for worsted weight)
- Polyester Fiberfill for stuffing
- Stitch Markers
- Tapestry Needle for weaving in ends and embroidery
- Scissors
- Water-soluble marker or sewing pins (optional, for embellishments)
Abbreviations (US Terms)
- MR: Magic Ring
- sc: Single Crochet
- inc: Increase (2 single crochet in one stitch)
- dec: Decrease (single crochet 2 together)
- hdc: Half Double Crochet
- dc: Double Crochet
- sl st: Slip Stitch
- ch: Chain
- BLO: Back Loops Only
- FLO: Front Loops Only
- x: Repeat instructions a specified number of times
- [ ] : Stitch count at the end of the row
Head and Body
We’ll start by crocheting the head and the upper part of the body as one piece. Work in continuous rounds unless otherwise specified.
Head (Yellow Yarn)
- Row 1: 6 sc in MR [6]
- Row 2: 6 inc [12]
- Row 3: (sc, inc) x 6 [18]
- Row 4: sc, inc, (2 sc, inc) x 5, sc [24]
- Row 5: 24 sc [24]
- Row 6: (3 sc, inc) x 6 [30]
- Row 7: 30 sc [30]
- Row 8: 2 sc, inc, (4 sc, inc) x 5, 2 sc [36]
- Row 9: 36 sc [36]
- Row 10: (5 sc, inc) x 6 [42]
- Row 11: 42 sc [42]
- Row 12: 3 sc, inc, (6 sc, inc) x 5, 3 sc [48]
- Row 13: 48 sc [48]
- Row 14: (7 sc, inc) x 6 [54]
- Rows 15–17: 54 sc [54]
Lower Ruffle (Pink Yarn)
Change to Pink yarn.
- Row 18: In front loops only (FLO): 4 sc, inc, (8 sc, inc) x 5, 4 sc [60]
- Row 19: (2 sc, inc) x 20 [80]
- Rows 20–21: 80 sc [80]
Outer Ruffle Trim (Red Yarn)
Change to Red yarn.
- Row 22: Ch 2, 3 hdc in each of 80 stitches [240], sl st.
Fasten off and weave in ends. This completes the largest ruffle on the jellyfish.
Upper Body (Continuing from Row 17 – Yellow Yarn)
Return to Row 17 (Yellow yarn) where you worked only in the front loops. Now we will work into the remaining **back loops only (BLO)** of Row 17 to form the upper body section.
- Row 1 (from BLO of Row 17): In back loops only (BLO): 54 sc [54]
- Row 2: (7 sc, dec) x 6 [48]
- Row 3: 3 sc, dec, (6 sc, dec) x 5, 3 sc [42]
Middle Ruffle (Emerald Yarn)
Change to Emerald yarn.
- Row 4: In front loops only (FLO): Ch 2, 3 hdc in each of 42 stitches, sl st, ch 2 [126]
- Row 5: 2 hdc in each of 126 stitches [252], sl st.
Fasten off and weave in ends. This completes the second ruffle.
Jellyfish Belly

(Image for visual guidance: Returning to Row 3 for the belly, just before the emerald ruffle)
Return to Row 3 (the yellow row just before you changed to emerald yarn for the ruffle). This is where you will begin crocheting the jellyfish’s belly.
Stuff the body firmly as you progress through these rows, maintaining a nice round shape.
Work all rows for the belly in back loops only (BLO).
- Row 1 (from BLO of Row 3): (5 sc, dec) x 6 [36]
- Row 2: 2 sc, dec, (4 sc, dec) x 5, 2 sc [30]
- Row 3: (3 sc, dec) x 6 [24]
- Row 4: sc, dec, (2 sc, dec) x 5, sc [18]
- Row 5: (sc, dec) x 6 [12]
- Row 6: 6 dec [6] Mark the last stitch with a stitch marker.
Fasten off, leaving a long yarn tail. Thread the tail onto your tapestry needle and weave it through the front loop of each of the remaining 6 stitches. Pull tightly to close the opening. Secure and weave in the yarn tail.
Tentacles
This is where the jellyfish truly comes to life! We will be attaching the tentacles by crocheting into the remaining front loops of the jellyfish’s belly, starting from the marked stitch in Row 6 of the belly.

(Image for visual guidance: Tentacle placement and finishing details)
Return to the marked stitch in Row 6 of the jellyfish’s belly. We will crochet continuously into all remaining front loops of the belly.
Red Tentacles
Attach Red yarn.
- Tentacle 1: (Ch 8, in the 3rd stitch from hook: hdc, sc, hdc) x 8, then Ch 4, in the 3rd stitch from hook: hdc, sc, hdc. Work back on the tentacle (ch 4, in the 3rd stitch from hook: hdc, sc, 4 sl st) x 7, then Ch 4, in the 3rd stitch from hook: hdc, sc, 3 sl st, 6 sl st on the belly. Do not fasten off.
- Tentacle 2: (Ch 8, in the 3rd stitch from hook: hdc, sc, sl st) x 10, then Ch 4, in the 3rd stitch from hook: hdc, sc, sl st on the tentacle. Continue on the other side of the tentacle, (ch 4, in the 3rd stitch from hook: hdc, sc, 4 sl st on the tentacle) x 9, then Ch 4, in the 3rd stitch from hook: hdc, sc, 3 sl st on the tentacle, 6 sl st on the belly.
White Tentacles
Change to White yarn.
- Tentacle 3: Ch 80, in the 3rd stitch from hook: hdc, sc, sl st, (ch 4, in the 3rd stitch from hook: hdc, sc, 5 sl st on the tentacle) x 15, 6 sl st on the belly. Do not fasten off.
- Tentacle 4: Ch 70, in the 3rd stitch from hook: dc, sc, sl st, (ch 4, in the 3rd stitch from hook: dc, sc, 5 sl st) x 13, 6 sl st on the belly. Do not fasten off.
- Tentacle 5: Ch 90, in the 3rd stitch from hook: dc, sc, sl st, (ch 4, in the 3rd stitch from hook: dc, sc, 5 sl st on the tentacle) x 17, 6 sl st on the belly.
Light Grey Tentacles
Change to Light Grey yarn.
- Tentacle 6: Ch 45, starting from the 2nd stitch from hook: 44 sl st, 6 sl st on the belly. Do not fasten off.
- Tentacle 7: Ch 55, starting from the 2nd stitch from hook: 54 sl st, 6 sl st on the belly. Do not fasten off.
- Tentacle 8: Ch 45, starting from the 2nd stitch from hook: 44 sl st, 6 sl st on the belly. Do not fasten off.
- Tentacle 9: Ch 55, starting from the 2nd stitch from hook: 54 sl st, sl st on the belly, sl st to the end of all remaining free front loops of the jellyfish’s belly.
Fasten off and weave in any remaining ends from the tentacles.
Finishing Touches
- Embroider eyes onto the head using dark turquoise and white thread. You can create small lines for closed eyes or French knots for open eyes.
- Embroider small rosy cheeks with pink yarn.
- Use scraps of white and emerald yarn to embroider decorative straight stitches, French knots, and/or backstitch clusters onto the head and body. A water-soluble marker or sewing pins can help you plan your design. Feel free to follow the example pictures or decorate your jellyfish to your own liking!
Your adorable crochet jellyfish is now complete! We hope you enjoyed making this fun and colorful amigurumi.